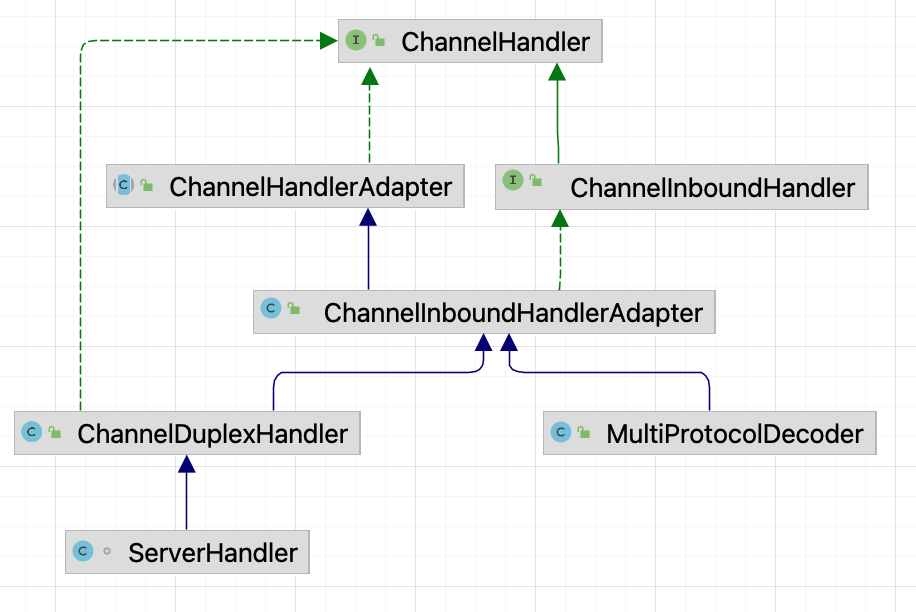
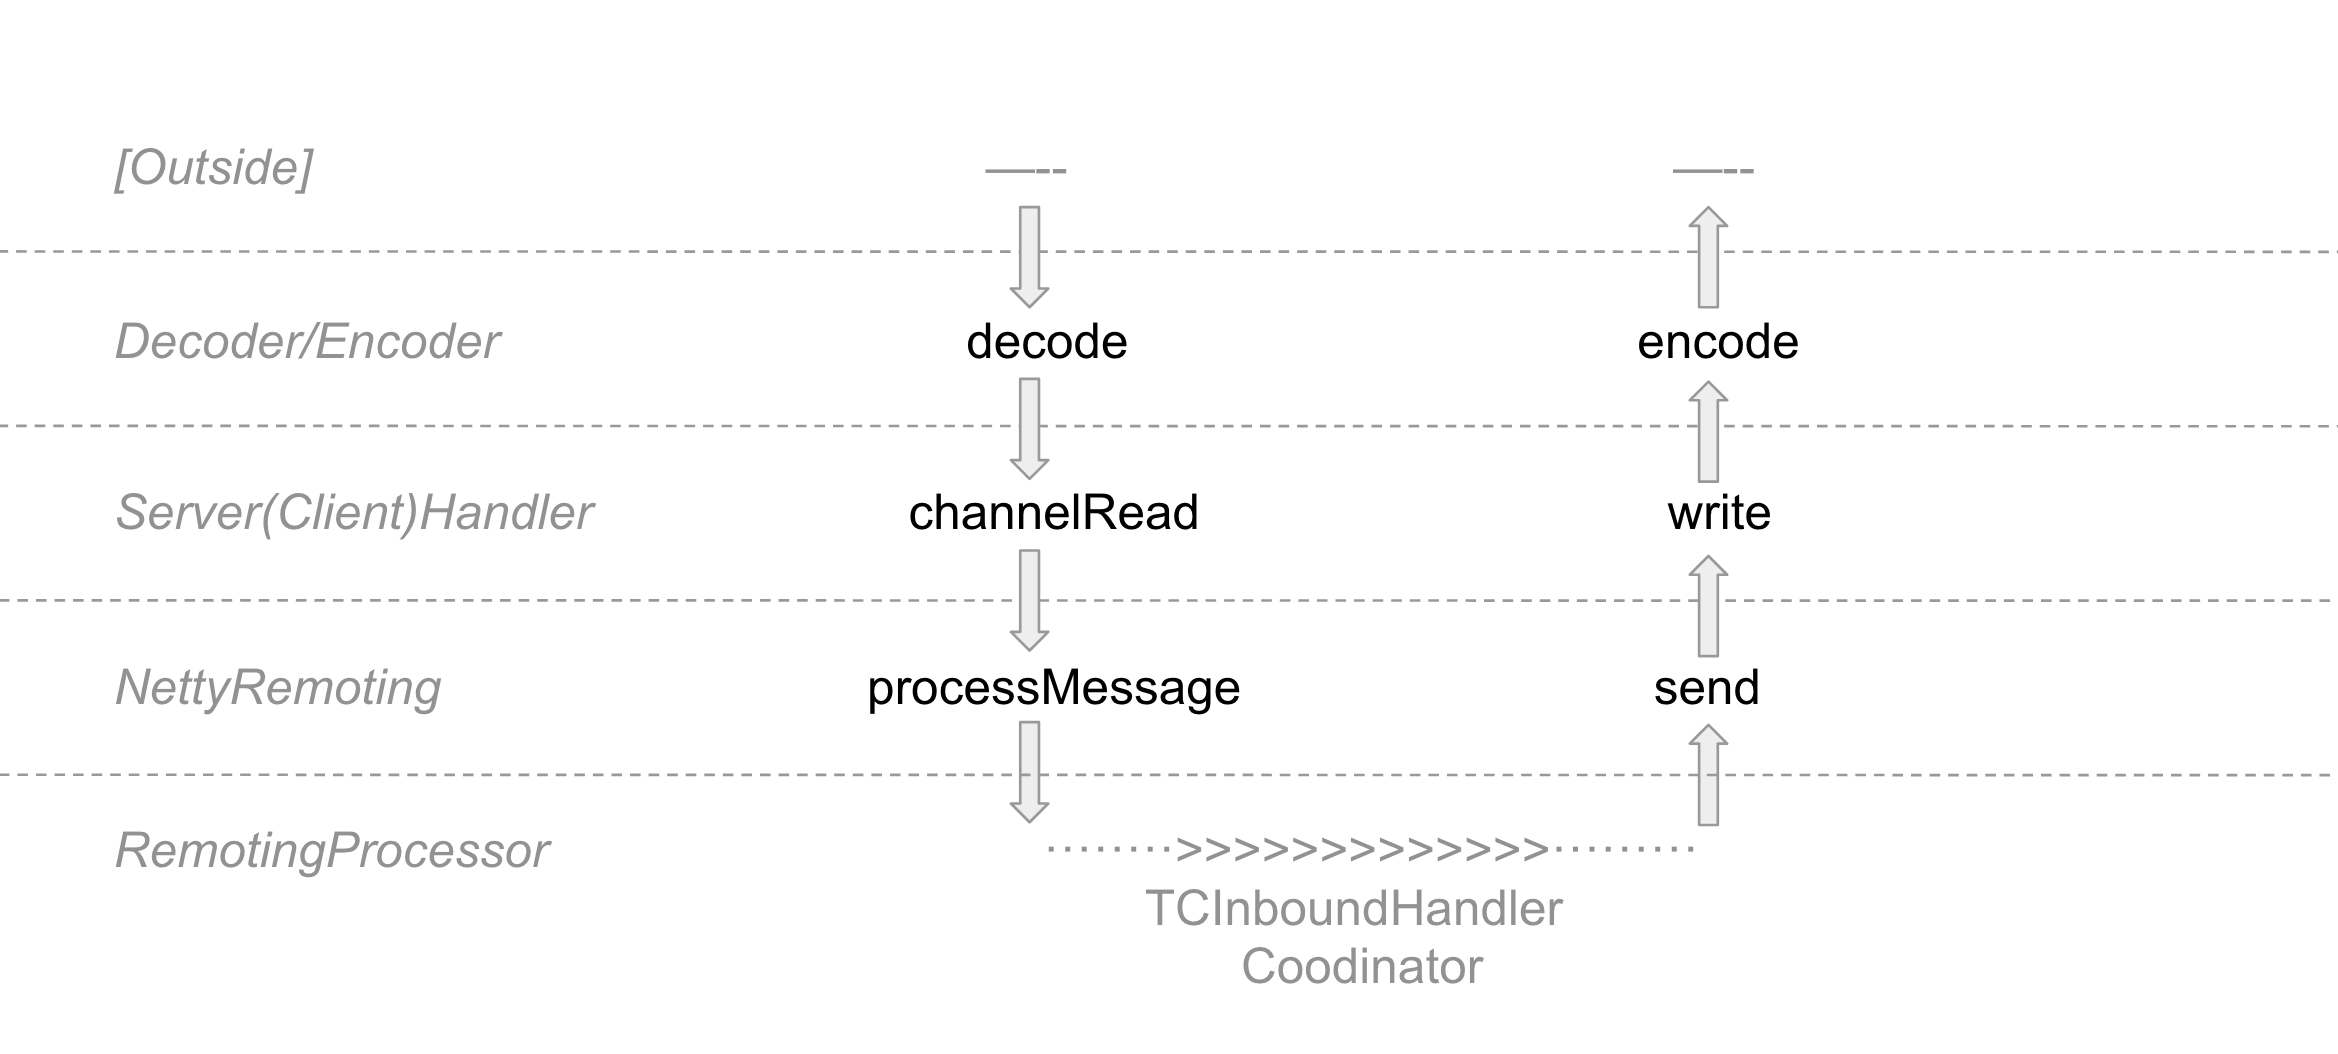
Placeholder. DO NOT DELETE.
Getting Started with Seata Network Communication Source Code
In the previous articles, we have thoroughly discussed Seata's XA, AT, and TCC modes, all of which are different transaction models defined within the global framework of Seata.
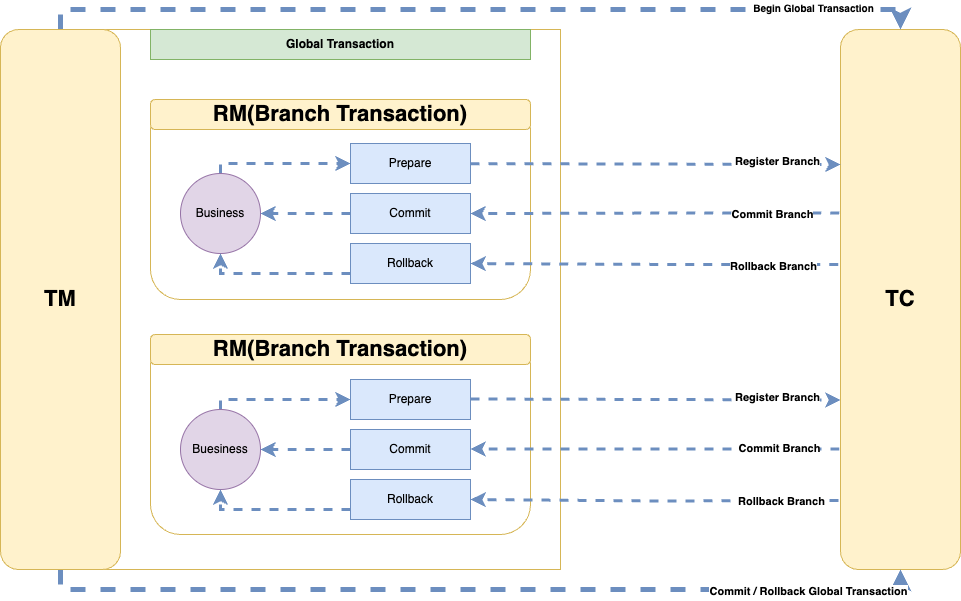
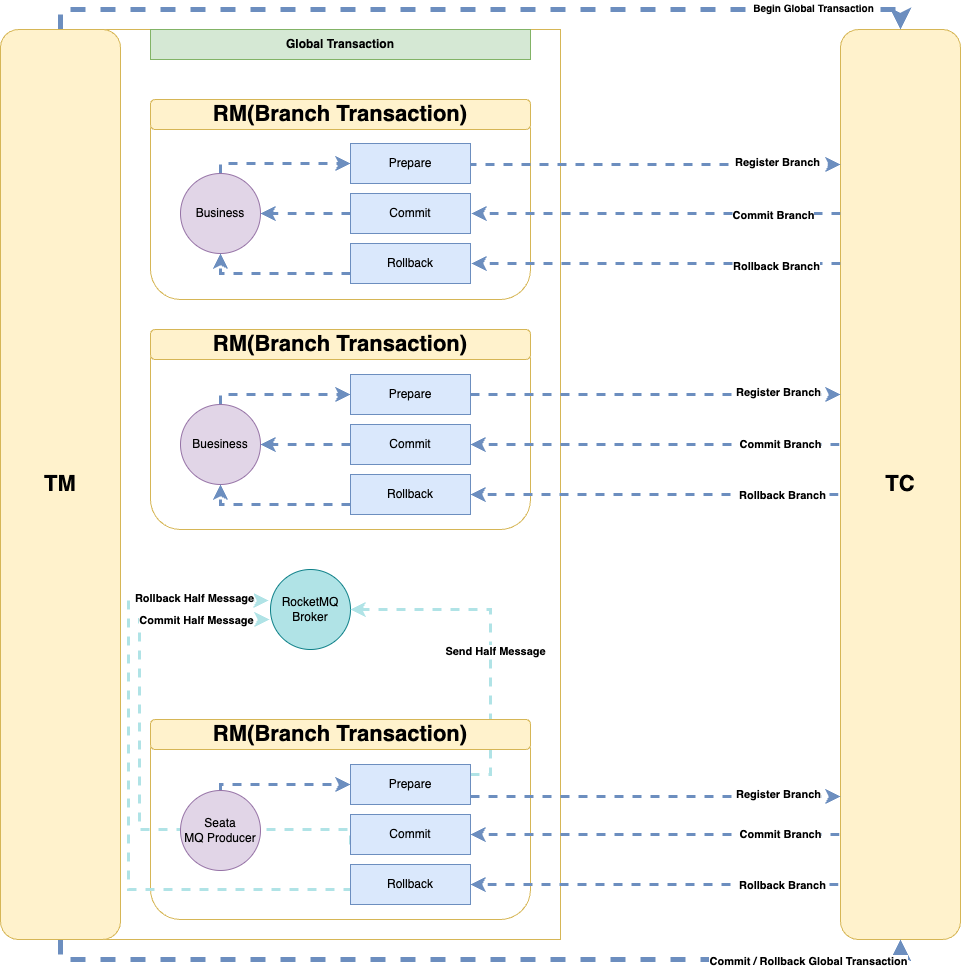
We know that in Seata, there are three types of roles: TC (Transaction Coordinator), RM (Resource Manager), and TM (Transaction Manager). The Seata Server acts as a TC to coordinate the commit and rollback of branch transactions, while various resources act as RMs and TMs. So, how do these three communicate with each other?
Therefore, this article will explore how Seata performs network communication at the underlying level.
Overall Class Hierarchy Structure
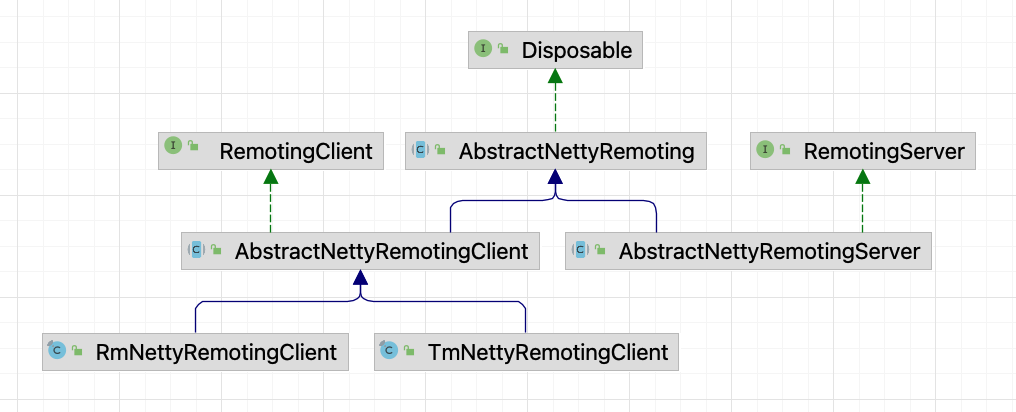
Let's start by looking at the big picture, examining the overall RPC class hierarchy structure of Seata.
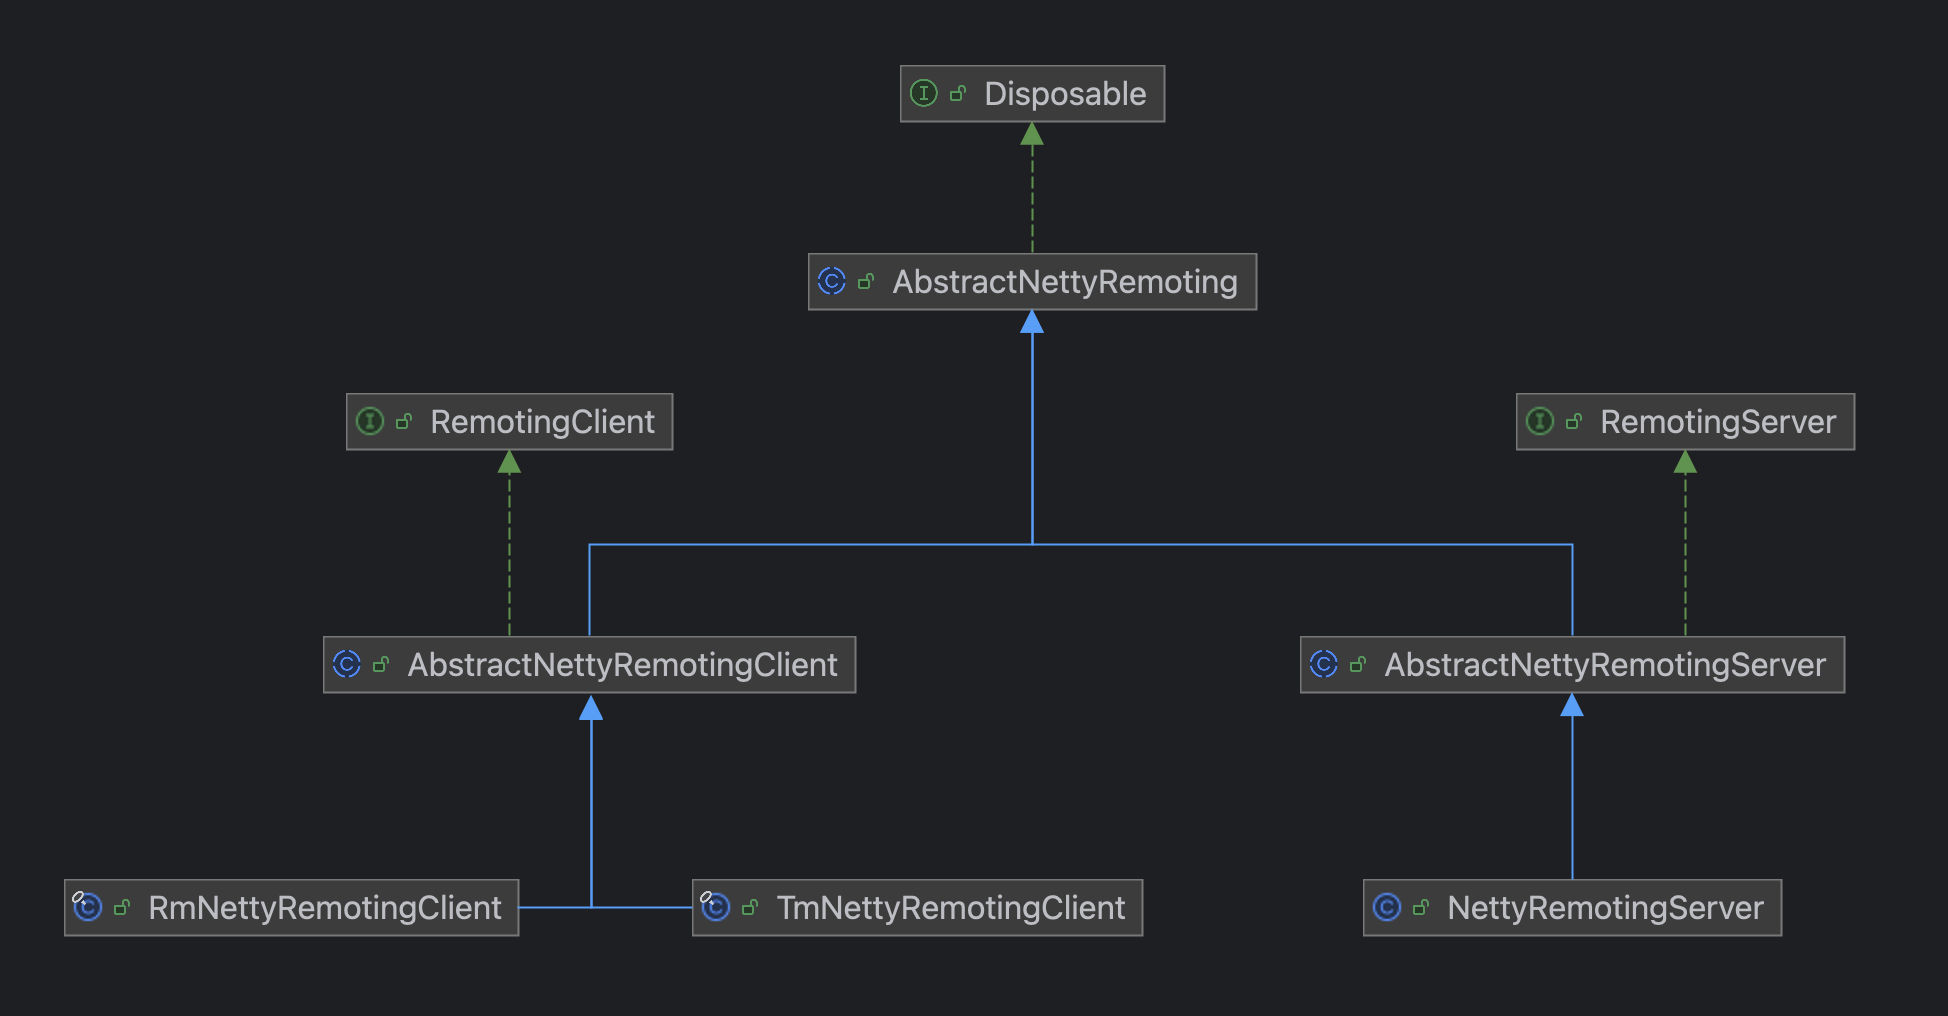
From the class hierarchy structure, it can be seen that AbstractNettyRemoting is the top-level abstract class for the entire Seata network communication.
In this class, some basic common methods of RPC are mainly implemented, such as synchronous call sendSync, asynchronous call sendAsync, etc.
Indeed, when it comes to network calls, they essentially boil down to synchronous calls and asynchronous calls; other aspects like requests and responses are just distinctions in message content.
So, in Seata, I personally think there should also be a top-level interface Remoting, similar to the following:
import io.netty.channel.Channel;
import java.util.concurrent.TimeoutException;
public interface Remoting<Req, Resp> {
/**
* Synchronous call
*/
Resp sendSync(Channel channel, Req request, long timeout) throws TimeoutException;
/**
* Asynchronous call
*/
void sendAsync(Channel channel, Req request);
}
While AbstractNettyRemoting implements general network calling methods, there are still some differences among different roles. For example, for the server, its request call needs to know which client to send to, whereas for the TM and RM, they can simply send requests without specifying a particular TC service. They only need to find an appropriate server node via a load balancing algorithm in the implementation class.
Thus, RemotingServer and RemotingClient are differentiated, but they still rely on AbstractNettyRemoting for network calls at the bottom layer, so each has subclasses that implement AbstractNettyRemoting.
One might say that this design in Seata is quite commendable, serving as a general solution pattern for remote communications in this kind of Client-Server architecture.
How to Start the Server and Client
After discussing the underlying class hierarchy of Seata, let's look from the perspectives of the Server and Client on how they start up and what needs to be done during startup.
How the Server Starts
As an independent Spring Boot project, how does the Seata Server automatically perform certain tasks when Spring Boot starts?
Seata achieves this by implementing the CommandLineRunner
interface. The principle behind this is not within the scope of this article.
We mainly focus on its run
method:
// org.apache.seata.server.ServerRunner#run
public void run(String... args) {
try {
long start = System.currentTimeMillis();
seataServer.start(args);
started = true;
long cost = System.currentTimeMillis() - start;
LOGGER.info("\r\n you can visit seata console UI on http://127.0.0.1:{}. \r\n log path: {}.", this.port, this.logPath);
LOGGER.info("seata server started in {} millSeconds", cost);
} catch (Throwable e) {
started = Boolean.FALSE;
LOGGER.error("seata server start error: {} ", e.getMessage(), e);
System.exit(-1);
}
}
The core logic lies within the seataServer.start()
method:
// org.apache.seata.server.Server#start
public void start(String[] args) {
// Parameter parser used to parse startup parameters from the shell script
ParameterParser parameterParser = new ParameterParser(args);
// Initialize metrics
MetricsManager.get().init();
ThreadPoolExecutor workingThreads = new ThreadPoolExecutor(
NettyServerConfig.getMinServerPoolSize(),
NettyServerConfig.getMaxServerPoolSize(),
NettyServerConfig.getKeepAliveTime(), TimeUnit.SECONDS,
new LinkedBlockingQueue<>(NettyServerConfig.getMaxTaskQueueSize()),
new NamedThreadFactory("ServerHandlerThread", NettyServerConfig.getMaxServerPoolSize()),
new ThreadPoolExecutor.CallerRunsPolicy());
// 127.0.0.1 and 0.0.0.0 are not valid here.
if (NetUtil.isValidIp(parameterParser.getHost(), false)) {
XID.setIpAddress(parameterParser.getHost());
} else {
String preferredNetworks = ConfigurationFactory.getInstance().getConfig(REGISTRY_PREFERED_NETWORKS);
if (StringUtils.isNotBlank(preferredNetworks)) {
XID.setIpAddress(NetUtil.getLocalIp(preferredNetworks.split(REGEX_SPLIT_CHAR)));
} else {
XID.setIpAddress(NetUtil.getLocalIp());
}
}
/**
* Main tasks performed:
* 1. Set workingThreads as the messageExecutor handler for AbstractNettyRemoting
* 2. Create ServerBootstrap, configure Boss and Worker, and set the port that the Seata Server listens on
* 3. Set outbound and inbound handlers ServerHandler, which is a composite handler of ChannelDuplexHandler
*/
NettyRemotingServer nettyRemotingServer = new NettyRemotingServer(workingThreads);
XID.setPort(nettyRemotingServer.getListenPort());
UUIDGenerator.init(parameterParser.getServerNode());
ConfigurableListableBeanFactory beanFactory = ((GenericWebApplicationContext) ObjectHolder.INSTANCE.getObject(OBJECT_KEY_SPRING_APPLICATION_CONTEXT)).getBeanFactory();
DefaultCoordinator coordinator = DefaultCoordinator.getInstance(nettyRemotingServer);
if (coordinator instanceof ApplicationListener) {
beanFactory.registerSingleton(NettyRemotingServer.class.getName(), nettyRemotingServer);
beanFactory.registerSingleton(DefaultCoordinator.class.getName(), coordinator);
((GenericWebApplicationContext) ObjectHolder.INSTANCE.getObject(OBJECT_KEY_SPRING_APPLICATION_CONTEXT)).addApplicationListener((ApplicationListener<?>) coordinator);
}
// Log store mode: file, db, redis
SessionHolder.init();
LockerManagerFactory.init();
// Initialize a series of scheduled thread pools for retrying transaction commit/rollback, etc.
coordinator.init();
// Set the transaction processing Handler to DefaultCoordinator
nettyRemotingServer.setHandler(coordinator);
serverInstance.serverInstanceInit();
// Let ServerRunner handle destruction instead of ShutdownHook, see https://github.com/seata/seata/issues/4028
ServerRunner.addDisposable(coordinator);
// Server initialization
nettyRemotingServer.init();
}
The final nettyRemotingServer.init()
is crucial for starting the entire Seata Server, primarily performing the following tasks:
- Register a series of handlers
- Initialize a scheduled thread pool for cleaning up expired MessageFuture objects
- Start the ServerBootstrap and register the TC service with the registry center, such as Nacos
Registering Processors
Within Seata, a Pair
object is used to associate a processor with an executor (thread pool), as shown below:
package org.apache.seata.core.rpc.processor;
public final class Pair<T1, T2> {
private final T1 first;
private final T2 second;
public Pair(T1 first, T2 second) {
this.first = first;
this.second = second;
}
public T1 getFirst() {
return first;
}
public T2 getSecond() {
return second;
}
}
Registering processors essentially involves associating message types, the processors that handle those messages, and the specific thread pools for execution, all stored in a hash table.
// AbstractNettyRemotingServer
protected final Map<Integer/*MessageType*/, Pair<RemotingProcessor, ExecutorService>> processorTable = new HashMap<>(32);
// org.apache.seata.core.rpc.netty.NettyRemotingServer#registerProcessor
private void registerProcessor() {
// 1. Register request message processors
ServerOnRequestProcessor onRequestProcessor = new ServerOnRequestProcessor(this, getHandler());
ShutdownHook.getInstance().addDisposable(onRequestProcessor);
super.registerProcessor(MessageType.TYPE_BRANCH_REGISTER, onRequestProcessor, messageExecutor);
super.registerProcessor(MessageType.TYPE_BRANCH_STATUS_REPORT, onRequestProcessor, messageExecutor);
super.registerProcessor(MessageType.TYPE_GLOBAL_BEGIN, onRequestProcessor, messageExecutor);
super.registerProcessor(MessageType.TYPE_GLOBAL_COMMIT, onRequestProcessor, messageExecutor);
super.registerProcessor(MessageType.TYPE_GLOBAL_LOCK_QUERY, onRequestProcessor, messageExecutor);
super.registerProcessor(MessageType.TYPE_GLOBAL_REPORT, onRequestProcessor, messageExecutor);
super.registerProcessor(MessageType.TYPE_GLOBAL_ROLLBACK, onRequestProcessor, messageExecutor);
super.registerProcessor(MessageType.TYPE_GLOBAL_STATUS, onRequestProcessor, messageExecutor);
super.registerProcessor(MessageType.TYPE_SEATA_MERGE, onRequestProcessor, messageExecutor);
// 2. Register response message processors
ServerOnResponseProcessor onResponseProcessor = new ServerOnResponseProcessor(getHandler(), getFutures());
super.registerProcessor(MessageType.TYPE_BRANCH_COMMIT_RESULT, onResponseProcessor, branchResultMessageExecutor);
super.registerProcessor(MessageType.TYPE_BRANCH_ROLLBACK_RESULT, onResponseProcessor, branchResultMessageExecutor);
// 3. Register RM message processors
RegRmProcessor regRmProcessor = new RegRmProcessor(this);
super.registerProcessor(MessageType.TYPE_REG_RM, regRmProcessor, messageExecutor);
// 4. Register TM message processors
RegTmProcessor regTmProcessor = new RegTmProcessor(this);
super.registerProcessor(MessageType.TYPE_REG_CLT, regTmProcessor, null);
// 5. Register heartbeat message processors
ServerHeartbeatProcessor heartbeatMessageProcessor = new ServerHeartbeatProcessor(this);
super.registerProcessor(MessageType.TYPE_HEARTBEAT_MSG, heartbeatMessageProcessor, null);
}
// org.apache.seata.core.rpc.netty.AbstractNettyRemotingServer#registerProcessor
public void registerProcessor(int messageType, RemotingProcessor processor, ExecutorService executor) {
Pair<RemotingProcessor, ExecutorService> pair = new Pair<>(processor, executor);
this.processorTable.put(messageType, pair);
}
You might notice that during the registration of some processors, the passed-in thread pool is null
. In such cases, which thread will execute the corresponding message?
We will discuss this in a later section.
Initializing the Scheduled Thread Pool
// org.apache.seata.core.rpc.netty.AbstractNettyRemoting#init
public void init() {
timerExecutor.scheduleAtFixedRate(() -> {
for (Map.Entry<Integer, MessageFuture> entry : futures.entrySet()) {
MessageFuture future = entry.getValue();
if (future.isTimeout()) {
futures.remove(entry.getKey());
RpcMessage rpcMessage = future.getRequestMessage();
future.setResultMessage(new TimeoutException(String.format("msgId: %s, msgType: %s, msg: %s, request timeout",
rpcMessage.getId(), String.valueOf(rpcMessage.getMessageType()), rpcMessage.getBody().toString())));
if (LOGGER.isDebugEnabled()) {
LOGGER.debug("timeout clear future: {}", entry.getValue().getRequestMessage().getBody());
}
}
}
nowMills = System.currentTimeMillis();
}, TIMEOUT_CHECK_INTERVAL, TIMEOUT_CHECK_INTERVAL, TimeUnit.MILLISECONDS);
}
There's not much to explain here—it initializes a scheduled thread pool that periodically cleans up timed-out MessageFuture
objects. The MessageFuture
is key to Seata converting asynchronous calls into synchronous ones, which we will discuss in detail later.
Starting the ServerBootstrap
Finally, starting the ServerBootstrap
is mostly related to Netty.
// org.apache.seata.core.rpc.netty.NettyServerBootstrap#start
public void start() {
int port = getListenPort();
this.serverBootstrap.group(this.eventLoopGroupBoss, this.eventLoopGroupWorker)
.channel(NettyServerConfig.SERVER_CHANNEL_CLAZZ)
.option(ChannelOption.SO_BACKLOG, nettyServerConfig.getSoBackLogSize())
.option(ChannelOption.SO_REUSEADDR, true)
.childOption(ChannelOption.SO_KEEPALIVE, true)
.childOption(ChannelOption.TCP_NODELAY, true)
.childOption(ChannelOption.SO_SNDBUF, nettyServerConfig.getServerSocketSendBufSize())
.childOption(ChannelOption.SO_RCVBUF, nettyServerConfig.getServerSocketResvBufSize())
.childOption(ChannelOption.WRITE_BUFFER_WATER_MARK, new WriteBufferWaterMark(nettyServerConfig.getWriteBufferLowWaterMark(), nettyServerConfig.getWriteBufferHighWaterMark()))
.localAddress(new InetSocketAddress(port))
.childHandler(new ChannelInitializer<SocketChannel>() {
@Override
public void initChannel(SocketChannel ch) {
// Multi-version protocol decoder
MultiProtocolDecoder multiProtocolDecoder = new MultiProtocolDecoder(channelHandlers);
ch.pipeline()
.addLast(new IdleStateHandler(nettyServerConfig.getChannelMaxReadIdleSeconds(), 0, 0))
.addLast(multiProtocolDecoder);
}
});
try {
this.serverBootstrap.bind(port).sync();
LOGGER.info("Server started, service listen port: {}", getListenPort());
InetSocketAddress address = new InetSocketAddress(XID.getIpAddress(), XID.getPort());
for (RegistryService<?> registryService : MultiRegistryFactory.getInstances()) {
// Register service
registryService.register(address);
}
initialized.set(true);
} catch (SocketException se) {
throw new RuntimeException("Server start failed, the listen port: " + getListenPort(), se);
} catch (Exception exx) {
throw new RuntimeException("Server start failed", exx);
}
}
The childOption
settings during the startup of ServerBootstrap
belong to the networking part and won't be explained in depth here.
You might have a question regarding why only a MultiProtocolDecoder
is added to the pipeline, what about the business handler?
In fact, the channelHandlers
passed into the constructor of MultiProtocolDecoder
include the ServerHandler
, which is set when creating the NettyRemotingServer
.
This approach is related to Seata's multi-version protocol support.
When the Seata Server decodes messages for the first time after starting, it removes the MultiProtocolDecoder
from the pipeline and adds specific Encoder
and Decoder
based on the version to the pipeline. At this point, the ServerHandler
is also added to the pipeline.
How the Client Starts
For the Client, since we typically use Seata within a Spring Boot application, our focus lies within the SeataAutoConfiguration
class.
In this class, a GlobalTransactionScanner
object is created. Notably, it implements InitializingBean
, so we turn our attention to the afterPropertiesSet
method.
Indeed, within this method, the initialization of TM (Transaction Manager) and RM (Resource Manager) takes place.
Initialization of TM
For TM, the initialization logic is as follows:
public static void init(String applicationId, String transactionServiceGroup, String accessKey, String secretKey) {
/**
* Main tasks include:
* 1. Creating a thread pool as the messageExecutor for AbstractNettyRemotingClient
* 2. Setting the transaction role transactionRole to TM_ROLE
* 3. Creating Bootstrap and setting outbound and inbound handlers ClientHandler
* 4. Creating a client Channel manager NettyClientChannelManager
*/
TmNettyRemotingClient tmNettyRemotingClient = TmNettyRemotingClient.getInstance(applicationId, transactionServiceGroup, accessKey, secretKey);
/**
* Main tasks include:
* 1. Registering a series of processors
* 2. Creating a scheduled thread pool that periodically initiates connections to servers within the transaction group; if the connection is broken, it tries to reconnect
* 3. If the client allows batch message sending, creating a mergeSendExecutorService thread pool and submitting MergedSendRunnable tasks
* 4. Initializing a scheduled thread pool to clean up expired MessageFuture objects
* 5. Starting the client Bootstrap
* 6. Initializing connections initConnection
*/
tmNettyRemotingClient.init();
}
The logic for starting the client Bootstrap is as follows:
@Override
public void start() {
if (this.defaultEventExecutorGroup == null) {
this.defaultEventExecutorGroup = new DefaultEventExecutorGroup(nettyClientConfig.getClientWorkerThreads(),
new NamedThreadFactory(getThreadPrefix(nettyClientConfig.getClientWorkerThreadPrefix()), nettyClientConfig.getClientWorkerThreads()));
}
this.bootstrap.group(this.eventLoopGroupWorker)
.channel(nettyClientConfig.getClientChannelClazz())
.option(ChannelOption.TCP_NODELAY, true)
.option(ChannelOption.SO_KEEPALIVE, true)
.option(ChannelOption.CONNECT_TIMEOUT_MILLIS, nettyClientConfig.getConnectTimeoutMillis())
.option(ChannelOption.SO_SNDBUF, nettyClientConfig.getClientSocketSndBufSize())
.option(ChannelOption.SO_RCVBUF, nettyClientConfig.getClientSocketRcvBufSize());
if (nettyClientConfig.enableNative()) {
if (PlatformDependent.isOsx()) {
if (LOGGER.isInfoEnabled()) {
LOGGER.info("client run on macOS");
}
} else {
bootstrap.option(EpollChannelOption.EPOLL_MODE, EpollMode.EDGE_TRIGGERED)
.option(EpollChannelOption.TCP_QUICKACK, true);
}
}
bootstrap.handler(new ChannelInitializer<SocketChannel>() {
@Override
public void initChannel(SocketChannel ch) {
ch.pipeline().addLast(new IdleStateHandler(nettyClientConfig.getChannelMaxReadIdleSeconds(),
nettyClientConfig.getChannelMaxWriteIdleSeconds(),
nettyClientConfig.getChannelMaxAllIdleSeconds()))
.addLast(new ProtocolDecoderV1())
.addLast(new ProtocolEncoderV1());
if (channelHandlers != null) {
addChannelPipelineLast(ch, channelHandlers);
}
}
});
if (initialized.compareAndSet(false, true) && LOGGER.isInfoEnabled()) {
LOGGER.info("NettyClientBootstrap has started");
}
}
Since the protocol version for the client can be determined based on different versions of Seata, V1 version encoders and decoders are directly added here. The channelHandlers
are actually the ClientHandler
, which is also a composite handler in Netty.
Initialization of RM
The initialization logic for RM is largely similar to that of TM and will not be elaborated on further here.
How Messages Are Sent and Handled
After understanding the general startup processes of the Seata Server and Client, we can delve deeper into how Seata sends and handles messages.
We mentioned earlier that the core logic for sending requests and processing messages lies within AbstractNettyRemoting
. Let's take a closer look at this class.
Synchronous and Asynchronous
First, let's briefly discuss what synchronous and asynchronous mean.
Synchronous (Synchronous) and Asynchronous (Asynchronous), in essence, describe different behavior patterns when a program handles multiple events or tasks.
Synchronous means one process must wait for another to complete before it can proceed. In other words, in synchronous operations, the caller will block waiting for a response after issuing a request until it receives a response result or times out before continuing with subsequent code execution.
In contrast, asynchronous allows the caller to continue executing without waiting for a response after making a request, but when the request is completed, it notifies the caller of the response in some way (such as through callback functions or Future). The asynchronous model can improve concurrency and efficiency.
From another perspective, synchronous calls require the calling thread to obtain the result, whereas asynchronous calls either have an asynchronous thread place the result somewhere (Future) or execute pre-prepared call success/failure callback methods (callback function).
Below is a simple example demonstrating three invocation styles: synchronous, asynchronous with Future, and asynchronous with Callback.
import lombok.Data;
import org.slf4j.Logger;
import org.slf4j.LoggerFactory;
import java.util.concurrent.CompletableFuture;
import java.util.concurrent.ExecutionException;
import java.util.concurrent.TimeUnit;
public class AsyncTest {
private static final Logger LOGGER = LoggerFactory.getLogger(AsyncTest.class);
public static void main(String[] args) throws InterruptedException, ExecutionException {
Result syncResponse = testSync();
LOGGER.info("Synchronous response result: {}", syncResponse.getString());
CompletableFuture<Result> result = testAsyncFuture();
testAsyncCallback();
LOGGER.info("Main thread continues executing~~");
TimeUnit.SECONDS.sleep(1); // Ensure all results are processed
LOGGER.info("Main thread retrieves result from async Future: {}", result.get().getString());
}
public static void testAsyncCallback() {
new AsyncTask().execute(new AsyncCallback() {
@Override
public void onComplete(Result result) {
try {
TimeUnit.MILLISECONDS.sleep(50); // Simulate asynchronous delay
} catch (InterruptedException e) {
}
LOGGER.info("Async Callback gets result: {}", result.getString());
}
});
}
public static CompletableFuture<Result> testAsyncFuture() {
return CompletableFuture.supplyAsync(() -> {
try {
TimeUnit.MILLISECONDS.sleep(50); // Simulate asynchronous delay
} catch (InterruptedException e) {
}
Result asyncResponse = getResult();
LOGGER.info("Async Future gets result: {}", asyncResponse.getString());
return asyncResponse;
});
}
public static Result testSync() {
return getResult();
}
@Data
static class Result {
private String string;
}
interface AsyncCallback {
void onComplete(Result result);
}
static class AsyncTask {
void execute(AsyncCallback callback) {
new Thread(() -> {
Result asyncRes = getResult();
callback.onComplete(asyncRes);
}).start();
}
}
private static Result getResult() {
Result result = new Result();
result.setString("result");
return result;
}
}
Output:
22:26:38.788 [main] INFO org.hein.netty.AsyncTest - Synchronous response result: result
22:26:38.849 [main] INFO org.hein.netty.AsyncTest - Main thread continues executing~~
22:26:38.911 [Thread-0] INFO org.hein.netty.AsyncTest - Async Callback gets result: result
22:26:38.911 [ForkJoinPool.commonPool-worker-1] INFO org.hein.netty.AsyncTest - Async Future gets result: result
22:26:39.857 [main] INFO org.hein.netty.AsyncTest - Main thread retrieves result from async Future: result
From the output, we can observe at least three points:
- One is that asynchronous Future and asynchronous Callback do not block the main thread from continuing its execution.
- Two, the handling of results during asynchronous calls is not done by the main thread.
- Finally, the difference between Future and Callback lies in that Future has the asynchronous thread store the result in a specific location (CompletableFuture#result), but retrieving the result still requires the main thread (or another thread) to call the get method. With Callback, it's essentially setting up the predefined way to handle the result, which is executed by the asynchronous thread.
Of course, CompletableFuture
can also be used for callbacks, for example, by calling the whenComplete
method.
Asynchronous Invocation
Netty, as a high-performance asynchronous IO framework, is designed to be asynchronous at its core. Therefore, implementing asynchronous calls based on Netty is relatively straightforward.
protected void sendAsync(Channel channel, RpcMessage rpcMessage) {
channelWritableCheck(channel, rpcMessage.getBody());
if (LOGGER.isDebugEnabled()) {
LOGGER.debug("write message: {}, channel: {}, active? {}, writable? {}, isopen? {}", rpcMessage.getBody(), channel, channel.isActive(), channel.isWritable(), channel.isOpen());
}
doBeforeRpcHooks(ChannelUtil.getAddressFromChannel(channel), rpcMessage);
channel.writeAndFlush(rpcMessage).addListener((ChannelFutureListener) future -> {
if (!future.isSuccess()) {
destroyChannel(future.channel());
}
});
}
An asynchronous call can be achieved by simply invoking the writeAndFlush
method of the channel.
It's important to note that the writeAndFlush
method will operate synchronously when called from an EventLoop thread.
Synchronous Invocation
Implementing asynchronous calls in Netty is simple, but converting them into synchronous calls requires more effort since it involves transforming an asynchronous call into a synchronous one.
Essentially, converting asynchronous to synchronous means that after the calling thread initiates a call, it should block until it receives a response, and then it continues execution.
The core of Seata's handling for this conversion lies within the MessageFuture
class, as follows:
package org.apache.seata.core.protocol;
import org.apache.seata.common.exception.ShouldNeverHappenException;
import java.util.concurrent.CompletableFuture;
import java.util.concurrent.ExecutionException;
import java.util.concurrent.TimeUnit;
import java.util.concurrent.TimeoutException;
public class MessageFuture {
private RpcMessage requestMessage;
private long timeout;
private final long start = System.currentTimeMillis();
private final transient CompletableFuture<Object> origin = new CompletableFuture<>();
public boolean isTimeout() {
return System.currentTimeMillis() - start > timeout;
}
public Object get(long timeout, TimeUnit unit) throws TimeoutException, InterruptedException {
Object result;
try {
result = origin.get(timeout, unit);
if (result instanceof TimeoutException) {
throw (TimeoutException) result;
}
} catch (ExecutionException e) {
throw new ShouldNeverHappenException("Should not get results in a multi-threaded environment", e);
} catch (TimeoutException e) {
throw new TimeoutException(String.format("%s, cost: %d ms", e.getMessage(), System.currentTimeMillis() - start));
}
if (result instanceof RuntimeException) {
throw (RuntimeException) result;
} else if (result instanceof Throwable) {
throw new RuntimeException((Throwable) result);
}
return result;
}
public void setResultMessage(Object obj) {
origin.complete(obj);
}
public RpcMessage getRequestMessage() { return requestMessage; }
public void setRequestMessage(RpcMessage requestMessage) { this.requestMessage = requestMessage;}
public long getTimeout() { return timeout; }
public void setTimeout(long timeout) { this.timeout = timeout;}
}
With this class, the process of a synchronous call works as follows, using a client request and server response as an example:
- First, the client constructs the request into a
MessageFuture
, then stores the request ID along with thisMessageFuture
object in a hash table. - The client then calls
channel.writeAndFlush
to initiate an asynchronous call. Yes, it's still asynchronous at this point. - The key to converting asynchronous to synchronous lies in the fact that the thread needs to call the
get
method on theMessageFuture
object, which blocks the thread, effectively calling theget
method onCompletableFuture
to enter a blocking state. - When the server finishes processing and sends a request from its perspective, the client sees this as a response.
- When the client receives the response, the EventLoop thread sets the response result in the
MessageFuture
. Since the request and response IDs are the same, the correspondingMessageFuture
object can be retrieved from the aforementioned hash table. - Once the response result is set, the previously blocked thread can resume execution, thereby achieving a synchronous effect.
Thus, Seata's solution essentially uses CompletableFuture
objects as containers for storing results.
protected Object sendSync(Channel channel, RpcMessage rpcMessage, long timeoutMillis) throws TimeoutException {
if (timeoutMillis <= 0) {
throw new FrameworkException("timeout should more than 0ms");
}
if (channel == null) {
LOGGER.warn("sendSync nothing, caused by null channel.");
return null;
}
MessageFuture messageFuture = new MessageFuture();
messageFuture.setRequestMessage(rpcMessage);
messageFuture.setTimeout(timeoutMillis);
futures.put(rpcMessage.getId(), messageFuture); // The request and response IDs are the same
// Check if the Channel is writable (Channels have write buffers, and if the buffer reaches a threshold water level, it becomes unwritable)
channelWritableCheck(channel, rpcMessage.getBody());
// Get the destination IP address
String remoteAddr = ChannelUtil.getAddressFromChannel(channel);
// Execute pre-send hooks
doBeforeRpcHooks(remoteAddr, rpcMessage);
// Send the result and set up a callback, non-blocking
channel.writeAndFlush(rpcMessage).addListener((ChannelFutureListener) future -> {
// If sending fails, remove the future and close the Channel
if (!future.isSuccess()) {
MessageFuture mf = futures.remove(rpcMessage.getId());
if (mf != null) {
mf.setResultMessage(future.cause());
}
destroyChannel(future.channel());
}
});
try {
// Since Netty sends asynchronously, we need to wait for the result here, converting async to sync
Object result = messageFuture.get(timeoutMillis, TimeUnit.MILLISECONDS);
// Execute post-send hooks
doAfterRpcHooks(remoteAddr, rpcMessage, result);
return result;
} catch (Exception exx) {
LOGGER.error("wait response error:{},ip:{},request:{}", exx.getMessage(), channel.remoteAddress(), rpcMessage.getBody());
// Timeout exception
if (exx instanceof TimeoutException) {
throw (TimeoutException) exx;
} else {
throw new RuntimeException(exx);
}
}
}
Message Handling
When it comes to message handling in Netty, one should think of inbound and outbound handlers first.
In the Seata Server side, besides common encoding and decoding handlers, there is also the ServerHandler
. Here's an example:
@ChannelHandler.Sharable
class ServerHandler extends ChannelDuplexHandler {
@Override
public void channelRead(final ChannelHandlerContext ctx, Object msg) throws Exception {
// Preceded by a decoder handler, so the message here is RpcMessage
if (msg instanceof RpcMessage) {
processMessage(ctx, (RpcMessage) msg);
} else {
LOGGER.error("rpcMessage type error");
}
}
// ...
}
The channelRead
method has significant business meaning, as all messages sent to the Server will come to this method after being decoded.
The processMessage
method within this context refers to the business processing method found in AbstractNettyRemoting
, as follows:
protected void processMessage(ChannelHandlerContext ctx, RpcMessage rpcMessage) throws Exception {
if (LOGGER.isDebugEnabled()) {
LOGGER.debug("{} msgId: {}, body: {}", this, rpcMessage.getId(), rpcMessage.getBody());
}
Object body = rpcMessage.getBody();
if (body instanceof MessageTypeAware) {
MessageTypeAware messageTypeAware = (MessageTypeAware) body;
// During Server startup, a lot of processors are registered with processorTable
final Pair<RemotingProcessor, ExecutorService> pair = this.processorTable.get((int) messageTypeAware.getTypeCode());
if (pair != null) {
// Execute with the corresponding thread pool
if (pair.getSecond() != null) {
try {
pair.getSecond().execute(() -> {
try {
// Find the corresponding processor to execute
pair.getFirst().process(ctx, rpcMessage);
} catch (Throwable th) {
LOGGER.error(FrameworkErrorCode.NetDispatch.getErrCode(), th.getMessage(), th);
} finally {
MDC.clear();
}
});
} catch (RejectedExecutionException e) {
// Thread pool is full, execute rejection policy
LOGGER.error(FrameworkErrorCode.ThreadPoolFull.getErrCode(), "thread pool is full, current max pool size is " + messageExecutor.getActiveCount());
if (allowDumpStack) {
// Export thread stack information
String name = ManagementFactory.getRuntimeMXBean().getName();
String pid = name.split("@")[0];
long idx = System.currentTimeMillis();
try {
String jstackFile = idx + ".log";
LOGGER.info("jstack command will dump to {}", jstackFile);
Runtime.getRuntime().exec(String.format("jstack %s > %s", pid, jstackFile));
} catch (IOException exx) {
LOGGER.error(exx.getMessage());
}
allowDumpStack = false;
}
}
} else {
try {
// If no thread pool is configured for the processor, it is executed by the current thread, which is basically the EventLoop thread
pair.getFirst().process(ctx, rpcMessage);
} catch (Throwable th) {
LOGGER.error(FrameworkErrorCode.NetDispatch.getErrCode(), th.getMessage(), th);
}
}
} else {
LOGGER.error("This message type [{}] has no processor.", messageTypeAware.getTypeCode());
}
} else {
LOGGER.error("This rpcMessage body[{}] is not MessageTypeAware type.", body);
}
}
The logic of this method is quite straightforward.
During the startup process of Seata Server, a multitude of processors are registered into the processorTable
, so here we can obtain the corresponding processor and thread pool based on the message type code.
If there is a thread pool, the processor's method is executed within that thread pool; otherwise, it is handed over to the EventLoop thread for execution.
Of course, the same approach applies to the Client.
Batch Sending
In network programming, there are times when batch sending is also required. Let's see how Seata implements this, focusing on the client sending to the server.
Recall that during the Client startup process, we mentioned a thread pool mergeSendExecutorService
. If batch sending is allowed, then upon Client startup, a MergedSendRunnable
task is submitted. First, let's look at what this task does:
private class MergedSendRunnable implements Runnable {
@Override
public void run() {
// Infinite loop
while (true) {
synchronized (mergeLock) {
try {
// Ensure the thread idles for no more than 1ms
mergeLock.wait(MAX_MERGE_SEND_MILLS); // 1
} catch (InterruptedException ignore) {
// ignore
}
}
// Flag indicating sending in progress
isSending = true;
// basketMap: key is address, value is the queue of messages (blocking queue) to be sent to that address
basketMap.forEach((address, basket) -> {
if (basket.isEmpty()) {
return;
}
MergedWarpMessage mergeMessage = new MergedWarpMessage();
while (!basket.isEmpty()) {
// Merge all RpcMessages from the same blocking queue
RpcMessage msg = basket.poll();
mergeMessage.msgs.add((AbstractMessage) msg.getBody());
mergeMessage.msgIds.add(msg.getId());
}
if (mergeMessage.msgIds.size() > 1) {
printMergeMessageLog(mergeMessage);
}
Channel sendChannel = null;
try {
// Batch message sending is a synchronous request but doesn't require a return value.
// Because messageFuture is created before putting the message into basketMap.
// The return value will be set in ClientOnResponseProcessor.
sendChannel = clientChannelManager.acquireChannel(address);
// Internally wraps mergeMessage as a regular RpcMessage and sends it
AbstractNettyRemotingClient.this.sendAsyncRequest(sendChannel, mergeMessage);
} catch (FrameworkException e) {
if (e.getErrorCode() == FrameworkErrorCode.ChannelIsNotWritable && sendChannel != null) {
destroyChannel(address, sendChannel);
}
// Fast fail
for (Integer msgId : mergeMessage.msgIds) {
MessageFuture messageFuture = futures.remove(msgId);
if (messageFuture != null) {
messageFuture.setResultMessage(new RuntimeException(String.format("%s is unreachable", address), e));
}
}
LOGGER.error("client merge call failed: {}", e.getMessage(), e);
}
});
isSending = false;
}
}
}
The related batch sending code follows:
public Object sendSyncRequest(Object msg) throws TimeoutException {
String serverAddress = loadBalance(getTransactionServiceGroup(), msg);
long timeoutMillis = this.getRpcRequestTimeout();
RpcMessage rpcMessage = buildRequestMessage(msg, ProtocolConstants.MSGTYPE_RESQUEST_SYNC);
// Send batch message
// Put message into basketMap, @see MergedSendRunnable
if (this.isEnableClientBatchSendRequest()) {
// If client-side batch message sending is enabled
// Sending batch messages is a sync request, which needs to create messageFuture and put it in futures.
MessageFuture messageFuture = new MessageFuture();
messageFuture.setRequestMessage(rpcMessage);
messageFuture.setTimeout(timeoutMillis);
futures.put(rpcMessage.getId(), messageFuture);
// Put message into basketMap
// Get the sending queue corresponding to serverAddress
BlockingQueue<RpcMessage> basket = CollectionUtils.computeIfAbsent(basketMap, serverAddress,
key -> new LinkedBlockingQueue<>());
// Add the message to the queue, waiting for mergeSendExecutorService to perform the actual sending
if (!basket.offer(rpcMessage)) {
LOGGER.error("put message into basketMap offer failed, serverAddress: {}, rpcMessage: {}", serverAddress, rpcMessage);
return null;
}
if (!isSending) {
// Ensure that once there is data in the queue, the thread is awakened to continue batch sending
synchronized (mergeLock) {
mergeLock.notifyAll();
}
}
try {
// Thread blocks waiting for response
return messageFuture.get(timeoutMillis, TimeUnit.MILLISECONDS);
} catch (Exception exx) {
LOGGER.error("wait response error: {}, ip: {}, request: {}", exx.getMessage(), serverAddress, rpcMessage.getBody());
if (exx instanceof TimeoutException) {
throw (TimeoutException) exx;
} else {
throw new RuntimeException(exx);
}
}
} else {
// Normal sending, acquire channel and call the parent class's synchronous method
Channel channel = clientChannelManager.acquireChannel(serverAddress);
return super.sendSync(channel, rpcMessage, timeoutMillis);
}
}
As can be seen, object lock synchronization-wait mechanisms are used here, resulting in the following effects:
- Messages are sent by traversing the
basketMap
every 1ms at most. - During the blocking period of threads inside
mergeSendExecutorService
(mainLock.wait), if a message that needs to be sent arrives, the thread onmainLock
is awakened to continue sending.
How does the Server handle this? It mainly looks at the TypeCode
of the MergedWarpMessage
, which is actually TYPE_SEATA_MERGE
. During Server startup, the processor registered for this Code is actually ServerOnRequestProcessor
.
This shows you how to find out how a certain message is processed; teaching you how to fish is better than giving you fish!
On the ServerOnRequestProcessor
side, there are actually two ways to handle MergedWarpMessage
messages:
- After processing all individual requests within
MergedWarpMessage
, send a unifiedMergeResultMessage
. - Handle the sending task with the
batchResponseExecutorService
thread pool, ensuring two points: one is to respond immediately when there is a message result, even if the thread is waiting, it will notify it, and secondly, it responds at least once every 1ms because the thread executing withinbatchResponseExecutorService
waits for no more than 1ms.
Note that these two methods respond with different message types; the first responds with MergeResultMessage
, and the second with BatchResultMessage
, each handled differently on the Client side.
The core processing method within ServerOnRequestProcessor
is as follows:
private void onRequestMessage(ChannelHandlerContext ctx, RpcMessage rpcMessage) {
Object message = rpcMessage.getBody();
RpcContext rpcContext = ChannelManager.getContextFromIdentified(ctx.channel());
// the batch send request message
if (message instanceof MergedWarpMessage) {
final List<AbstractMessage> msgs = ((MergedWarpMessage) message).msgs;
final List<Integer> msgIds = ((MergedWarpMessage) message).msgIds;
// Allow TC server to batch return results && client version >= 1.5.0
if (NettyServerConfig.isEnableTcServerBatchSendResponse() && StringUtils.isNotBlank(rpcContext.getVersion())
&& Version.isAboveOrEqualVersion150(rpcContext.getVersion())) {
// Handled by `batchResponseExecutorService` individually without waiting for all batch requests to complete
for (int i = 0; i < msgs.size(); i++) {
if (PARALLEL_REQUEST_HANDLE) {
int finalI = i;
CompletableFuture.runAsync(
() -> handleRequestsByMergedWarpMessageBy150(msgs.get(finalI), msgIds.get(finalI), rpcMessage, ctx, rpcContext));
} else {
handleRequestsByMergedWarpMessageBy150(msgs.get(i), msgIds.get(i), rpcMessage, ctx, rpcContext);
}
}
} else {
// Responses are sent only after each request has been processed
List<AbstractResultMessage> results = new ArrayList<>();
List<CompletableFuture<AbstractResultMessage>> futures = new ArrayList<>();
for (int i = 0; i < msgs.size(); i++) {
if (PARALLEL_REQUEST_HANDLE) {
int finalI = i;
futures.add(CompletableFuture.supplyAsync(() -> handleRequestsByMergedWarpMessage(msgs.get(finalI), rpcContext)));
} else {
results.add(i, handleRequestsByMergedWarpMessage(msgs.get(i), rpcContext));
}
}
if (CollectionUtils.isNotEmpty(futures)) {
try {
for (CompletableFuture<AbstractResultMessage> future : futures) {
results.add(future.get()); // Blocking wait for processing result
}
} catch (InterruptedException | ExecutionException e) {
LOGGER.error("handle request error: {}", e.getMessage(), e);
}
}
MergeResultMessage resultMessage = new MergeResultMessage();
resultMessage.setMsgs(results.toArray(new AbstractResultMessage[0]));
remotingServer.sendAsyncResponse(rpcMessage, ctx.channel(), resultMessage);
}
} else {
// Handle individual message response
}
}
The difference between handleRequestsByMergedWarpMessage
and handleRequestsByMergedWarpMessageBy150
lies in the fact that the latter encapsulates the result into a QueueItem
and adds it to a blocking queue for actual sending by threads in batchResponseExecutorService
, while the former simply returns the processing result.
private AbstractResultMessage handleRequestsByMergedWarpMessage(AbstractMessage subMessage, RpcContext rpcContext) {
AbstractResultMessage resultMessage = transactionMessageHandler.onRequest(subMessage, rpcContext);
return resultMessage;
}
private void handleRequestsByMergedWarpMessageBy150(AbstractMessage msg, int msgId, RpcMessage rpcMessage,
ChannelHandlerContext ctx, RpcContext rpcContext) {
AbstractResultMessage resultMessage = transactionMessageHandler.onRequest(msg, rpcContext);
// Get the sending queue corresponding to the channel
BlockingQueue<QueueItem> msgQueue = CollectionUtils.computeIfAbsent(basketMap, ctx.channel(), key -> new LinkedBlockingQueue<>());
// Add the result to the queue, waiting for `batchResponseExecutorService` thread pool to perform the actual sending
if (!msgQueue.offer(new QueueItem(resultMessage, msgId, rpcMessage))) {
LOGGER.error("put message into basketMap offer failed, channel: {}, rpcMessage: {}, resultMessage: {}", ctx.channel(), rpcMessage, resultMessage);
}
if (!isResponding) {
// Ensure that once there is data in the queue, the thread is awakened to perform batch sending
synchronized (batchResponseLock) {
batchResponseLock.notifyAll();
}
}
}
Now, let's look at how the batchResponseExecutorService
thread pool handles batch sending tasks:
private class BatchResponseRunnable implements Runnable {
@Override
public void run() {
while (true) {
synchronized (batchResponseLock) {
try {
// Idle for no more than 1ms
batchResponseLock.wait(MAX_BATCH_RESPONSE_MILLS);
} catch (InterruptedException e) {
LOGGER.error("BatchResponseRunnable Interrupted error", e);
}
}
isResponding = true;
// Traverse `basketMap` for processing
basketMap.forEach((channel, msgQueue) -> {
if (msgQueue.isEmpty()) {
return;
}
// Group responses according to [serialization,compressor,rpcMessageId,headMap] dimensions.
// Encapsulate queue messages into `BatchResultMessage` but not send all at once.
// Send asynchronously per group based on [serialization,compressor,rpcMessageId,headMap].
Map<ClientRequestRpcInfo, BatchResultMessage> batchResultMessageMap = new HashMap<>();
while (!msgQueue.isEmpty()) {
QueueItem item = msgQueue.poll();
BatchResultMessage batchResultMessage = CollectionUtils.computeIfAbsent(batchResultMessageMap,
new ClientRequestRpcInfo(item.getRpcMessage()),
key -> new BatchResultMessage());
batchResultMessage.getResultMessages().add(item.getResultMessage());
batchResultMessage.getMsgIds().add(item.getMsgId());
}
batchResultMessageMap.forEach((clientRequestRpcInfo, batchResultMessage) ->
remotingServer.sendAsyncResponse(buildRpcMessage(clientRequestRpcInfo), channel, batchResultMessage));
});
isResponding = false;
}
}
}
Finally, let's see how the Client side processes Server's batch response messages. According to the processor registered by the Client, the processor handling batch messages is ClientOnResponseProcessor
, as follows:
public void process(ChannelHandlerContext ctx, RpcMessage rpcMessage) throws Exception {
// Process `MergeResultMessage`
if (rpcMessage.getBody() instanceof MergeResultMessage) {
MergeResultMessage results = (MergeResultMessage) rpcMessage.getBody();
MergedWarpMessage mergeMessage = (MergedWarpMessage) mergeMsgMap.remove(rpcMessage.getId());
for (int i = 0; i < mergeMessage.msgs.size(); i++) {
int msgId = mergeMessage.msgIds.get(i);
MessageFuture future = futures.remove(msgId);
if (future == null) {
LOGGER.error("msg: {} is not found in futures, result message: {}", msgId, results.getMsgs()[i]);
} else {
future.setResultMessage(results.getMsgs()[i]);
}
}
} else if (rpcMessage.getBody() instanceof BatchResultMessage) {
// Process `BatchResultMessage`
try {
BatchResultMessage batchResultMessage = (BatchResultMessage) rpcMessage.getBody();
for (int i = 0; i < batchResultMessage.getMsgIds().size(); i++) {
int msgId = batchResultMessage.getMsgIds().get(i);
MessageFuture future = futures.remove(msgId);
if (future == null) {
LOGGER.error("msg: {} is not found in futures, result message: {}", msgId, batchResultMessage.getResultMessages().get(i));
} else {
future.setResultMessage(batchResultMessage.getResultMessages().get(i));
}
}
} finally {
// For compatibility with old versions, in batch sending of version 1.5.0,
// batch messages will also be placed in the local cache of `mergeMsgMap`,
// but version 1.5.0 no longer needs to obtain batch messages from `mergeMsgMap`.
mergeMsgMap.clear();
}
} else {
// Process non-batch sending messages
MessageFuture messageFuture = futures.remove(rpcMessage.getId());
if (messageFuture != null) {
messageFuture.setResultMessage(rpcMessage.getBody());
} else {
if (rpcMessage.getBody() instanceof AbstractResultMessage) {
if (transactionMessageHandler != null) {
transactionMessageHandler.onResponse((AbstractResultMessage) rpcMessage.getBody(), null);
}
}
}
}
}
Of course, the logic here is quite simple: it involves putting the results into the corresponding MessageFuture
, so the initially blocked thread that sent the request can obtain the result, thereby completing one cycle of batch sending and response handling.
Let's do some extra thinking: Why does Seata have two methods for batch sending, and which is better?
For the MergeResultMessage
approach, it must wait until all messages have been processed before sending them out, so its response speed is limited by the longest-processing message, even if other messages could be sent out much sooner.
However, the BatchResultMessage
approach differs in that it can achieve sending as soon as a message is processed, without waiting for other messages, thanks to parallel processing with CompletableFuture
. This method definitely responds faster.
The latter approach was introduced in Seata version 1.5 onwards, which can be seen as a better way to handle batch sending.
Lastly, sharing an interaction flow diagram for global transaction commit requests by the author of the Seata RPC refactoring would be beneficial.
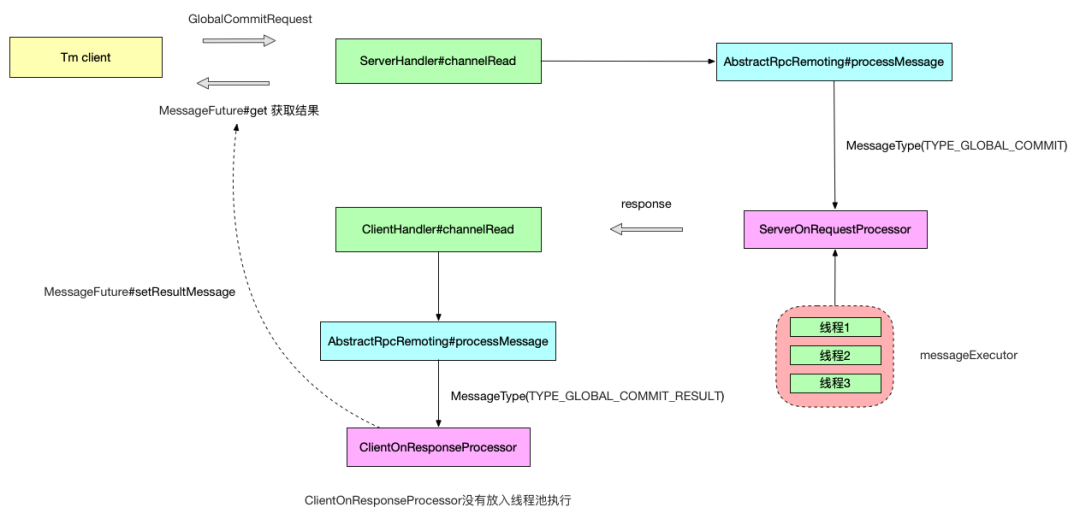
How Seata Manages Channel
Throughout the network communication process involving TC, TM, and RM, Channel is a critical communication component. To understand how Seata manages Channels, the easiest approach is to examine where the Server and Client obtain the Channel when sending messages.
In the sendSyncRequest
method of the AbstractNettyRemotingClient
class, we can see the following code:
public Object sendSyncRequest(Object msg) throws TimeoutException {
// ...
// The Client acquires a Channel through NettyClientChannelManager
Channel channel = clientChannelManager.acquireChannel(serverAddress);
return super.sendSync(channel, rpcMessage, timeoutMillis);
}
And in the sendSyncRequest
method of the AbstractNettyRemotingServer
class, we can see the following code:
public Object sendSyncRequest(String resourceId, String clientId, Object msg, boolean tryOtherApp) throws TimeoutException {
// The Server obtains a Channel through ChannelManager
Channel channel = ChannelManager.getChannel(resourceId, clientId, tryOtherApp);
if (channel == null) {
throw new RuntimeException("rm client is not connected. dbkey:" + resourceId + ",clientId:" + clientId);
}
RpcMessage rpcMessage = buildRequestMessage(msg, ProtocolConstants.MSGTYPE_RESQUEST_SYNC);
return super.sendSync(channel, rpcMessage, NettyServerConfig.getRpcRequestTimeout());
}
Therefore, on the Client side, it mainly acquires Channels through NettyClientChannelManager
, while the Server retrieves Channels from ChannelManager
based on resourceId
and clientId
.
So, below we will primarily investigate these two classes along with some related logic.
Client Channel
Let's first look at how Channels are managed on the Client side; the core class here is NettyClientChannelManager
.
First, let's take a simple look at the attributes of this class,
// serverAddress -> lock
private final ConcurrentMap<String, Object> channelLocks = new ConcurrentHashMap<>();
// serverAddress -> NettyPoolKey
private final ConcurrentMap<String, NettyPoolKey> poolKeyMap = new ConcurrentHashMap<>();
// serverAddress -> Channel
private final ConcurrentMap<String, Channel> channels = new ConcurrentHashMap<>();
// Object pool, NettyPoolKey -> Channel
private final GenericKeyedObjectPool<NettyPoolKey, Channel> nettyClientKeyPool;
// Functional interface, encapsulates the logic for obtaining a NettyPoolKey via serverAddress
private final Function<String, NettyPoolKey> poolKeyFunction;
Core Classes of the Object Pool
Seata uses GenericKeyedObjectPool
as the object pool managing Channels.
GenericKeyedObjectPool
is an implementation from the Apache Commons Pool library, primarily used for managing a set of object pools, each distinguished by a unique Key. It can support pooling requirements for multiple types of objects.
When using GenericKeyedObjectPool
, it's typically necessary to configure a KeyedPoolableObjectFactory
. This factory defines how to create, validate, activate, passivate, and destroy objects within the pool.
When GenericKeyedObjectPool
needs to create an object, it calls the makeObject
method of the KeyedPoolableObjectFactory
factory, and when it needs to destroy an object, it calls the destroyObject
method to destroy it……
How to Pool Channel
The object being pooled is the Channel, and the corresponding Key is NettyPoolKey
, as follows:
public class NettyPoolKey {
private TransactionRole transactionRole;
private String address;
private AbstractMessage message;
// ...
}
In NettyPoolKey
, three pieces of information are maintained: the transaction role (TM, RM, Server), the target TC Server address, and the RPC message sent by the Client when connecting to the Server.
How is this NettyPoolKey
created? In Seata, the client actually has two roles, TM and RM, and the creation logic for each will be different. Therefore, Seata abstracts a method in AbstractNettyRemotingClient
whose return value is a functional interface that encapsulates the logic for creating a NettyPoolKey
based on serverAddress
.
// org.apache.seata.core.rpc.netty.AbstractNettyRemotingClient#getPoolKeyFunction
protected abstract Function<String, NettyPoolKey> getPoolKeyFunction();
For example, the implementation in TM is:
protected Function<String, NettyPoolKey> getPoolKeyFunction() {
return severAddress -> {
RegisterTMRequest message = new RegisterTMRequest(applicationId, transactionServiceGroup, getExtraData());
return new NettyPoolKey(NettyPoolKey.TransactionRole.TM_ROLE, severAddress, message);
};
}
And the implementation in RM is:
protected Function<String, NettyPoolKey> getPoolKeyFunction() {
return serverAddress -> {
String resourceIds = getMergedResourceKeys();
if (resourceIds != null && LOGGER.isInfoEnabled()) {
LOGGER.info("RM will register: {}", resourceIds);
}
RegisterRMRequest message = new RegisterRMRequest(applicationId, transactionServiceGroup);
message.setResourceIds(resourceIds);
return new NettyPoolKey(NettyPoolKey.TransactionRole.RM_ROLE, serverAddress, message);
};
}
From here, you can see that the message sent by TM after connecting to the Server is RegisterTMRequest
, while for RM it is RegisterRMRequest
.
When is this functional interface called? We'll look at that later.
We also mentioned earlier that an object pool comes with a corresponding object creation factory KeyedPoolableObjectFactory
. In Seata, NettyPoolableFactory
extends KeyedPoolableObjectFactory
to implement this.
/**
* Netty Channel creation factory, creates Channel through NettyPoolKey, methods in this class must be thread-safe
*/
public class NettyPoolableFactory implements KeyedPoolableObjectFactory<NettyPoolKey, Channel> {
// ...
/**
* This method is called when a new instance is needed
*/
@Override
public Channel makeObject(NettyPoolKey key) {
InetSocketAddress address = NetUtil.toInetSocketAddress(key.getAddress());
// Create Channel, essentially connect to Seata Server via bootstrap.connect and return Channel
Channel tmpChannel = clientBootstrap.getNewChannel(address);
long start = System.currentTimeMillis();
Object response;
Channel channelToServer = null;
if (key.getMessage() == null) {
throw new FrameworkException("register msg is null, role:" + key.getTransactionRole().name());
}
try {
// Send Message, for TM it's RegisterTMRequest, for RM it's RegisterRMRequest
response = rpcRemotingClient.sendSyncRequest(tmpChannel, key.getMessage());
// Determine if registration was successful based on response
if (!isRegisterSuccess(response, key.getTransactionRole())) {
rpcRemotingClient.onRegisterMsgFail(key.getAddress(), tmpChannel, response, key.getMessage());
} else {
// Registration successful
channelToServer = tmpChannel;
// Add serverAddress as key and Channel as value to NettyClientChannelManager.channels
// If RM, possibly need to register resources with Server
rpcRemotingClient.onRegisterMsgSuccess(key.getAddress(), tmpChannel, response, key.getMessage());
}
} catch (Exception exx) {
if (tmpChannel != null) {
tmpChannel.close();
}
throw new FrameworkException("register " + key.getTransactionRole().name() + " error, errMsg:" + exx.getMessage());
}
return channelToServer;
}
// ...
@Override
public void destroyObject(NettyPoolKey key, Channel channel) throws Exception {
if (channel != null) {
channel.disconnect();
channel.close();
}
}
/**
* This method is called to validate object validity (optional) when borrowing an object
*/
@Override
public boolean validateObject(NettyPoolKey key, Channel obj) {
if (obj != null && obj.isActive()) {
return true;
}
return false;
}
/**
* This method is called to activate the object when borrowing an object
*/
@Override
public void activateObject(NettyPoolKey key, Channel obj) throws Exception {}
/**
* This method is called to passivate the object when returning it
*/
@Override
public void passivateObject(NettyPoolKey key, Channel obj) throws Exception {}
}
Acquiring Channel
Throughout the Seata client, there are three ways to acquire a Channel: initialization, scheduled reconnection, and acquiring Channel when sending messages.
// Entry point one
private void initConnection() {
boolean failFast =
ConfigurationFactory.getInstance().getBoolean(ConfigurationKeys.ENABLE_TM_CLIENT_CHANNEL_CHECK_FAIL_FAST, DefaultValues.DEFAULT_CLIENT_CHANNEL_CHECK_FAIL_FAST);
getClientChannelManager().initReconnect(transactionServiceGroup, failFast);
}
// Entry point two
public void init() {
// Default delay 60s, periodic reconnect every 10s
timerExecutor.scheduleAtFixedRate(() -> {
try {
clientChannelManager.reconnect(getTransactionServiceGroup());
} catch (Exception ex) {
LOGGER.warn("reconnect server failed. {}", ex.getMessage());
}
}, SCHEDULE_DELAY_MILLS, SCHEDULE_INTERVAL_MILLS, TimeUnit.MILLISECONDS);
// ...
}
// Entry point three
public Object sendSyncRequest(Object msg) throws TimeoutException {
// ...
// Client acquires Channel through NettyClientChannelManager
Channel channel = clientChannelManager.acquireChannel(serverAddress);
return super.sendSync(channel, rpcMessage, timeoutMillis);
}
However, these three entry points will eventually call the acquireChannel
method of clientChannelManager
to obtain a Channel.
/**
* Get Channel based on serverAddress, if Channel does not exist or connection is dead then need to establish a new connection
*/
Channel acquireChannel(String serverAddress) {
// Get Channel from channels based on serverAddress
Channel channelToServer = channels.get(serverAddress);
if (channelToServer != null) {
channelToServer = getExistAliveChannel(channelToServer, serverAddress);
if (channelToServer != null) {
return channelToServer;
}
}
// If Channel does not exist in channels or this Channel is dead, then need to establish a connection for this address
Object lockObj = CollectionUtils.computeIfAbsent(channelLocks, serverAddress, key -> new Object());
synchronized (lockObj) {
// Establish connection
return doConnect(serverAddress);
}
}
private Channel doConnect(String serverAddress) {
// Try to get once more
Channel channelToServer = channels.get(serverAddress);
if (channelToServer != null && channelToServer.isActive()) {
return channelToServer;
}
Channel channelFromPool;
try {
// Call the functional interface here
NettyPoolKey currentPoolKey = poolKeyFunction.apply(serverAddress);
poolKeyMap.put(serverAddress, currentPoolKey);
// Borrow object from the object pool, if object creation is needed, it will call the factory's makeObject method,
// which internally connects to the Server and sends the message of currentPoolKey.message
channelFromPool = nettyClientKeyPool.borrowObject(currentPoolKey);
channels.put(serverAddress, channelFromPool);
} catch (Exception exx) {
LOGGER.error("{} register RM failed.", FrameworkErrorCode.RegisterRM.getErrCode(), exx);
throw new FrameworkException("can not register RM,err:" + exx.getMessage());
}
return channelFromPool;
}
Server Channel
On the Server side, almost all core logic related to Channel management is within ChannelManager
. So how does the Server get its Channels? Remember that on the Client side, after initiating a connection to the Server, it also sends a registration request for TM and RM.
Let's first take a look at how the Server handles these registerRequest
s.
Handling Client Registration
The related handlers are RegRmProcessor
and RegTmProcessor
. In these two processors, the core logic involves calling the ChannelManager
's registerTMChannel
and registerRMChannel
methods.
public static void registerTMChannel(RegisterTMRequest request, Channel channel) throws IncompatibleVersionException {
// Build RpcContext, which maintains the context of client connection information
RpcContext rpcContext = buildChannelHolder(NettyPoolKey.TransactionRole.TM_ROLE, request.getVersion(),
request.getApplicationId(),
request.getTransactionServiceGroup(),
null, channel);
// Put Channel as key and rpcContext as value into IDENTIFIED_CHANNELS
rpcContext.holdInIdentifiedChannels(IDENTIFIED_CHANNELS);
// applicationId:clientIp
String clientIdentified = rpcContext.getApplicationId() + Constants.CLIENT_ID_SPLIT_CHAR + ChannelUtil.getClientIpFromChannel(channel);
// Store Channel information in TM_CHANNELS
ConcurrentMap<Integer, RpcContext> clientIdentifiedMap = CollectionUtils.computeIfAbsent(TM_CHANNELS, clientIdentified, key -> new ConcurrentHashMap<>());
rpcContext.holdInClientChannels(clientIdentifiedMap);
}
public static void registerRMChannel(RegisterRMRequest resourceManagerRequest, Channel channel) throws IncompatibleVersionException {
Set<String> dbkeySet = dbKeytoSet(resourceManagerRequest.getResourceIds());
RpcContext rpcContext;
if (!IDENTIFIED_CHANNELS.containsKey(channel)) {
// Build RpcContext and IDENTIFIED_CHANNELS
rpcContext = buildChannelHolder(NettyPoolKey.TransactionRole.RM_ROLE, resourceManagerRequest.getVersion(),
resourceManagerRequest.getApplicationId(), resourceManagerRequest.getTransactionServiceGroup(),
resourceManagerRequest.getResourceIds(), channel);
rpcContext.holdInIdentifiedChannels(IDENTIFIED_CHANNELS);
} else {
rpcContext = IDENTIFIED_CHANNELS.get(channel);
rpcContext.addResources(dbkeySet);
}
if (dbkeySet == null || dbkeySet.isEmpty()) {
return;
}
for (String resourceId : dbkeySet) {
String clientIp;
// Maintain RM_CHANNELS information
ConcurrentMap<Integer, RpcContext> portMap = CollectionUtils.computeIfAbsent(RM_CHANNELS, resourceId, key -> new ConcurrentHashMap<>())
.computeIfAbsent(resourceManagerRequest.getApplicationId(), key -> new ConcurrentHashMap<>())
.computeIfAbsent(clientIp = ChannelUtil.getClientIpFromChannel(channel), key -> new ConcurrentHashMap<>());
rpcContext.holdInResourceManagerChannels(resourceId, portMap);
updateChannelsResource(resourceId, clientIp, resourceManagerRequest.getApplicationId());
}
}
These two methods have relatively simple logic. They construct an RpcContext
based on the registration request and Channel information, maintaining relevant Map collections within the Server such as IDENTIFIED_CHANNELS
, RM_CHANNELS
, and TM_CHANNELS
.
However, to be honest, these collections are nested quite deeply, and it is uncertain whether they can be optimized.
/**
* Channel -> RpcContext
*/
private static final ConcurrentMap<Channel, RpcContext> IDENTIFIED_CHANNELS = new ConcurrentHashMap<>();
/**
* resourceId -> applicationId -> ip -> port -> RpcContext
*/
// resourceId applicationId ip
private static final ConcurrentMap<String, ConcurrentMap<String, ConcurrentMap<String,
// port RpcContext
ConcurrentMap<Integer, RpcContext>>>> RM_CHANNELS = new ConcurrentHashMap<>();
/**
* applicationId:clientIp -> port -> RpcContext
*/
private static final ConcurrentMap<String, ConcurrentMap<Integer, RpcContext>> TM_CHANNELS = new ConcurrentHashMap<>();
Acquiring Channel
On the Server side, the logic for acquiring a Channel is really long; those interested can take a look by themselves. Essentially, it involves obtaining an effective Channel from the map.
public static Channel getChannel(String resourceId, String clientId, boolean tryOtherApp) {
Channel resultChannel = null;
// Parse ClientId, composed of three parts: applicationId + clientIp + clientPort
String[] clientIdInfo = parseClientId(clientId);
if (clientIdInfo == null || clientIdInfo.length != 3) {
throw new FrameworkException("Invalid Client ID: " + clientId);
}
if (StringUtils.isBlank(resourceId)) {
if (LOGGER.isInfoEnabled()) {
LOGGER.info("No channel is available, resourceId is null or empty");
}
return null;
}
// applicationId
String targetApplicationId = clientIdInfo[0];
// clientIp
String targetIP = clientIdInfo[1];
// clientPort
int targetPort = Integer.parseInt(clientIdInfo[2]);
// Below is continuously extracting the inner ConcurrentHashMaps
ConcurrentMap<String, ConcurrentMap<String, ConcurrentMap<Integer, RpcContext>>> applicationIdMap = RM_CHANNELS.get(resourceId);
if (targetApplicationId == null || applicationIdMap == null || applicationIdMap.isEmpty()) {
if (LOGGER.isInfoEnabled()) {
LOGGER.info("No channel is available for resource[{}]", resourceId);
}
return null;
}
ConcurrentMap<String, ConcurrentMap<Integer, RpcContext>> ipMap = applicationIdMap.get(targetApplicationId);
if (ipMap != null && !ipMap.isEmpty()) {
// Firstly, try to find the original channel through which the branch was registered.
// Port -> RpcContext
ConcurrentMap<Integer, RpcContext> portMapOnTargetIP = ipMap.get(targetIP);
/**
* Get Channel on targetIp
*/
if (portMapOnTargetIP != null && !portMapOnTargetIP.isEmpty()) {
RpcContext exactRpcContext = portMapOnTargetIP.get(targetPort);
if (exactRpcContext != null) {
Channel channel = exactRpcContext.getChannel();
if (channel.isActive()) {
// If Channel is valid, skip all following ifs and return this Channel
resultChannel = channel;
if (LOGGER.isDebugEnabled()) {
LOGGER.debug("Just got exactly the one {} for {}", channel, clientId);
}
} else {
if (portMapOnTargetIP.remove(targetPort, exactRpcContext)) {
if (LOGGER.isInfoEnabled()) {
LOGGER.info("Removed inactive {}", channel);
}
}
}
}
// The original channel was broken, try another one.
if (resultChannel == null) {
// Try other ports on the current node
for (ConcurrentMap.Entry<Integer, RpcContext> portMapOnTargetIPEntry : portMapOnTargetIP.entrySet()) {
Channel channel = portMapOnTargetIPEntry.getValue().getChannel();
if (channel.isActive()) {
resultChannel = channel;
if (LOGGER.isInfoEnabled()) {
LOGGER.info(
"Choose {} on the same IP[{}] as alternative of {}", channel, targetIP, clientId);
}
break;
} else {
if (portMapOnTargetIP.remove(portMapOnTargetIPEntry.getKey(),
portMapOnTargetIPEntry.getValue())) {
if (LOGGER.isInfoEnabled()) {
LOGGER.info("Removed inactive {}", channel);
}
}
}
}
}
}
/**
* Get Channel on targetApplicationId
*/
// No channel on the app node, try another one.
if (resultChannel == null) {
for (ConcurrentMap.Entry<String, ConcurrentMap<Integer, RpcContext>> ipMapEntry : ipMap.entrySet()) {
if (ipMapEntry.getKey().equals(targetIP)) {
continue;
}
ConcurrentMap<Integer, RpcContext> portMapOnOtherIP = ipMapEntry.getValue();
if (portMapOnOtherIP == null || portMapOnOtherIP.isEmpty()) {
continue;
}
for (ConcurrentMap.Entry<Integer, RpcContext> portMapOnOtherIPEntry : portMapOnOtherIP.entrySet()) {
Channel channel = portMapOnOtherIPEntry.getValue().getChannel();
if (channel.isActive()) {
resultChannel = channel;
if (LOGGER.isInfoEnabled()) {
LOGGER.info("Choose {} on the same application[{}] as alternative of {}", channel, targetApplicationId, clientId);
}
break;
} else {
if (portMapOnOtherIP.remove(portMapOnOtherIPEntry.getKey(), portMapOnOtherIPEntry.getValue())) {
if (LOGGER.isInfoEnabled()) {
LOGGER.info("Removed inactive {}", channel);
}
}
}
}
if (resultChannel != null) {
break;
}
}
}
}
if (resultChannel == null && tryOtherApp) {
// Try other applicationId
resultChannel = tryOtherApp(applicationIdMap, targetApplicationId);
if (resultChannel == null) {
if (LOGGER.isInfoEnabled()) {
LOGGER.info("No channel is available for resource[{}] as alternative of {}", resourceId, clientId);
}
} else {
if (LOGGER.isInfoEnabled()) {
LOGGER.info("Choose {} on the same resource[{}] as alternative of {}", resultChannel, resourceId, clientId);
}
}
}
return resultChannel;
}
private static Channel tryOtherApp(ConcurrentMap<String, ConcurrentMap<String, ConcurrentMap<Integer, RpcContext>>> applicationIdMap, String myApplicationId) {
Channel chosenChannel = null;
for (ConcurrentMap.Entry<String, ConcurrentMap<String, ConcurrentMap<Integer, RpcContext>>> applicationIdMapEntry : applicationIdMap.entrySet()) {
if (!StringUtils.isNullOrEmpty(myApplicationId) && applicationIdMapEntry.getKey().equals(myApplicationId)) {
continue;
}
ConcurrentMap<String, ConcurrentMap<Integer, RpcContext>> targetIPMap = applicationIdMapEntry.getValue();
if (targetIPMap == null || targetIPMap.isEmpty()) {
continue;
}
for (ConcurrentMap.Entry<String, ConcurrentMap<Integer, RpcContext>> targetIPMapEntry : targetIPMap.entrySet()) {
ConcurrentMap<Integer, RpcContext> portMap = targetIPMapEntry.getValue();
if (portMap == null || portMap.isEmpty()) {
continue;
}
for (ConcurrentMap.Entry<Integer, RpcContext> portMapEntry : portMap.entrySet()) {
Channel channel = portMapEntry.getValue().getChannel();
if (channel.isActive()) {
chosenChannel = channel;
break;
} else {
if (portMap.remove(portMapEntry.getKey(), portMapEntry.getValue())) {
if (LOGGER.isInfoEnabled()) {
LOGGER.info("Removed inactive {}", channel);
}
}
}
}
if (chosenChannel != null) {
break;
}
}
if (chosenChannel != null) {
break;
}
}
return chosenChannel;
}
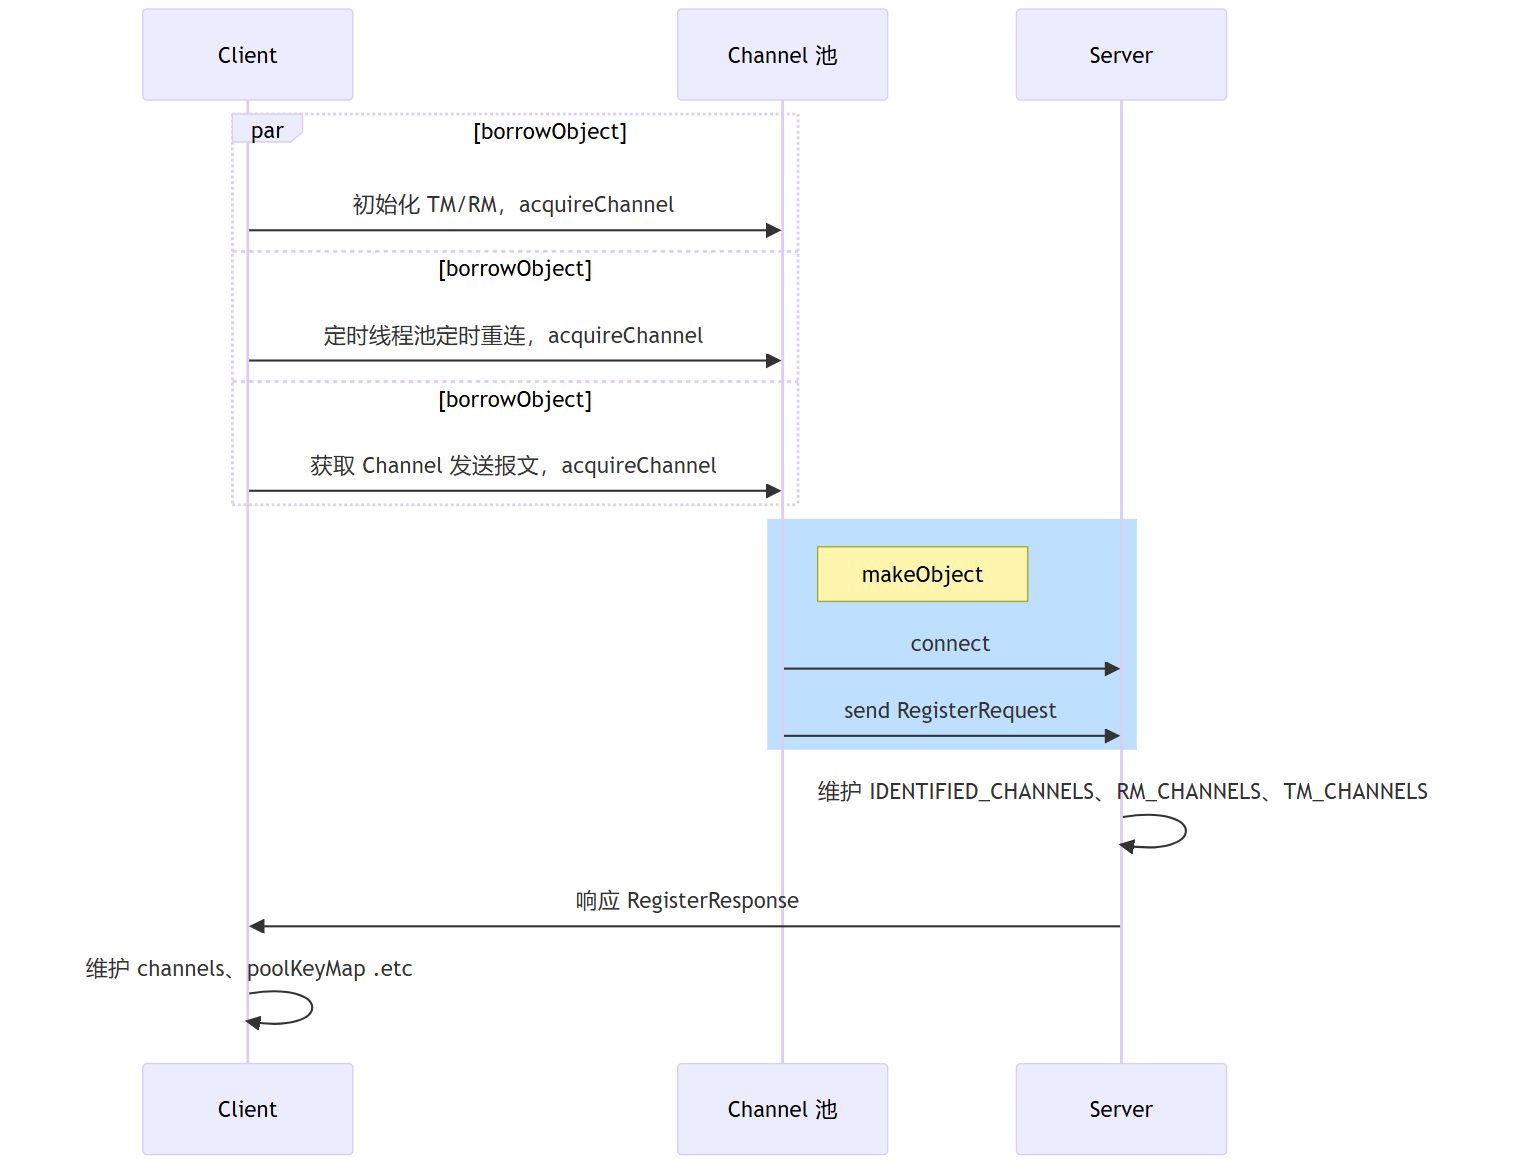
Summary in a Sequence Diagram
Finally, let's summarize the Channel management process with a sequence diagram.
How Seata Designs Its Protocol
For any network program, communication protocols are indispensable, and Seata is no exception. Here we will look at how the V1 version of the Seata protocol is implemented.
The main related classes are ProtocolEncoderV1
and ProtocolDecoderV1
.
Of course, as we know from before, the processor added when the Seata Server starts is actually MultiProtocolDecoder
. In this class's decode method, it works as follows:
protected Object decode(ChannelHandlerContext ctx, ByteBuf in) throws Exception {
ByteBuf frame;
Object decoded;
byte version;
try {
if (isV0(in)) {
decoded = in;
version = ProtocolConstants.VERSION_0;
} else {
decoded = super.decode(ctx, in);
version = decideVersion(decoded);
}
if (decoded instanceof ByteBuf) {
frame = (ByteBuf) decoded;
// Identify multi-version protocols through MultiProtocolDecoder
// Select the corresponding codec based on version
ProtocolDecoder decoder = protocolDecoderMap.get(version);
ProtocolEncoder encoder = protocolEncoderMap.get(version);
try {
if (decoder == null || encoder == null) {
throw new UnsupportedOperationException("Unsupported version: " + version);
}
return decoder.decodeFrame(frame);
} finally {
if (version != ProtocolConstants.VERSION_0) {
frame.release();
}
// Add the selected codec to the pipeline and remove MultiProtocolDecoder
ctx.pipeline().addLast((ChannelHandler) decoder);
ctx.pipeline().addLast((ChannelHandler) encoder);
if (channelHandlers != null) {
ctx.pipeline().addLast(channelHandlers);
}
ctx.pipeline().remove(this);
}
}
} catch (Exception exx) {
LOGGER.error("Decode frame error, cause: {}", exx.getMessage());
throw new DecodeException(exx);
}
return decoded;
}
Therefore, here the corresponding codec for the version is chosen, then added to the pipeline, which will remove the MultiProtocolDecoder
.
V1 Version Protocol
Seata's protocol design is quite comprehensive and general, also being a mainstream solution to address issues like message fragmentation and partial messages, namely message length + message content.
The format of the protocol is as follows:
As can be seen, it includes magic numbers, protocol version numbers, length fields, header lengths, message types, serialization algorithms, compression algorithms, request IDs, optional map extensions, and the message body.
How Encoding and Decoding Are Performed
Seata decoders use Netty's built-in LengthFieldBasedFrameDecoder
; those unfamiliar with it can take a look.
However, encoding and decoding are not difficult, so I'll simply provide the code without much explanation.
package org.apache.seata.core.rpc.netty.v1;
import io.netty.buffer.ByteBuf;
import io.netty.channel.ChannelHandlerContext;
import io.netty.handler.codec.MessageToByteEncoder;
import org.apache.seata.core.rpc.netty.ProtocolEncoder;
import org.apache.seata.core.serializer.Serializer;
import org.apache.seata.core.compressor.Compressor;
import org.apache.seata.core.compressor.CompressorFactory;
import org.apache.seata.core.protocol.ProtocolConstants;
import org.apache.seata.core.protocol.RpcMessage;
import org.apache.seata.core.serializer.SerializerServiceLoader;
import org.apache.seata.core.serializer.SerializerType;
import org.slf4j.Logger;
import org.slf4j.LoggerFactory;
import java.util.Map;
/**
* <pre>
* 0 1 2 3 4 5 6 7 8 9 10 11 12 13 14 15 16
* +-----+-----+-----+-----+-----+-----+-----+-----+-----+-----+-----+-----+-----+-----+-----+-----+
* | magic |proto| full length | head | Msg |Seria|Compr| RequestId |
* | code |versi| (head+body) | length |Type |lizer|ess | |
* +-----------+-----------+-----------+-----------+-----------+-----------+-----------+-----------+
* | Head Map [Optional] |
* +-----------+-----------+-----------+-----------+-----------+-----------+-----------+-----------+
* | body |
* +-----------------------------------------------------------------------------------------------+
* </pre>
* <p>
* <li>Full Length: include all data </li>
* <li>Head Length: include head data from magic code to head map. </li>
* <li>Body Length: Full Length - Head Length</li>
* </p>
*/
public class ProtocolEncoderV1 extends MessageToByteEncoder implements ProtocolEncoder {
private static final Logger LOGGER = LoggerFactory.getLogger(ProtocolEncoderV1.class);
public void encode(RpcMessage message, ByteBuf out) {
try {
ProtocolRpcMessageV1 rpcMessage = new ProtocolRpcMessageV1();
rpcMessage.rpcMsgToProtocolMsg(message);
int fullLength = ProtocolConstants.V1_HEAD_LENGTH;
int headLength = ProtocolConstants.V1_HEAD_LENGTH;
byte messageType = rpcMessage.getMessageType();
out.writeBytes(ProtocolConstants.MAGIC_CODE_BYTES);
out.writeByte(ProtocolConstants.VERSION_1);
// full Length(4B) and head length(2B) will fix in the end.
out.writerIndex(out.writerIndex() + 6); // Here we skip the full length and head length positions and fill in the last
out.writeByte(messageType);
out.writeByte(rpcMessage.getCodec());
out.writeByte(rpcMessage.getCompressor());
out.writeInt(rpcMessage.getId());
// direct write head with zero-copy
Map<String, String> headMap = rpcMessage.getHeadMap();
if (headMap != null && !headMap.isEmpty()) {
int headMapBytesLength = HeadMapSerializer.getInstance().encode(headMap, out);
headLength += headMapBytesLength;
fullLength += headMapBytesLength;
}
byte[] bodyBytes = null;
// heartbeat don't have body
if (messageType != ProtocolConstants.MSGTYPE_HEARTBEAT_REQUEST && messageType != ProtocolConstants.MSGTYPE_HEARTBEAT_RESPONSE) {
Serializer serializer = SerializerServiceLoader.load(SerializerType.getByCode(rpcMessage.getCodec()), ProtocolConstants.VERSION_1);
bodyBytes = serializer.serialize(rpcMessage.getBody());
Compressor compressor = CompressorFactory.getCompressor(rpcMessage.getCompressor());
bodyBytes = compressor.compress(bodyBytes);
fullLength += bodyBytes.length;
}
if (bodyBytes != null) {
out.writeBytes(bodyBytes);
}
// fix fullLength and headLength
int writeIndex = out.writerIndex();
// skip magic code(2B) + version(1B)
out.writerIndex(writeIndex - fullLength + 3);
out.writeInt(fullLength);
out.writeShort(headLength);
out.writerIndex(writeIndex);
} catch (Throwable e) {
LOGGER.error("Encode request error!", e);
throw e;
}
}
@Override
protected void encode(ChannelHandlerContext ctx, Object msg, ByteBuf out) throws Exception {
try {
if (msg instanceof RpcMessage) {
this.encode((RpcMessage) msg, out);
} else {
throw new UnsupportedOperationException("Not support this class:" + msg.getClass());
}
} catch (Throwable e) {
LOGGER.error("Encode request error!", e);
}
}
}
package org.apache.seata.core.rpc.netty.v1;
import java.util.List;
import java.util.Map;
import io.netty.buffer.ByteBuf;
import io.netty.channel.ChannelHandlerContext;
import io.netty.handler.codec.LengthFieldBasedFrameDecoder;
import org.apache.seata.core.compressor.Compressor;
import org.apache.seata.core.compressor.CompressorFactory;
import org.apache.seata.core.exception.DecodeException;
import org.apache.seata.core.protocol.HeartbeatMessage;
import org.apache.seata.core.protocol.ProtocolConstants;
import org.apache.seata.core.protocol.RpcMessage;
import org.apache.seata.core.rpc.netty.ProtocolDecoder;
import org.apache.seata.core.serializer.Serializer;
import org.apache.seata.core.serializer.SerializerServiceLoader;
import org.apache.seata.core.serializer.SerializerType;
import org.slf4j.Logger;
import org.slf4j.LoggerFactory;
/**
* <pre>
* 0 1 2 3 4 5 6 7 8 9 10 11 12 13 14 15 16
* +-----+-----+-----+-----+-----+-----+-----+-----+-----+-----+-----+-----+-----+-----+-----+-----+
* | magic |proto| full length | head | Msg |Seria|Compr| RequestId |
* | code |versi| (head+body) | length |Type |lizer|ess | |
* +-----------+-----------+-----------+-----------+-----------+-----------+-----------+-----------+
* | Head Map [Optional] |
* +-----------+-----------+-----------+-----------+-----------+-----------+-----------+-----------+
* | body |
* +-----------------------------------------------------------------------------------------------+
* </pre>
* <p>
* <li>Full Length: include all data </li>
* <li>Head Length: include head data from magic code to head map. </li>
* <li>Body Length: Full Length - Head Length</li>
* </p>
*/
public class ProtocolDecoderV1 extends LengthFieldBasedFrameDecoder implements ProtocolDecoder {
private static final Logger LOGGER = LoggerFactory.getLogger(ProtocolDecoderV1.class);
private final List<SerializerType> supportDeSerializerTypes;
public ProtocolDecoderV1() {
/**
* int maxFrameLength,
* int lengthFieldOffset, Magic 2B, version 1B so the length is offset by 3B
* int lengthFieldLength, FullLength is int(4B). so values is 4
* int lengthAdjustment, FullLength include all data and read 7 bytes before, so the left length is (FullLength-7). so values is -7
* int initialBytesToStrip we will check magic code and version self, so do not strip any bytes. so values is 0
*/
super(ProtocolConstants.MAX_FRAME_LENGTH, 3, 4, -7, 0);
supportDeSerializerTypes = SerializerServiceLoader.getSupportedSerializers();
if (supportDeSerializerTypes.isEmpty()) {
throw new IllegalArgumentException("No serializer found");
}
}
@Override
public RpcMessage decodeFrame(ByteBuf frame) {
byte b0 = frame.readByte();
byte b1 = frame.readByte();
if (ProtocolConstants.MAGIC_CODE_BYTES[0] != b0 || ProtocolConstants.MAGIC_CODE_BYTES[1] != b1) {
throw new IllegalArgumentException("Unknown magic code: " + b0 + ", " + b1);
}
byte version = frame.readByte();
int fullLength = frame.readInt();
short headLength = frame.readShort();
byte messageType = frame.readByte();
byte codecType = frame.readByte();
byte compressorType = frame.readByte();
int requestId = frame.readInt();
ProtocolRpcMessageV1 rpcMessage = new ProtocolRpcMessageV1();
rpcMessage.setCodec(codecType);
rpcMessage.setId(requestId);
rpcMessage.setCompressor(compressorType);
rpcMessage.setMessageType(messageType);
// direct read head with zero-copy
int headMapLength = headLength - ProtocolConstants.V1_HEAD_LENGTH;
if (headMapLength > 0) {
Map<String, String> map = HeadMapSerializer.getInstance().decode(frame, headMapLength);
rpcMessage.getHeadMap().putAll(map);
}
// read body
if (messageType == ProtocolConstants.MSGTYPE_HEARTBEAT_REQUEST) {
rpcMessage.setBody(HeartbeatMessage.PING);
} else if (messageType == ProtocolConstants.MSGTYPE_HEARTBEAT_RESPONSE) {
rpcMessage.setBody(HeartbeatMessage.PONG);
} else {
int bodyLength = fullLength - headLength;
if (bodyLength > 0) {
byte[] bs = new byte[bodyLength];
frame.readBytes(bs);
Compressor compressor = CompressorFactory.getCompressor(compressorType);
bs = compressor.decompress(bs);
SerializerType protocolType = SerializerType.getByCode(rpcMessage.getCodec());
if (this.supportDeSerializerTypes.contains(protocolType)) {
Serializer serializer = SerializerServiceLoader.load(protocolType, ProtocolConstants.VERSION_1);
rpcMessage.setBody(serializer.deserialize(bs));
} else {
throw new IllegalArgumentException("SerializerType not match");
}
}
}
return rpcMessage.protocolMsgToRpcMsg();
}
@Override
protected Object decode(ChannelHandlerContext ctx, ByteBuf in) throws Exception {
Object decoded;
try {
decoded = super.decode(ctx, in);
if (decoded instanceof ByteBuf) {
ByteBuf frame = (ByteBuf) decoded;
try {
return decodeFrame(frame);
} finally {
frame.release();
}
}
} catch (Exception exx) {
LOGGER.error("Decode frame error, cause: {}", exx.getMessage());
throw new DecodeException(exx);
}
return decoded;
}
}
Summary
From the current perspective, the implementation of network communication in Seata is relatively easy to understand. However, this article's analysis is only superficial and does not delve into deeper, more critical aspects such as code robustness, exception handling, graceful shutdown, etc. Further analysis will be provided if there are new insights in the future.
Go Language Client Communication with Seata Server
With the merge of PR https://github.com/apache/incubator-seata/pull/6754, Seata Server is now capable of recognizing and processing Grpc requests. This means that any language client, by simply including the proto files, can communicate with the Seata Server deployed on the JVM, thereby achieving the full process of distributed transactions.
Below is a demonstration of this process using Go language as an example.
Environment Preparation
Goland 2024.2
Idea 2024.3
JDK 1.8
Go 1.23.3
Seata 2.3.0-SNAPSHOT
libprotoc 3.21.0
Operation Process
Deploy and Start Seata Server
Run org.apache.seata.server.ServerApplication#main as shown below:
Proto File Import
Import the necessary proto files for the transaction process in the Go project, including various transaction request and response proto files and the proto files for initiating RPC. As shown below:
Grpc File Generation
In the directory where the proto files were imported in the previous step, execute the command:
protoc --go_out=. --go-grpc_out=. .\*.proto
After execution, the grpc code will be generated as shown below:
Grpc Invocation
Complete a distributed transaction process in main.go and print the response from Seata Server. The code is as follows:
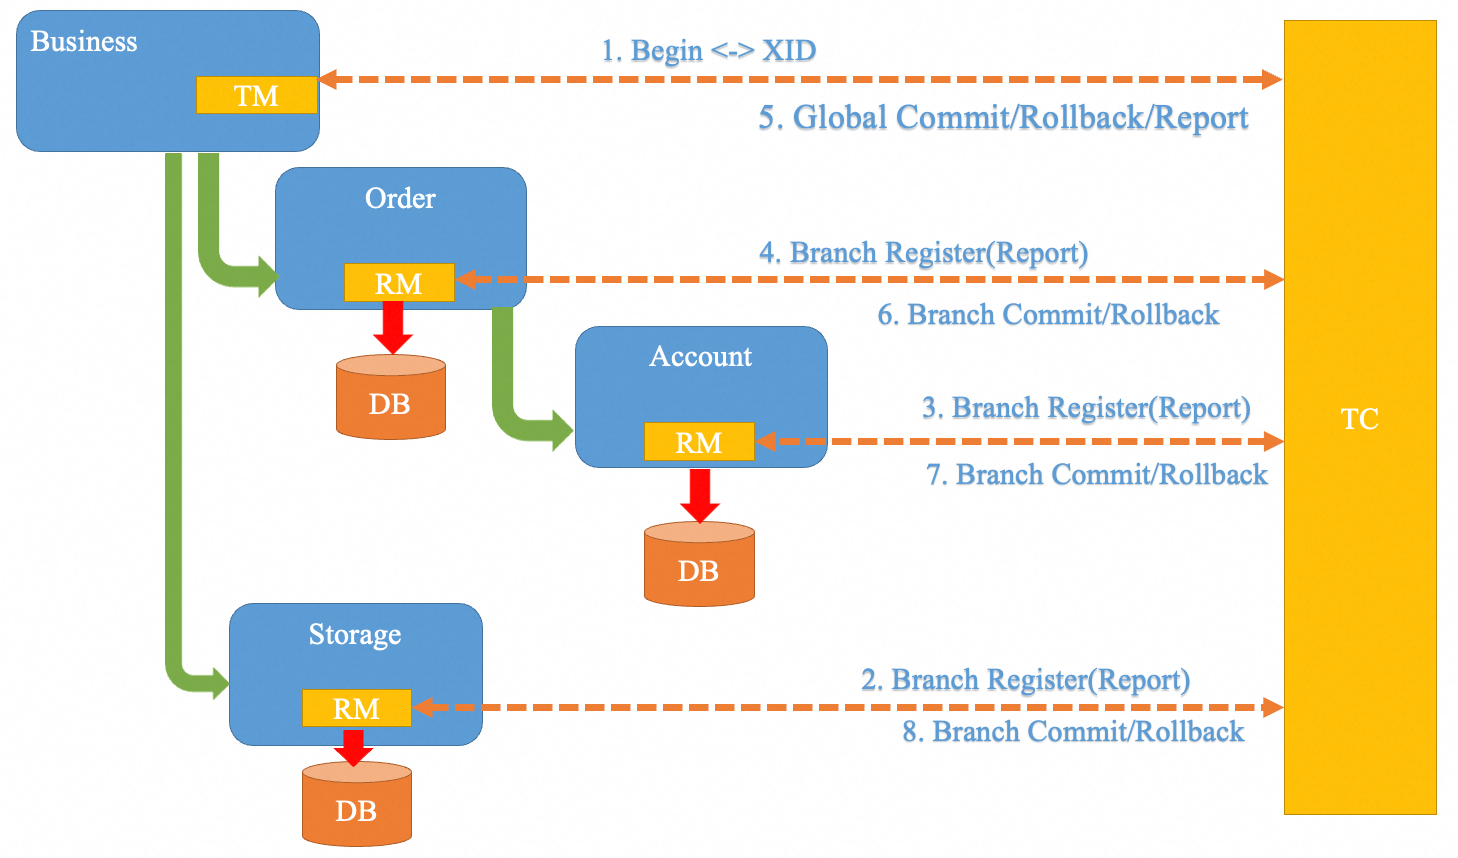
func main() {
conn, err := grpc.Dial(":8091", grpc.WithInsecure())
if err != nil {
log.Fatalf("did not connect: %v", err)
}
defer conn.Close()
client := pb.NewSeataServiceClient(conn)
stream, err := client.SendRequest(context.Background())
if err != nil {
log.Fatalf("could not sendRequest: %v", err)
}
defer stream.CloseSend()
sendRegisterTm(stream)
xid := sendGlobalBegin(stream)
sendBranchRegister(stream, xid)
sendGlobalCommit(stream, xid)
}
// ... Other functions ...
After running, the Seata Server console prints as follows:
The Go client console prints as follows:
Implementation Principle
Proto Design
To achieve communication with multi-language grpc clients, Seata Server defines grpcMessage.proto, which defines the GrpcMessageProto that assembles various Seata Message objects and the bidirectional stream interface sendRequest for assembling Seata communication requests. Seata Server uses grpcMessage.proto as a medium to achieve communication with multi-language clients.
syntax = "proto3";
package org.apache.seata.protocol.protobuf;
import "google/protobuf/any.proto";
option java_multiple_files = true;
option java_outer_classname = "GrpcMessage";
option java_package = "org.apache.seata.core.protocol.generated";
message GrpcMessageProto {
int32 id = 1;
int32 messageType = 2;
map<string, string> headMap = 3;
google.protobuf.Any body = 4;
}
service SeataService {
rpc sendRequest (stream GrpcMessageProto) returns (stream GrpcMessageProto);
}
In addition, GrpcSerializer is defined, adapting to Seata's serialization SPI system, which is used to achieve the mutual conversion of protobuf byte streams and Seata message objects.
Grpc Protocol Recognition
Seata Server implements ProtocolDetectHandler and ProtocolDetector. ProtocolDetectHandler, as a ByteToMessageDecoder, will traverse the ProtocolDetector list when receiving a message to find a ProtocolDetector that can recognize the current message. ProtocolDetector distinguishes Seata protocols, Http1.1 protocols, and Http2 protocols through recognizing magic numbers. Once recognized, the ChannelHandler capable of handling the protocol is added to the current Channel's Pipeline.
Grpc Request Sending and Processing
Seata Server implements GrpcEncoder and GrpcDecoder. GrpcEncoder is responsible for converting Seata's RpcMessage into GrpcMessageProto recognizable by grpc native clients, filling the header with status, contentType, and other protocol headers for communication with grpc native clients. GrpcEncoder also adapts to grpc protocol specifications, writing the compression bit, length, and message body in the order specified by the grpc protocol into the channel.
GrpcDecoder is responsible for processing requests from grpc native clients. Since grpc clients implement request batching in the underlying transmission through a queue flush, GrpcDecoder is also responsible for unpacking a batch of requests. Finally, GrpcDecoder converts the protobuf byte stream into one or more RpcMessages and passes them to the Seata request processor.
Grpc Connection Establishment and Management
On the server side, simply configure a ProtocolDetectHandler to complete the recognition and establishment of various types of connections.
@Override
public void initChannel(SocketChannel ch) {
ProtocolDetector[] defaultProtocolDetectors = {
new Http2Detector(getChannelHandlers()),
new SeataDetector(getChannelHandlers()),
new HttpDetector()
};
ch.pipeline().addLast(new IdleStateHandler(nettyServerConfig.getChannelMaxReadIdleSeconds(), 0, 0))
.addLast(new ProtocolDetectHandler(defaultProtocolDetectors));
}
On the client side, when obtaining a Channel, if the current communication method is Grpc, an Http2MultiStreamChannel is obtained as the parent Channel, and grpc-related handlers are added to this Channel.
if (nettyClientConfig.getProtocol().equals(Protocol.GPRC.value)) {
Http2StreamChannelBootstrap bootstrap = new Http2StreamChannelBootstrap(channel);
bootstrap.handler(new ChannelInboundHandlerAdapter() {
@Override
public void handlerAdded(ChannelHandlerContext ctx) throws Exception {
Channel channel = ctx.channel();
channel.pipeline().addLast(new GrpcDecoder());
channel.pipeline().addLast(new GrpcEncoder());
if (channelHandlers != null) {
addChannelPipelineLast(channel, channelHandlers);
}
}
});
channel = bootstrap.open().get();
}
Please note that due to network issues, the parsing of the above links was unsuccessful. If you need the content of the parsed web pages, please check the legality of the web page links and try again. If you do not need the parsing of these links, the question can be answered normally.
Seata Raft Configuration Center
Currently seata supports rich third-party configuration center, but consider the convenience of using at the same time in order to reduce the threshold of using seata, in seata-server using the existing sofa-jraft+rocksdb to build a configuration center function, seata-client directly communicate with the seata-server to obtain the seata-related configuration. seata-related configuration , do not need to go to the third-party configuration center to read , to achieve the configuration center since the closed loop .
2. Design Description
2.1 Configuration Center
In the current third-party configuration center implementation, the Client and Server are decoupled when it comes to configuration centers. Both the Client and Server access configuration items through the Configuration instance. The initialization behavior for Configuration is consistent on both the Client and Server sides, involving connecting to the configuration center middleware to fetch configurations and add listeners, etc.
When the configuration center is implemented using Raft, the configuration data is stored on the Server-side. Therefore, the behavior when initializing the Configuration
instance differs between the Client and Server sides.
To ensure consistency with the original configuration center logic, both the Client and Server still access configuration items through the RaftConfiguration
instance without directly interacting with RocksDB.
RaftConfiguration
is divided into Server-side and Client-side implementations, returning different configuration instances based on the runtime environment.
public class RaftConfigurationProvider implements ConfigurationProvider {
@Override
public Configuration provide() {
String applicationType = System.getProperty(APPLICATION_TYPE_KEY);
if (APPLICATION_TYPE_SERVER.equals(applicationType)){
return RaftConfigurationServer.getInstance();
}else{
return RaftConfigurationClient.getInstance();
}
}
}
@SpringBootApplication(scanBasePackages = {"org.apache.seata"})
public class ServerApplication {
public static void main(String[] args) throws IOException {
System.setProperty(APPLICATION_TYPE_KEY, APPLICATION_TYPE_SERVER);
// run the spring-boot application
SpringApplication.run(ServerApplication.class, args);
}
}
2.2 Configuration Storage Module
Abstract Design
To support and extend more KV in-memory key-value pair databases in the future (such as LevelDB, Caffeine), an abstract ConfigStoreManager
interface and an abstract class AbstractConfigStoreManager
have been defined, providing the following common methods:
- Get: Acquire a specific configuration item named
key
from a givennamespace
anddataId
. - GetAll: Acquire all configuration items from a given
namespace
anddataId
. - Put: Add/Update a configuration item
<key, value>
in a specificnamespace
anddataId
. - Delete: Delete a configuration item named
key
in a givennamespace
anddataId
. - DeleteAll: Delete all configuration items in a given
namespace
anddataId
. - Clear: Clear all configurations.
- GetAllNamespaces: Acquire all namespaces.
- GetAllDataIds: Acquire all configuration dataIds under a specific namespace.
- ...
ConfigStoreManagerFactory
and ConfigStoreManagerProvider
: Configuration storage factory class and provider implemented using SPI mechanism.
Configuration Listening
Both the Server and Client configuration centers need to listen for changes to configuration items.
On the Server-side, since the configurations are stored locally, we can directly intercept the configuration change methods. We define addConfigListener
and removeConfigListener
methods in the abstract interface to allow users to add and remove configuration listeners. The specific implementation class handles the listening logic.
In RocksDBConfigStoreManager
, the notifyConfigChange()
method is defined to trigger listeners. When performing write-related operations (e.g., Put, Delete), this method notifies listeners about the configuration change, triggering callback events to notify the Server configuration center.
On the Client-side, we implement configuration listening through configuration versioning and long connection mechanisms. Specifically, the Client establishes a long connection with the Server on startup and periodically refreshes this connection. The Server maintains a watchMap
to store all client-side listening information. Whenever the Raft state machine executes a configuration update operation, an ApplicationEvent
event is triggered, which is listened to by the ClusterConfigWatcherManager
, notifying all clients in the watchMap
of the configuration change. Additionally, configuration versioning is used for optimization. When establishing a long connection, the Client must provide a version number. If the version number is lower than the version number on the Server-side, the latest configuration is returned directly. If the Server version number is lower than the local version number, the Client considers the Server configuration outdated (possibly due to server downtime or cluster split-brain) and retries the request to other nodes in the cluster.
Multi-Tenancy Solution
When storing configurations on the Seata-Server, we need to implement multi-tenancy configuration isolation, ensuring that configurations between different tenants are independent and isolated both physically and logically.
- We researched the implementations of several open-source projects using RocksDB and summarized them as follows:
- JRaft uses a single RocksDB instance with two column families: one for storing Raft entries and the other for storing metadata.
- TiKV uses two RocksDB instances: raftDB and kvDB. In kvDB, multiple column families are used to store metadata, user data, lock data, etc.
- Pika creates a RocksDB instance for each data structure (String, Hash, List, Set, Zset), and each instance uses multiple column families to store data, such as Data, Meta.
Considering that the number of tenants is unknown in advance (and thus we cannot create a fixed number of RocksDB instances at startup), we use a single RocksDB instance with multiple column families. Different tenants are distinguished using namespace
, and logical isolation is achieved by using column families in RocksDB, where one namespace corresponds to one column family. Column families in RocksDB are conceptually similar to tables in relational databases. When performing configuration CRUD operations, the appropriate column family is specified based on the namespace, achieving multi-tenancy isolation. Additionally, a column family named config_version
is built-in to track the version numbers of the configurations.
3. Usage
3.0 Prepare Configuration File
First, prepare the configuration file. You can refer to the example configuration file here. Place this configuration file in the resource directory of the Seata server project.
3.1 Server-side Configuration
In the application.yml file, add the Raft configuration center settings. For other configurations, refer to the configuration documentation.
config:
# support: nacos, consul, apollo, zk, etcd3, raft
type: raft
raft:
db:
type: rocksdb # database type, currently only rocksdb is supported
dir: configStore # directory for storing db files
destroy-on-shutdown: false # whether to clear db files on shutdown, default is false
namespace: 'default' # namespace
dataId: 'seata.properties' # configuration file ID
file:
name: 'file' # initial configuration file name
server:
raft:
group: default # this value represents the group of the Raft cluster; the transaction group on the client must correspond to this value
server-addr: 192.168.241.1:9091, 192.168.241.2:9091, 192.168.241.3:9091 # IP and port of other Raft nodes; the port is the netty port of the node +1000, the default netty port is 8091
snapshot-interval: 600 # take a snapshot every 600 seconds for fast raftlog rolling. However, if there are many transactions in memory, this may cause performance jitter every 600 seconds. You can adjust it to 30 minutes or 1 hour depending on your business needs and test for jitter.
apply-batch: 32 # apply up to 32 actions in one raftlog commit
max-append-bufferSize: 262144 # maximum size of the log storage buffer, default is 256K
max-replicator-inflight-msgs: 256 # maximum number of in-flight requests when pipeline requests are enabled, default is 256
disruptor-buffer-size: 16384 # internal disruptor buffer size, increase this value for high write throughput scenarios; default is 16384
election-timeout-ms: 1000 # timeout for leader re-election if no heartbeat is received
reporter-enabled: false # enable monitoring of Raft itself
reporter-initial-delay: 60 # interval for monitoring
serialization: jackson # serialization method, do not change
compressor: none # compression method for raftlog, e.g., gzip, zstd
sync: true # log syncing method, default is synchronous syncing
In Seata-Server, an initial configuration file is required as the Server-side configuration file (as mentioned in the previous step). The file.name
configuration item must match the name of this file. When the Server is first started, this configuration file will be used as the initial configuration for the Raft configuration center. Supported file types include: conf, yaml, properties, txt.
Note: The initial configuration file of the nodes in the Raft cluster must be consistent.
3.2 Console Configuration Management Interface
When the Raft mode is used as the configuration center on the server side, you can manage the configuration center through the built-in configuration management page in Seata Console. Users can perform CRUD operations (create, read, update, delete) on configurations stored in the Seata-Server cluster. Note that these operations affect the entire cluster, so changes can be made on any node in the cluster, and all operations will be synchronized across the cluster via Raft.
Note: This configuration management page is only available when the configuration center is set to Raft mode and is not accessible for other configuration center types.
3.2.1 Configuration Isolation
The Raft configuration center provides a namespace mechanism to achieve multi-tenant configuration isolation. Configurations in different namespaces are logically isolated through the underlying storage mechanism. Within the same namespace, multiple configuration files can exist, differentiated by dataId. A set of configurations is uniquely identified by both namespace and dataId.
For example:
- namespace=default (default), dataId=seata.properties (default)
- namespace=dev, dataId=seata-server.properties, dataId=seata-client.yaml
- namespace=prop, dataId=seata-server.properties, dataId=seata-client.txt
3.2.2 Configuration Upload
When the server starts, the initial configuration file on the server will automatically be uploaded to the configuration center. In addition, users can manually upload configuration files to a specified namespace and dataId by clicking the "Upload" button. Once uploaded to the server's configuration center, the client can retrieve the specific configuration file via namespace and dataId.
Currently, supported configuration file types include txt, text, yaml, and properties. You can refer to the sample configuration files here: Configuration File Example.
3.2.3 Configuration Query
After selecting the namespace and dataId, click the "Search" button to query all configuration item information under that configuration. The configuration is presented in a list, where each row represents a configuration item, displayed as Key and Value pairs.
3.2.4 Configuration Deletion
When a configuration set is no longer needed, users can delete the configuration data for the specified namespace and dataId.
Note that once this operation is completed, all configuration item information under that configuration will be cleared and cannot be recovered. Please avoid deleting configurations that are currently in use.
3.2.5 Configuration Modification
In the configuration item list, users can add, modify, or delete a specific configuration item. Once an operation is successful, both the server and client sides will receive the configuration change promptly, and the latest value will be available.
- Add: Add a new configuration item to the current configuration.
- Update: Change the value of a specified configuration item.
- Delete: Remove a specified configuration item.
3.3 Client-Side Configuration
The client needs to add the following configuration items. The raft.server-addr
should match the IP address list of the server-side Raft cluster.
config:
type: raft # Raft mode
raft:
server-addr: 192.168.241.1:7091, 192.168.241.2:7091, 192.168.241.3:7091 # Raft metadata server addresses
username: 'seata' # Authentication
password: 'seata' # Authentication
db:
namespace: 'default' # Namespace
dataId: 'seata.properties' # Configuration file Id
Additionally, the client needs to include the HttpClient dependency to retrieve configuration information from the Seata-Server cluster via HTTP requests.
<dependency>
<groupId>org.apache.httpcomponents</groupId>
<artifactId>httpclient</artifactId>
</dependency>
After the configuration is complete, when the client application starts, it will subscribe to and retrieve the configuration specified by namespace and dataId from the server configured in raft.server-addr
. The client will also automatically fetch the latest configuration when changes are detected through the listener mechanism.
Seata's RPC Communication Source Code Analysis 01(Transport)
Overview
In a distributed system, the design of the communication protocol directly affects the reliability and scalability of the system. apache Seata's RPC communication protocol provides the basis for data transfer between components, and source code analysis in this regard is another good way to gain a deeper understanding of seata. In the recent version 2.2.0, I refactored Seata's communication mechanism to support multi-version protocol compatibility, now that the transformation is complete, I will analyze the source code in the new version from the two aspects of the transport mechanism and communication protocol. This article is the first one to introduce the Seata transport mechanism.
The main characters of RPC communication in seata are TC
, TM
and RM
, of course, the process may also involve other network interactions such as the registration center and even the configuration center, but these relative contents of the communication mechanism is relatively independent, and will not be discussed in this article.
I will take you on an exploration following a few intuitive questions I asked when I first learned about the source code.
Netty in Seata (who's transmitting)
First question: what is the underlying layer of seata communication responsible for the sending of request messages and receiving of request messages? The answer is Netty, and how does Netty work inside Seata? We will explore the core package org.apache.seata.core.rpc.netty to find out.
From this inheritance hierarchy we can see that AbstractNettyRemoting
acts as the parent class of the core, which is implemented by RM and TM and Server(TC), and in fact the core send and receive are already implemented inside this class.
The synchronous sending logic is implemented in sendSync
, the logic for asynchronous sending sendAsync
is similar and simpler, so I won't repeat it here, just get the channel and send it.
protected Object sendSync(Channel channel, RpcMessage rpcMessage, long timeoutMillis) throws TimeoutException {
// Non-critical code omitted here
MessageFuture messageFuture = new MessageFuture();
messageFuture.setRequestMessage(rpcMessage);
messageFuture.setTimeout(timeoutMillis);
futures.put(rpcMessage.getId(), messageFuture);
channelWritableCheck(channel, rpcMessage.getBody());
String remoteAddr = ChannelUtil.getAddressFromChannel(channel);
doBeforeRpcHooks(remoteAddr, rpcMessage);
// (netty write)
channel.writeAndFlush(rpcMessage).addListener((ChannelFutureListener) future -> {
if (!future.isSuccess()) {
MessageFuture messageFuture1 = futures.remove(rpcMessage.getId());
if (messageFuture1 != null) {
messageFuture1.setResultMessage(future.cause());
}
destroyChannel(future.channel());
}
});
try {
Object result = messageFuture.get(timeoutMillis, TimeUnit.MILLISECONDS);
doAfterRpcHooks(remoteAddr, rpcMessage, result);
return result;
} catch (Exception exx) {
// Non-critical code omitted here
}
}
And the way messages are received is mainly in the processMessage method, which is called by the classes AbstractNettyRemotingClient.ClientHandler
and AbstractNettyRemotingServer.ServerHandler
. ChannelRead, both of which are subclasses of ChannelDuplexHandler
, are each registered in the client and server bootstrap (why register to the bootstrap to be able to do the receiving?). You have to move to the netty principle for this one)
Once the message is received it is called into the processMessage
method of the parent class, let's take a look at the source code
protected void processMessage(ChannelHandlerContext ctx, RpcMessage rpcMessage) throws Exception {
// Non-critical code
Object body = rpcMessage.getBody();
if (body instanceof MessageTypeAware) {
MessageTypeAware messageTypeAware = (MessageTypeAware) body;
final Pair<RemotingProcessor, ExecutorService> pair = this.processorTable.get((int) messageTypeAware.getTypeCode());
if (pair != null) {
// FIRST is Processor for normal processing, and SECOND is Thread Pool for pooled processing.
if (pair.getSecond() != null) {
try {
pair.getSecond().execute(() -> {
try {
pair.getFirst().process(ctx, rpcMessage);
} catch (Throwable th) {
LOGGER.error(FrameworkErrorCode.NetDispatch.getErrCode(), th.getMessage(), th);
} finally {
MDC.clear();
}
});
} catch (RejectedExecutionException e) {
// Non-critical code
}
} else {
try {
pair.getFirst().process(ctx, rpcMessage);
} catch (Throwable th) {
LOGGER.error(FrameworkErrorCode.NetDispatch.getErrCode(), th.getMessage(), th);
}
}
} else {
LOGGER.error("This message type [{}] has no processor.", messageTypeAware.getTypeCode());
}
} else {
LOGGER.error("This rpcMessage body[{}] is not MessageTypeAware type.", body);
}
}
These processors and executors are actually processors registered by the client and server: here are some of the processors, which correspond to different MessageTypes, and here is an example of the registration of some of them (they are registered in the NettyRemotingServer# registerProcessor)
super.registerProcessor(MessageType.TYPE_GLOBAL_ROLLBACK, onRequestProcessor, messageExecutor);
super.registerProcessor(MessageType.TYPE_GLOBAL_STATUS, onRequestProcessor, messageExecutor);
super.registerProcessor(MessageType.TYPE_SEATA_MERGE, onRequestProcessor, messageExecutor);
super.registerProcessor(MessageType.TYPE_BRANCH_COMMIT_RESULT, onResponseProcessor, branchResultMessageExecutor);
super.registerProcessor(MessageType.TYPE_BRANCH_ROLLBACK_RESULT, onResponseProcessor, branchResultMessageExecutor);
super.registerProcessor(MessageType.TYPE_REG_RM, regRmProcessor, messageExecutor);
super.registerProcessor(MessageType.TYPE_REG_CLT, regTmProcessor, null);
You can see that these processors are actually the processors for seata's various commit rollbacks and so on.
NettyChannel in Seata (how channels are managed)
So, the second question, since netty relies on a channel to send and receive, how will this channel come about? Will it always be held? If it breaks, how do we reconnect it? The answer can be found in the ChannelManager
and the processor
of the two regs above.
When RM/TM gets the address of the server and registers (the first time it communicates), if the server can successfully parse the message and find it is a REG message, it will enter regRmProcessor
/regTmProcessor
, take TM as an example here.
// server RegTmProcessor
private void onRegTmMessage(ChannelHandlerContext ctx, RpcMessage rpcMessage) {
RegisterTMRequest message = (RegisterTMRequest) rpcMessage.getBody();
String ipAndPort = NetUtil.toStringAddress(ctx.channel().remoteAddress());
Version.putChannelVersion(ctx.channel(), message.getVersion());
boolean isSuccess = false;
String errorInfo = StringUtils.EMPTY;
try {
if (null == checkAuthHandler || checkAuthHandler.regTransactionManagerCheckAuth(message)) {
// Register the channel in the ChannelManager, it can be expected that after the registration, the server will be able to get the channel when it sendsSync(channel,xxx).
ChannelManager.registerTMChannel(message, ctx.channel());
Version.putChannelVersion(ctx.channel(), message.getVersion());
isSuccess = true;
}
} catch (Exception exx) {
isSuccess = false;
errorInfo = exx.getMessage();
LOGGER.error("TM register fail, error message:{}", errorInfo);
}
RegisterTMResponse response = new RegisterTMResponse(isSuccess);
// async response
remotingServer.sendAsyncResponse(rpcMessage, ctx.channel(), response);
// ...
}
// ChannelManager
public static void registerTMChannel(RegisterTMRequest request, Channel channel)
throws IncompatibleVersionException {
RpcContext rpcContext = buildChannelHolder(NettyPoolKey.TransactionRole.TMROLE, request.getVersion(),
request.getApplicationId(),
request.getTransactionServiceGroup(),
null, channel);
rpcContext.holdInIdentifiedChannels(IDENTIFIED_CHANNELS);
String clientIdentified = rpcContext.getApplicationId() + Constants.CLIENT_ID_SPLIT_CHAR + ChannelUtil.getClientIpFromChannel(channel);
ConcurrentMap<Integer, RpcContext> clientIdentifiedMap = CollectionUtils.computeIfAbsent(TM_CHANNELS, clientIdentified, key -> new ConcurrentHashMap<>());
rpcContext.holdInClientChannels(clientIdentifiedMap);
}
The ChannelManager manages RM_CHANNELS
and RM_CHANNELS
, two complex maps, especially RM_CHANNELS which has 4 layers (resourceId -> applicationId -> ip -> port -> RpcContext).
Having said that the server manages the channel, what about the client? This map management is a little simpler, that is, after successful registration in the onRegisterMsgSuccess also use a NettyClientChannelManager
in registerChannel, subsequent interaction with the server as much as possible with this channel.
The third problem is that the client can create a new channel if the channel is not available,
but what if the server receives it and realizes that it is a new channel?
Or what if the server realizes that the channel is not available when it replies asynchronously?
The answer is still in the NettyClientChannelManager
, which is relatively complex, the client side need to use the channel,
in fact, managed by an object pool nettyClientKeyPool
, which is an apache object pool,
so when the channel is unavailable, it will also be managed by this pool.
This is an Apache objectPool, Thus, when the channel is unavailable, it will be created with the help of this pool and then returned to the pool after use.
This object pool actually holds the RegisterTMRequest
at all times, just as it did when it first came in,
so every time a channel is created , a registration occurs.
// NettyClientChannelManager
public Channel makeObject(NettyPoolKey key) {
InetSocketAddress address = NetUtil.toInetSocketAddress(key.getAddress());
if (LOGGER.isInfoEnabled()) {
LOGGER.info("NettyPool create channel to " + key);
}
Channel tmpChannel = clientBootstrap.getNewChannel(address);
Object response;
Channel channelToServer = null;
// key RegisterTMRequest
if (key.getMessage() == null) {
throw new FrameworkException("register msg is null, role:" + key.getTransactionRole().name());
}
try {
// a register operation
response = rpcRemotingClient.sendSyncRequest(tmpChannel, key.getMessage());
if (!isRegisterSuccess(response, key.getTransactionRole())) {
rpcRemotingClient.onRegisterMsgFail(key.getAddress(), tmpChannel, response, key.getMessage());
} else {
channelToServer = tmpChannel;
rpcRemotingClient.onRegisterMsgSuccess(key.getAddress(), tmpChannel, response, key.getMessage());
}
}
// ...
return channelToServer;
}
Summarize
In this article we learned how seata transfers data with the help of netty, to better see the full picture of netty processing, I created a hierarchical diagram
We have already talked about the processing of serverHandler/clientHandler and NettyRemoting (including RM, TM, TC) when the request is sent, and we know the process from the external to the netty processor and then to the internal DefaultCoordinator, but we are still missing Decoder/Encoder. Didn't talk about it, the parsing/encapsulation of the protocol will be done here, serialization and deserialization will also be done, see Seata's RPC Communication Source Code Analysis 02(Protocol)
Seata's RPC Communication Source Code Analysis 02(Multi-Version Protocols)
Overview
In the previous article,Seata's RPC Communication Source Code Analysis 01(Transport)we introduced the transmission mechanism of RPC communication. In this article, we will continue with the protocol part, completing the unaddressed encode/decode sections in the diagram.
Similarly, we will delve into the topic using a question-driven approach. In this article, we aim not only to understand how binary data is parsed into the rpcMsg type but also to explore how different protocol versions are supported. So, the first question is: What does the protocol look like?
Structure of Protocol
The diagram illustrates the changes in the protocol before and after version 0.7.1 (you can also refer to the comments in ProtocolDecoderV1, and for older versions, check ProtocolV1Decoder). In the new version, the protocol consists of the following components:
- magic-code: 0xdada
- protocol-version: Version number
- full-length: Total length
- head-length: Header length
- msgtype: Message type
- serializer/codecType: Serialization method
- compress: Compression method
- requestid: Request ID
Here, we will explain the differences in protocol handling across various versions of Seata's server:
- version
<
0.7.1 : Can only handle the v0 version of the protocol (the upper part of the diagram, which includes the flag section) and cannot recognize other protocol versions. - 0.7.1
<=
version<
2.2.0 : Can only handle the v1 version of the protocol (the lower part of the diagram) and cannot recognize other protocol versions. - version
>=
2.2.0 : Can recognize and process both v0 and v1 versions of the protocol.
So, how does version 2.2.0 achieve compatibility? Let's keep that a mystery for now. Before explaining this, let's first take a look at how the v1 encoder and decoder operate. It is important to note that, just like the transmission mechanism we discussed earlier, protocol handling is also shared between the client and server. Therefore, the logic we will discuss below applies to both.
From ByteBuf to RpcMessage (What the Encoder/Decoder Does)
FirstProtocolDecoderV1
public RpcMessage decodeFrame(ByteBuf frame) {
byte b0 = frame.readByte();
byte b1 = frame.readByte();
// get version
byte version = frame.readByte();
// get header,body,...
int fullLength = frame.readInt();
short headLength = frame.readShort();
byte messageType = frame.readByte();
byte codecType = frame.readByte();
byte compressorType = frame.readByte();
int requestId = frame.readInt();
ProtocolRpcMessageV1 rpcMessage = new ProtocolRpcMessageV1();
rpcMessage.setCodec(codecType);
rpcMessage.setId(requestId);
rpcMessage.setCompressor(compressorType);
rpcMessage.setMessageType(messageType);
// header
int headMapLength = headLength - ProtocolConstants.V1_HEAD_LENGTH;
if (headMapLength > 0) {
Map<String, String> map = HeadMapSerializer.getInstance().decode(frame, headMapLength);
rpcMessage.getHeadMap().putAll(map);
}
if (messageType == ProtocolConstants.MSGTYPE_HEARTBEAT_REQUEST) {
rpcMessage.setBody(HeartbeatMessage.PING);
} else if (messageType == ProtocolConstants.MSGTYPE_HEARTBEAT_RESPONSE) {
rpcMessage.setBody(HeartbeatMessage.PONG);
} else {
int bodyLength = fullLength - headLength;
if (bodyLength > 0) {
byte[] bs = new byte[bodyLength];
frame.readBytes(bs);
// According to the previously extracted compressorType, decompression is performed as needed.
Compressor compressor = CompressorFactory.getCompressor(compressorType);
bs = compressor.decompress(bs);
SerializerType protocolType = SerializerType.getByCode(rpcMessage.getCodec());
if (this.supportDeSerializerTypes.contains(protocolType)) {
// Since this is the ProtocolDecoderV1 specifically for version 1, the serializer can directly use version1 as input.
Serializer serializer = SerializerServiceLoader.load(protocolType, ProtocolConstants.VERSION_1);
rpcMessage.setBody(serializer.deserialize(bs));
} else {
throw new IllegalArgumentException("SerializerType not match");
}
}
}
return rpcMessage.protocolMsg2RpcMsg();
}
Since the encode operation is the exact reverse of the decode operation, we won’t go over it again. Let’s continue by examining the serialize operation.
the serialize comes from SerializerServiceLoader
public static Serializer load(SerializerType type, byte version) throws EnhancedServiceNotFoundException {
// PROTOBUF
if (type == SerializerType.PROTOBUF) {
try {
ReflectionUtil.getClassByName(PROTOBUF_SERIALIZER_CLASS_NAME);
} catch (ClassNotFoundException e) {
throw new EnhancedServiceNotFoundException("'ProtobufSerializer' not found. " +
"Please manually reference 'org.apache.seata:seata-serializer-protobuf' dependency ", e);
}
}
String key = serialzerKey(type, version);
//Here is a SERIALIZER_MAP, which acts as a cache for serializer classes. The reason for caching is that the scope of SeataSerializer is set to Scope.PROTOTYPE, which prevents the class from being created multiple times.
Serializer serializer = SERIALIZER_MAP.get(key);
if (serializer == null) {
if (type == SerializerType.SEATA) {
// SPI of seata
serializer = EnhancedServiceLoader.load(Serializer.class, type.name(), new Object[]{version});
} else {
serializer = EnhancedServiceLoader.load(Serializer.class, type.name());
}
SERIALIZER_MAP.put(key, serializer);
}
return serializer;
}
public SeataSerializer(Byte version) {
if (version == ProtocolConstants.VERSION_0) {
versionSeataSerializer = SeataSerializerV0.getInstance();
} else if (version == ProtocolConstants.VERSION_1) {
versionSeataSerializer = SeataSerializerV1.getInstance();
}
if (versionSeataSerializer == null) {
throw new UnsupportedOperationException("version is not supported");
}
}
With this, the decoder obtains a Serializer. When the program reachesrpcMessage.setBody(serializer.deserialize(bs))
,
let's take a look at how the deserialize method processes the data.
public <T> T deserialize(byte[] bytes) {
return deserializeByVersion(bytes, ProtocolConstants.VERSION_0);
}
private static <T> T deserializeByVersion(byte[] bytes, byte version) {
//The previous part involves validity checks, which we will skip here.
ByteBuffer byteBuffer = ByteBuffer.wrap(bytes);
short typecode = byteBuffer.getShort();
ByteBuffer in = byteBuffer.slice();
//create Codec
AbstractMessage abstractMessage = MessageCodecFactory.getMessage(typecode);
MessageSeataCodec messageCodec = MessageCodecFactory.getMessageCodec(typecode, version);
//codec decode
messageCodec.decode(abstractMessage, in);
return (T) abstractMessage;
}
This serialize does not contain much logic, the key components is in the MessageCodecFactory and Codec, let's delve deeper.
You can see that MessageCodecFactory
has quite a lot of content, but in a single form, they all return message and codec according to MessageType,
so we won't show the content of factory here, we will directly look at message and codec, that is, messageCodec.decode( abstractMessage, in)
,
although there are still a lot of codec types, but we can see that their structure is similar, parsing each field:
// BranchRegisterRequestCodec decode
public <T> void decode(T t, ByteBuffer in) {
BranchRegisterRequest branchRegisterRequest = (BranchRegisterRequest)t;
// get xid
short xidLen = in.getShort();
if (xidLen > 0) {
byte[] bs = new byte[xidLen];
in.get(bs);
branchRegisterRequest.setXid(new String(bs, UTF8));
}
// get branchType
branchRegisterRequest.setBranchType(BranchType.get(in.get()));
short len = in.getShort();
if (len > 0) {
byte[] bs = new byte[len];
in.get(bs);
branchRegisterRequest.setResourceId(new String(bs, UTF8));
}
// get lockKey
int iLen = in.getInt();
if (iLen > 0) {
byte[] bs = new byte[iLen];
in.get(bs);
branchRegisterRequest.setLockKey(new String(bs, UTF8));
}
// get applicationData
int applicationDataLen = in.getInt();
if (applicationDataLen > 0) {
byte[] bs = new byte[applicationDataLen];
in.get(bs);
branchRegisterRequest.setApplicationData(new String(bs, UTF8));
}
}
Well, by this point, we've got the branchRegisterRequest, which can be handed off to the TCInboundHandler for processing.
But the problem is again, we only see the client (RM/TM) has the following kind of code to add encoder/decoder, that is, we know the client are using the current version of encoder/decoder processing:
bootstrap.handler(
new ChannelInitializer<SocketChannel>() {
@Override
public void initChannel(SocketChannel ch) {
ChannelPipeline pipeline = ch.pipeline();
pipeline.addLast(new IdleStateHandler(nettyClientConfig.getChannelMaxReadIdleSeconds(),nettyClientConfig.getChannelMaxWriteIdleSeconds(),nettyClientConfig.getChannelMaxAllIdleSeconds()))
.addLast(new ProtocolDecoderV1())
.addLast(new ProtocolEncoderV1());
if (channelHandlers != null) {
addChannelPipelineLast(ch, channelHandlers);
}
}
});
But how does server handle it? And what about the promised multi-version protocol?
Multi-version protocol (version recognition and binding)
Let's start by looking at a class diagram for encoder/decoder:
ProtocolDecoderV1 we have analyzed, ProtocolEncoderV1 is the reverse operation, it should be better understood, as for ProtocolDecoderV0 and ProtocolEncoderV0, from the diagram you can also see that they are in parallel with v1, except for the operation of v0 (although so far we haven't put him to use yet), they are both subclasses of the typical encode and decode in netty, but what about MultiProtocolDecoder? He's the protagonist of the MultiProtocolDecoder and is registered into the server's bootstrap at startup.
protected boolean isV0(ByteBuf in) {
boolean isV0 = false;
in.markReaderIndex();
byte b0 = in.readByte();
byte b1 = in.readByte();
// In fact, identifying the protocol relies on the 3rd byte (b2), as long as it is a normal new version, b2 is the version number greater than 0. For versions below 0.7, b2 is the first bit of the FLAG, which just so happens to be 0 in either case!
// v1/v2/v3 : b2 = version
// v0 : b2 = 0 ,1st byte in FLAG(2byte:0x10/0x20/0x40/0x80)
byte b2 = in.readByte();
if (ProtocolConstants.MAGIC_CODE_BYTES[0] == b0 && ProtocolConstants.MAGIC_CODE_BYTES[1] == b1 && 0 == b2) {
isV0 = true;
}
// The read bytes have to be reset back in order for each version of the decoder to parse them from scratch.
in.resetReaderIndex();
return isV0;
}
protected Object decode(ChannelHandlerContext ctx, ByteBuf in) throws Exception {
ByteBuf frame;
Object decoded;
byte version;
try {
// Identify the version number and get the current version number
if (isV0(in)) {
decoded = in;
version = ProtocolConstants.VERSION_0;
} else {
decoded = super.decode(ctx, in);
version = decideVersion(decoded);
}
if (decoded instanceof ByteBuf) {
frame = (ByteBuf) decoded;
ProtocolDecoder decoder = protocolDecoderMap.get(version);
ProtocolEncoder encoder = protocolEncoderMap.get(version);
try {
if (decoder == null || encoder == null) {
throw new UnsupportedOperationException("Unsupported version: " + version);
}
// First time invoke ,use a well-judged decoder for the operation
return decoder.decodeFrame(frame);
} finally {
if (version != ProtocolConstants.VERSION_0) {
frame.release();
}
// First time invoke , bind the encoder and decoder corresponding to the version, which is equivalent to binding the channel
ctx.pipeline().addLast((ChannelHandler)decoder);
ctx.pipeline().addLast((ChannelHandler)encoder);
if (channelHandlers != null) {
ctx.pipeline().addLast(channelHandlers);
}
// After binding, remove itself and do not judge it subsequently
ctx.pipeline().remove(this);
}
}
} catch (Exception exx) {
LOGGER.error("Decode frame error, cause: {}", exx.getMessage());
throw new DecodeException(exx);
}
return decoded;
}
protected byte decideVersion(Object in) {
if (in instanceof ByteBuf) {
ByteBuf frame = (ByteBuf) in;
frame.markReaderIndex();
byte b0 = frame.readByte();
byte b1 = frame.readByte();
if (ProtocolConstants.MAGIC_CODE_BYTES[0] != b0 || ProtocolConstants.MAGIC_CODE_BYTES[1] != b1) {
throw new IllegalArgumentException("Unknown magic code: " + b0 + ", " + b1);
}
byte version = frame.readByte();
frame.resetReaderIndex();
return version;
}
return -1;
}
With the above analysis, v0 finally comes in handy (when a client with an older version registers, the server assigns it a lower version of encoder/decoder), and we've figured out how multi-version protocols are recognized and bound.
How to Write Test Cases in Seata
Background
As the Seata project continues to grow and expand, our contributor community is also continuously growing. With the continuous enhancement of project functionality, the requirements for code quality are also increasing. In this process, we expect every contributor to provide standardized and comprehensive test cases along with their feature code submissions.
An excellent project relies on comprehensive unit tests as a fundamental guarantee. The Test-Driven Development (TDD) concept has been proposed for many years, emphasizing writing test cases before writing functional code. By writing unit tests, developers can gain a deeper understanding of the roles of related classes and methods in the code, grasp the core logic, and become familiar with the running scenarios of various situations. Meanwhile, unit tests also provide stable and secure protection for open-source projects, ensuring the quality and stability of the code when accepting contributor submissions. Unit testing is the first line of defense for quality assurance. Effective unit testing can detect over 90% of code bugs in advance and prevent code deterioration. During project refactoring and evolution, unit testing plays a crucial role, ensuring that the refactored code continues to function properly without introducing new bugs.
In the community's view, contributing reasonable test case code is equally important as contributing functional code. To help developers write high-quality test cases, this article provides some basic standards and recommendations.
Recommended Frameworks
The community currently uses the following three frameworks to write test cases:
junit5
junit is the most commonly used unit testing framework in Java, used for writing and running repeatable test cases.
<junit-jupiter.version>5.8.2</junit-jupiter.version>
<dependency>
<groupId>org.junit</groupId>
<artifactId>junit-bom</artifactId>
<version>${junit-jupiter.version}</version>
</dependency>
mockito
mockitoIt is a mock framework mainly used for mock testing. It can simulate any bean managed by Spring, mock method return values, simulate throwing exceptions, etc. This allows us to complete testing and verification in situations where some dependencies are missing.
<mockito.version>4.11.0</mockito.version>
<dependency>
<groupId>org.mockito</groupId>
<artifactId>mockito-core</artifactId>
<version>${mockito.version}</version>
</dependency>
<dependency>
<groupId>org.mockito</groupId>
<artifactId>mockito-junit-jupiter</artifactId>
<version>${mockito.version}</version>
</dependency>
<dependency>
<groupId>org.mockito</groupId>
<artifactId>mockito-inline</artifactId>
<version>${mockito.version}</version>
</dependency>
assertj
assertj is an assertion library that provides a set of easy-to-use and highly readable assertion methods. When junit's assertions are difficult to meet, assertj can be used for assertions.
Please note: We manage the versions of these three libraries uniformly in the pom.xml of seata-dependencies.
<assertj-core.version>3.12.2</assertj-core.version>
<dependency>
<groupId>org.assertj</groupId>
<artifactId>assertj-core</artifactId>
<version>${assertj-core.version}</version>
</dependency>
Specifications
We have referenced the Alibaba Java Development Manual and compiled some suggestions and specifications, divided into different levels. Among them, the [[mandatory]] parts must be strictly adhered to by developers. The community will review the code according to the mandatory rules when merging it. The [[recommended]] and [[reference]] parts are provided to help everyone better understand our considerations and principles for test cases.
1. [[mandatory]] Unit tests must adhere to the AIR principle.
Explanation: Good unit tests, from a macro perspective, possess characteristics of automation, independence, and repeatability.
- A: Automatic
- I: Independent
- R: Repeatable
2. [[mandatory]] Unit tests should be fully automated and non-interactive.
Test cases are usually executed periodically, and the execution process must be fully automated to be meaningful. Tests that require manual inspection of output results are not good unit tests. System.out should not be used for manual verification in unit tests; assert must be used for verification.
3. [[mandatory]] Maintain the independence of unit tests. To ensure the stability, reliability, and ease of maintenance of unit tests, unit test cases must not call each other or depend on the execution order.
Counterexample: method2 depends on the execution of method1, with the result of method1 being used as input for method2.
4. [[mandatory]] Unit tests must be repeatable and unaffected by external environments.
Explanation: Unit tests are usually included in continuous integration, and unit tests are executed each time code is checked in. If unit tests depend on external environments (network, services, middleware, etc.), it can lead to the unavailability of the continuous integration mechanism.
Example: To avoid being affected by external environments, it is required to design the code to inject dependencies into the SUT. During testing, use a DI framework like Spring to inject a local (in-memory) implementation or a Mock implementation.
5. [[mandatory]] For unit tests, ensure that the granularity of testing is small enough to facilitate precise issue localization. The granularity of unit testing is at most at the class level, generally at the method level.
Explanation: Only with small granularity can errors be quickly located when they occur. Unit tests are not responsible for checking cross-class or cross-system interaction logic; that is the domain of integration testing.
6. [[mandatory]] Incremental code for core business, core applications, and core modules must ensure that unit tests pass.
Explanation: Add unit tests promptly for new code. If new code affects existing unit tests, promptly make corrections.
7. [[mandatory]] Unit test code must be written in the following project directory: src/test/java; it is not allowed to be written in the business code directory.
Explanation: This directory is skipped during source code compilation, and the unit test framework defaults to scanning this directory.
8. [[mandatory]] The basic goal of unit testing: achieve a statement coverage of 70%; the statement coverage and branch coverage of core modules must reach 100%.
Explanation: As mentioned in the application layering of project conventions, DAO layer, Manager layer, and highly reusable Service should all undergo unit testing.
9. [[recommended]] When writing unit test code, adhere to the BCDE principle to ensure the delivery quality of the tested modules.
- B: Border, boundary value testing, including loop boundaries, special values, special time points, data sequences, etc.
- C: Correct, correct input, and expected results.
- D: Design, combined with design documents, to write unit tests.
- E: Error, forced error message input (such as: illegal data, exceptional processes, business allowance outside, etc.), and expected results.
10. [[recommended]] For database-related operations such as queries, updates, and deletions, do not assume that the data in the database exists, or directly manipulate the database to insert data. Please use program insertion or data import to prepare data.
Counterexample: In a unit test for deleting a row of data, manually add a row directly into the database as the deletion target. However, this newly added row of data does not comply with the business insertion rules, resulting in abnormal test results.
11. [[recommended]] For database-related unit tests, an automatic rollback mechanism can be set to prevent dirty data from being left in the database due to unit testing. Alternatively, clear prefix and suffix identifiers can be used for data generated by unit testing.
12. [[recommended]] For code that is untestable, necessary refactoring should be done at the appropriate time to make the code testable, avoiding writing non-standard test code just to meet testing requirements.
13. [[recommended]] Unit tests, as a means of quality assurance, should complete the writing and verification of unit tests before submitting a pull request.
14. [[reference]] To facilitate unit testing, business code should avoid the following situations:
- Doing too much in constructors.
- Having too many global variables and static methods.
- Having too many external dependencies.
- Having too many conditional statements. Explanation: For multiple conditional statements, it is recommended to refactor using guard clauses, strategy patterns, state patterns, etc.
Exploring the Journey of Open Source Development in Seata Project
Seata is an open-source distributed transaction solution dedicated to providing high-performance and user-friendly distributed transaction services in a microservices architecture. During this year's Summer of Code event, I joined the Apache Seata (Incubator) community, completed the Summer of Code project, and have been actively involved in the community ever since. I was fortunate to share my developer experience at the YunQi Developer Show during the Cloud Conferen
Relevant Background
Before formally introducing my experiences, I would like to provide some relevant background information to explain why I chose to participate in open source and how I got involved. There are various motivations for participating in open source, and here are some of the main reasons I believe exist:
- Learning: Participating in open source provides us with the opportunity to contribute to open-source projects developed by different organizations, interact with industry experts, and offers learning opportunities.
- Skill Enhancement: In my case, I usually work with Java and Python for backend development. However, when participating in the Seata project, I had the chance to learn the Go language, expanding my backend technology stack. Additionally, as a student, it's challenging to encounter production-level frameworks or applications, and the open-source community provided me with this opportunity.
- Interest: Many of my friends are passionate about open source, enjoying programming and being enthusiastic about open source.
- Job Seeking: Participating in open source can enrich our portfolio, adding weight to resumes.
- Work Requirements: Sometimes, involvement in open source is to address work-related challenges or meet job requirements.
These are some reasons for participating in open source. For me, learning, skill enhancement, and interest are the primary motivations. Whether you are a student or a working professional, if you have the willingness to participate in open source, don't hesitate. Anyone can contribute to open-source projects. Age, gender, occupation, and location are not important; the key is your passion and curiosity about open-source projects.
The opportunity for me to participate in open source arose when I joined the Open Source Promotion Plan (OSPP) organized by the Institute of Software, Chinese Academy of Sciences.
OSPP is an open-source activity for university developers. The community releases open-source projects, and student developers complete project development under the guidance of mentors. The completed results are contributed to the community, merged into the community repository, and participants receive project bonuses and certificates. OSPP is an excellent opportunity to enter the open-source community, and it was my first formal encounter with open-source projects. This experience opened a new door for me. I deeply realized that participating in the construction of open-source projects, sharing your technical achievements, and enabling more developers to use what you contribute is a joyful and meaningful endeavor.
The image below, officially released by OSPP, shows that the number of participating communities and students has been increasing year by year since 2020, and the event is getting better. This year, a total of 133 community projects were involved, each providing several topics, with each student selecting only one topic. Choosing a community to participate in and finding a suitable topic in such a large number of communities is a relatively complex task.
Considering factors such as community activity, technical stack compatibility, and guidance for newcomers, I ultimately chose to join the Seata community.
Seata is an open-source distributed transaction framework that provides a complete distributed transaction solution, including AT, TCC, Saga, and XA transaction modes, and supports multiple programming languages and data storage solutions. Since its open source in 2019, Seata has been around for 5 years, with over 300 contributors in the community. The project has received 24k+ stars and is a mature community. Seata is compatible with 10+ mainstream RPC frameworks and RDBMS, has integration relationships with 20+ communities, and is applied to business systems by thousands of customers. It can be considered the de facto standard for distributed transaction solutions.
Seata's Journey to Apache Incubator
On October 29, 2023, Seata was formally donated to the Apache Software Foundation and became an incubating project. After incubation, Seata is expected to become the first top-level distributed transaction framework project under the Apache Software Foundation. This donation will propel Seata to a broader development scope, profoundly impacting ecosystem construction, and benefiting more developers. This significant milestone also opens up broader development opportunities for Seata.
Development Journey
Having introduced some basic information, the following sections will delve into my development journey in the Seata community.
Before officially starting development, I undertook several preparatory steps. Given Seata's five years of development and the accumulation of hundreds of thousands of lines of code, direct involvement requires a certain learning curve. I share some preparatory experiences in the hope of providing inspiration.
-
Documentation and Blogs as Primary Resources
- Text materials such as documentation and blogs help newcomers quickly understand project background and code structure.
- Official documentation is the primary reference material, providing insights into everything the official documentation deems necessary to know.
- Blogs, secondary to official documentation, are often written by developers or advanced users. Blogs may delve deeper into specific topics, such as theoretical models of projects, project structure, and source code analysis of specific modules.
- Public accounts (such as WeChat) are similar to blogs, generally containing technical articles. An advantage of public accounts is the ability to subscribe for push notifications, allowing for technical reading during spare time.
- Additionally, slides from online or offline community presentations and meetups provide meaningful textual materials.
- Apart from official materials, many third-party resources are available for learning, such as understanding specific implementations and practices through user-shared use cases, exploring the project's ecosystem through integration documentation from third-party communities, and learning through video tutorials. However, among all these materials, I consider official documentation and blogs to be the most helpful.
-
Familiarizing Yourself with the Framework
- Not all text materials need to be thoroughly read. Understanding is superficial if confined to paper. Practice should commence when you feel you understand enough. The "Get Started" section in the official documentation is a step-by-step guide to understanding the project's basic workflow.
- Another approach is to find examples or demonstrations provided by the official project, build and run them, understand the meanings of code and configurations, and learn about the project's requirements, goals, existing features, and architecture through usage.
- For instance, Seata has a repository named "seata-samples" containing over 20 use cases, covering scenarios like Seata integration with Dubbo, integration with SCA, and Nacos integration. These examples cover almost all supported scenarios.
-
Roughly Reading Source Code to Grasp Main Logic
- In the preparation phase, roughly reading the source code to grasp the project's main logic is crucial. Efficiently understanding a project's core content is a skill that requires long-term accumulation.
- First, through the previously mentioned preparation steps, understanding the project's concepts, interactions, and process models is helpful.
- Taking Seata as an example, through official documentation and practical operations, you can understand the three roles in Seata's transaction domain: TC (Transaction Coordinator), TM (Transaction Manager), and RM (Resource Manager). TC, deployed independently as a server, maintains the state of global and branch transactions, crucial for Seata's high availability. TM interacts with TC, defining the start, commit, or rollback of global transactions. RM manages resources for branch transaction processing, interacts with TC to register branch transactions and report branch transaction states, and drives branch transaction commit or rollback. After roughly understanding the interaction between these roles, grasping the project's main logic becomes easier.
- Having a mental impression of these models makes it easier to extract the main logic from the source code. For example, analyzing the Seata TC transaction coordinator, as a server-side application deployed independently of the business, involves starting the server locally and tracking it through the startup class. This analysis can reveal some initialization logic, such as service registration and initialization of global locks. Tracking the code through RPC calls can reveal how TC persists global and branch transactions and how it drives global transaction commit or rollback.
- However, for embedded client framework code without a startup class entry point for analysis, starting with a sample can be effective. Finding references to framework code in a sample allows for code reading. For instance, a crucial annotation in Seata is
GlobalTransaction
, used to identify a global transaction. To understand how TM analyzes this annotation, one can use the IDE's search function to find the interceptor forGlobalTransaction
and analyze its logic. - Here's a tip: Unit tests often focus on the functional aspects of a single module. Reading unit tests can reveal a module's input-output, logic boundaries, and understanding the code through the unit test's call chain is an essential means of understanding the source code.
With everything prepared, the next step is to actively participate in the community.
Ways to Contribute and Personal Insights
There are various ways to participate, with one of the most common being to check the project's Issues list. Communities often mark issues suitable for new contributors with special labels such as "good-first-issue," "contributions-welcome," and "help-wanted." Interested tasks can be filtered through these labels.
In addition to Issues, GitHub provides a discussion feature where you can participate in open discussions and gain new ideas.
Furthermore, communities often hold regular meetings, such as weekly or bi-weekly meetings, where you can stay updated on the community's latest progress, ask questions, and interact with other community members.
Summary and Insights
I initially joined the Seata community through the Open Source Summer Program. I completed my project, implemented new features for Seata Saga, and carried out a series of optimizations. However, I didn't stop there. My open-source experience with Seata provided me with the most valuable developer experience in my student career. Over time, I continued to stay active in the community through the aforementioned participation methods. This was mainly due to the following factors:
-
Communication and Networking: The mentorship system provided crucial support. During development, the close collaboration between my mentor and me played a key role in adapting to community culture and workflow. My mentor not only helped me acclimate to the community but also provided design ideas and shared work-related experiences and insights, all of which were very helpful for my development. Additionally, Seata community founder Ming Cai provided a lot of assistance, including establishing contacts with other students, helping with code reviews, and offering many opportunities.
-
Positive Feedback: During Seata's development, I experienced a virtuous cycle. Many details provided positive feedback, such as my contributions being widely used and beneficial to users, and the recognition of my development efforts by the community. This positive feedback strengthened my desire to continue contributing to the Seata community.
-
Skill Enhancement: Participating in Seata development greatly enhanced my abilities. Here, I could learn production-level code, including performance optimization, interface design, and techniques for boundary judgment. I could directly participate in the operation of an open-source project, including project planning, scheduling, and communication. Additionally, I gained insights into how a distributed transaction framework is designed and implemented.
In addition to these valuable developer experiences, I gained some personal insights into participating in open source. To inspire other students interested in joining open-source communities, I made a simple summary:
-
Understand and Learn Community Culture and Values: Every open-source community has different cultures and values. Understanding a community's culture and values is crucial for successful participation. Observing and understanding the daily development and communication styles of other community members is a good way to learn community culture. Respect others' opinions and embrace different viewpoints in the community.
-
Dare to Take the First Step: Don't be afraid of challenges; taking the first step is key to participating in open-source communities. You can start by tackling issues labeled "good-first-issue" or by contributing to documentation, unit tests, etc. Overcoming the fear of difficulties, actively trying, and learning are crucial.
-
Have Confidence in Your Work: Don't doubt your abilities. Everyone starts from scratch, and no one is born an expert. Participating in open-source communities is a process of learning and growth that requires continuous practice and experience accumulation.
-
Actively Participate in Discussions, Keep Learning Different Technologies: Don't hesitate to ask questions, whether about specific project technologies or challenges in the development process. Also, don't limit yourself to one domain. Try to learn and master different programming languages, frameworks, and tools. This broadens your technical perspective and provides valuable insights for the project.
Through my open-source journey, I accumulated valuable experience and skills. This not only helped me grow into a more valuable developer but also gave me a profound understanding of the power of open-source communities. However, I am not just an individual participant; I represent a part of the Seata community. Seata, as a continuously growing and evolving open-source project, has tremendous potential and faces new challenges. Therefore, I want to emphasize the importance of the Seata community and its future potential. It has entered the incubation stage of the Apache Software Foundation, a significant milestone that will bring broader development opportunities for Seata. Seata welcomes more developers and contributors to join us. Let's work together to drive the development of this open-source project and contribute to the advancement of the distributed transaction field.
Seata-Raft Storage Mode in Depth and Getting Started
- 1. Overview
- 2. Architecture Introduction
- 3. Deployment and Usage
- 4. Benchmark Comparison
- 5. Conclusion
Seata is an open-source distributed transaction solution with over 24000 stars and a highly active community. It is dedicated to providing high-performance and user-friendly distributed transaction services in microservices architecture.
Currently, Seata's distributed transaction data storage modes include file, db, and redis. This article focuses on the architecture, deployment and usage, benchmark comparison of Seata-Server Raft mode. It explores why Seata needs Raft and provides insights into the process from research and comparison to design, implementation, and knowledge accumulation.
Presenter: Jianbin Chen(funkye) github id: funky-eyes
2. Architecture Introduction
2.1 What is Raft Mode?
Firstly, it is essential to understand what the Raft distributed consensus algorithm is. The following excerpt is a direct quote from the official documentation of sofa-jraft:
RAFT is a novel and easy-to-understand distributed consensus replication protocol proposed by Diego Ongaro and John Ousterhout at Stanford University. It serves as the central coordination component in the RAMCloud project. Raft is a Leader-Based variant of Multi-Paxos, providing a more complete and clear protocol description compared to protocols like Paxos, Zab, View Stamped Replication. It also offers clear descriptions of node addition and deletion. As a replication state machine, Raft is the most fundamental component in distributed systems, ensuring ordered replication and execution of commands among multiple nodes, guaranteeing consistency when the initial states of multiple nodes are consistent.
In summary, Seata's Raft mode is based on the Sofa-Jraft component, implementing the ability to ensure the data consistency and high availability of Seata-Server itself.
2.2 Why Raft Mode is Needed
After understanding the definition of Seata-Raft mode, you might wonder whether Seata-Server is now unable to ensure consistency and high availability. Let's explore how Seata-Server currently achieves this from the perspectives of consistency and high availability.
2.2.1 Existing Storage Modes
In the current Seata design, the role of the Server is to ensure the correct execution of the two-phase commit for transactions. However, this depends on the correct storage of transaction records. To ensure that transaction records are not lost, it is necessary to drive all Seata-RM instances to perform the correct two-phase commit behavior while maintaining correct state. So, how does Seata currently store transaction states and records?
Firstly, let's introduce the three transaction storage modes supported by Seata: file, db, and redis. In terms of consistency ranking, the db mode provides the best guarantee for transaction records, followed by the asynchronous flushing of the file mode, and finally the aof and rdb modes of redis.
To elaborate:
-
The file mode is Seata's self-implemented transaction storage method. It stores transaction information on the local disk in a sequential write manner. For performance considerations, it defaults to asynchronous mode and stores transaction information in memory to ensure consistency between memory and disk data. In the event of Seata-Server (TC) unexpected crash, it reads transaction information from the disk upon restarting and restores it to memory for the continuation of transaction contexts.
-
The db mode is another implementation of Seata's abstract transaction storage manager (AbstractTransactionStoreManager). It relies on databases such as PostgreSQL, MySQL, Oracle, etc., to perform transaction information operations. Consistency is guaranteed by the local transactions of the database, and data persistence is the responsibility of the database.
-
Redis, similar to db, is a transaction storage method using Jedis and Lua scripts. It performs transaction operations using Lua scripts, and in Seata 2.x, all operations (such as lock competition) are handled using Lua scripts. Data storage is similar to db, relying on the storage side (Redis) to ensure data consistency. Like db, redis adopts a computation and storage separation architecture design in Seata.
2.2.2 High Availability
High availability is simply the ability of a cluster to continue running normally after the main node crashes. The common approach is to deploy multiple nodes providing the same service and use a registry center to real-time sense the online and offline status of the main node for timely switching to an available node.
It may seem that deploying a few more machines is all that's needed. However, there is a problem behind it – how to ensure that multiple nodes operate as a whole. If one node crashes, another node can seamlessly take over the work of the crashed node, including handling the data of the crashed node. The answer to solving this problem is simple: in a computation and storage separation architecture, store data in a shared middleware. Any node can access this shared storage area to obtain transaction information for all nodes' operations, thus achieving high availability.
However, the prerequisite is that computation and storage must be separated. Why is the integration of computation and storage not feasible? This brings us to the implementation of the File mode. As described earlier, the File mode stores data on local disks and node memory, with no synchronization in data writing operations. This means that the current File mode cannot achieve high availability and only supports single-machine deployment. For basic quick start and simple use, the File mode has lower applicability, and the high-performance, memory-based File mode is practically no longer used in production environments.
2.3 How is Seata-Raft Designed?
2.3.1 Design Principles
The design philosophy of Seata-Raft mode is to encapsulate the File mode, which is unable to achieve high availability, and use the Raft algorithm to synchronize data between multiple TCs. This mode ensures data consistency among multiple TCs when using the File mode and replaces asynchronous flushing operations with Raft logs and snapshots for data recovery.
In the Seata-Raft mode, the client-side, upon startup, retrieves its transaction group (e.g., default) and the IP addresses of relevant Raft cluster nodes from the configuration center. By sending a request to the control port of Seata-Server, the client can obtain metadata for the Raft cluster corresponding to the default group, including leader, follower, and learner member nodes. Subsequently, the client monitors (watches) any member nodes of non-leader nodes.
Assuming that TM initiates a transaction, and the leader node in the local metadata points to the address of TC1, TM will only interact with TC1. When TC1 adds global transaction information, through the Raft protocol, denoted as step 1 in the diagram, TC1 sends the log to other nodes. Step 2 represents the response of follower nodes to log reception. When more than half of the nodes (such as TC2) accept and respond successfully, the state machine (FSM) on TC1 will execute the action of adding a global transaction.
If TC1 crashes or a reelection occurs, what happens? Since the metadata has been obtained during the initial startup, the client will execute the watch follower node's interface to update the local metadata information. Therefore, subsequent transaction requests will be sent to the new leader (e.g., TC2). Meanwhile, TC1's data has already been synchronized to TC2 and TC3, ensuring data consistency. Only at the moment of the election, if a transaction happens to be sent to the old leader, it will be actively rolled back to ensure data correctness.
It is important to note that in this mode, if a transaction is in the phase of sending resolution requests or the one-phase process has not yet completed at the moment of the election, and it happens exactly during the election, these transactions will be actively rolled back. This is because the RPC node has crashed or a reelection has occurred, and there is currently no implemented RPC retry. The TM side has a default retry mechanism of 5 times, but due to the approximately 1s-2s time required for the election, transactions in the 'begin' state may not successfully resolve, so they are prioritized for rollback to release locks, avoiding impacting the correctness of other business.
2.3.2 Fault Recovery
In Seata, when a TC experiences a failure, the data recovery process is as follows:
As shown in the above diagram:
-
Check for the Latest Data Snapshot: Firstly, the system checks for the existence of the latest data snapshot file. The data snapshot is a one-time full copy of the in-memory data state. If there is a recent data snapshot, the system directly loads it into memory.
-
Replay Based on Raft Logs After Snapshot: If there is the latest snapshot or no snapshot file, the system replays the data based on the previously recorded Raft logs. Each request in Seata-Server ultimately goes through the ServerOnRequestProcessor for processing, then moves to the specific coordinator class (DefaultCoordinator or RaftCoordinator), and further proceeds to the specific business code (DefaultCore) for the corresponding transaction processing (e.g., begin, commit, rollback).
-
After the log replay is complete, the leader initiates log synchronization and continues to execute the related transaction's add, delete, and modify actions.
Through these steps, Seata can achieve data recovery after a failure. It first attempts to load the latest snapshot, if available, to reduce replay time. Then, it replays based on Raft logs to ensure the consistency of data operations. Finally, through the log synchronization mechanism, it ensures data consistency among multiple nodes.
2.3.3 Business Processing Synchronization Process
For the case where the client side is obtaining the latest metadata while a business thread is executing operations such as begin, commit, or registry, Seata adopts the following handling:
-
On the client side:
- If the client is executing operations like begin, commit, or registry, and at this moment, it needs to obtain the latest metadata, the RPC request from the client might fail since the leader may no longer exist or is not the current leader.
- If the request fails, the client receives an exception response, and in this case, the client needs to roll back based on the request result.
-
TC side for detecting the old leader:
- On the TC side, if the client's request reaches the old leader node, TC checks if it is the current leader. If it is not the leader, it rejects the request.
- If it is the leader but fails midway, such as failing during the process of submitting a task to the state machine, the creation of the task (createTask) fails due to the current state not being the leader. In this case, the client also receives a response with an exception.
- The old leader's task submission also fails, ensuring the consistency of transaction information.
Through the above handling, when the client obtains the latest metadata while a business operation is in progress, Seata ensures data consistency and transaction correctness. If the client's RPC request fails, it triggers a rollback operation. On the TC side, detection of the old leader and the failure of task submission prevent inconsistencies in transaction information. This way, the client's data can also maintain consistency.
3. Usage and Deployment
In terms of usage and deployment, the community adheres to the principles of minimal intrusion and minimal changes. Therefore, the overall deployment should be straightforward. The following sections introduce deployment changes separately for the client and server sides.
3.1 Client
Firstly, those familiar with the use of registry configuration centers should be aware of the seata.registry.type
configuration item in Seata's configuration, supporting options like Nacos, ZooKeeper, etcd, Redis, etc. After version 2.0, a configuration item for Raft was added.
registry:
type: raft
raft:
server-addr: 192.168.0.111:7091, 192.168.0.112:7091, 192.168.0.113:7091
Switch the registry.type
to 'raft' and configure the address for obtaining Raft-related metadata, which is unified as the IP of the seata-server + HTTP port. Then, it is essential to configure the traditional transaction group.
seata:
tx-service-group: default_tx_group
service:
vgroup-mapping:
default_tx_group: default
If the current transaction group used is default_tx_group
, then the corresponding Seata cluster/group is 'default'. There is a corresponding relationship, and this will be further explained in the server deployment section.
With this, the changes on the client side are complete.
3.2 Server
For server-side changes, there might be more adjustments, involving familiarity with some tuning parameters and configurations. Of course, default values can be used without any modifications.
seata:
server:
raft:
group: default # This value represents the group of this raft cluster, and the value corresponding to the client's transaction group should match it.
server-addr: 192.168.0.111:9091,192.168.0.112:9091,192.168.0.113:9091 # IP and port of the 3 nodes, the port is the netty port of the node + 1000, default netty port is 8091
snapshot-interval: 600 # Take a snapshot every 600 seconds for fast rolling of raftlog. However, making a snapshot every 600 seconds may cause business response time jitter if there is too much transaction data in memory. But it is friendly for fault recovery and faster node restart. You can adjust it to 30 minutes, 1 hour, etc., according to the business. You can test whether there is jitter on your own, and find a balance point between rt jitter and fault recovery.
apply-batch: 32 # At most, submit raftlog once for 32 batches of actions
max-append-bufferSize: 262144 # Maximum size of the log storage buffer, default is 256K
max-replicator-inflight-msgs: 256 # In the case of enabling pipeline requests, the maximum number of in-flight requests, default is 256
disruptor-buffer-size: 16384 # Internal disruptor buffer size. If it is a scenario with high write throughput, you need to appropriately increase this value. Default is 16384
election-timeout-ms: 1000 # How long without a leader's heartbeat to start a new election
reporter-enabled: false # Whether the monitoring of raft itself is enabled
reporter-initial-delay: 60 # Interval of monitoring
serialization: jackson # Serialization method, do not change
compressor: none # Compression method for raftlog, such as gzip, zstd, etc.
sync: true # Flushing method for raft log, default is synchronous flushing
config:
# support: nacos, consul, apollo, zk, etcd3
type: file # This configuration can choose different configuration centers
registry:
# support: nacos, eureka, redis, zk, consul, etcd3, sofa
type: file # Non-file registration center is not allowed in raft mode
store:
# support: file, db, redis, raft
mode: raft # Use raft storage mode
file:
dir: sessionStore # This path is the storage location of raftlog and related transaction logs, default is relative path, it is better to set a fixed location
In 3 or more nodes of seata-server, after configuring the above parameters, you can directly start it, and you will see similar log output, which means the cluster has started successfully:
2023-10-13 17:20:06.392 WARN --- [Rpc-netty-server-worker-10-thread-1] [com.alipay.sofa.jraft.rpc.impl.BoltRaftRpcFactory] [ensurePipeline] []: JRaft SET bolt.rpc.dispatch-msg-list-in-default-executor to be false for replicator pipeline optimistic.
2023-10-13 17:20:06.439 INFO --- [default/PeerPair[10.58.16.231:9091 -> 10.58.12.217:9091]-AppendEntriesThread0] [com.alipay.sofa.jraft.storage.impl.LocalRaftMetaStorage] [save] []: Save raft meta, path=sessionStore/raft/9091/default/raft_meta, term=4, votedFor=0.0.0.0:0, cost time=25 ms
2023-10-13 17:20:06.441 WARN --- [default/PeerPair[10.58.16.231:9091 -> 10.58.12.217:9091]-AppendEntriesThread0] [com.alipay.sofa.jraft.core.NodeImpl] [handleAppendEntriesRequest] []: Node <default/10.58.16.231:9091> reject term_unmatched AppendEntriesRequest from 10.58.12.217:9091, term=4, prevLogIndex=4, prevLogTerm=4, localPrevLogTerm=0, lastLogIndex=0, entriesSize=0.
2023-10-13 17:20:06.442 INFO --- [JRaft-FSMCaller-Disruptor-0] [io.seata.server.cluster.raft.RaftStateMachine] [onStartFollowing] []: groupId: default, onStartFollowing: LeaderChangeContext [leaderId=10.58.12.217:9091, term=4, status=Status[ENEWLEADER<10011>: Raft node receives message from new leader with higher term.]].
2023-10-13 17:20:06.449 WARN --- [default/PeerPair[10.58.16.231:9091 -> 10.58.12.217:9091]-AppendEntriesThread0] [com.alipay.sofa.jraft.core.NodeImpl] [handleAppendEntriesRequest] []: Node <default/10.58.16.231:9091> reject term_unmatched AppendEntriesRequest from 10.58.12.217:9091, term=4, prevLogIndex=4, prevLogTerm=4, localPrevLogTerm=0, lastLogIndex=0, entriesSize=0.
2023-10-13 17:20:06.459 INFO --- [Bolt-default-executor-4-thread-1] [com.alipay.sofa.jraft.core.NodeImpl] [handleInstallSnapshot] []: Node <default/10.58.16.231:9091> received InstallSnapshotRequest from 10.58.12.217:9091, lastIncludedLogIndex=4, lastIncludedLogTerm=4, lastLogId=LogId [index=0, term=0].
2023-10-13 17:20:06.489 INFO --- [Bolt-conn-event-executor-13-thread-1] [com.alipay.sofa.jraft.rpc.impl.core.ClientServiceConnectionEventProcessor] [onEvent] []: Peer 10.58.12.217:9091 is connected
2023-10-13 17:20:06.519 INFO --- [JRaft-Group-Default-Executor-0] [com.alipay.sofa.jraft.util.Recyclers] [<clinit>] []: -Djraft.recyclers.maxCapacityPerThread: 4096.
2023-10-13 17:20:06.574 INFO --- [JRaft-Group-Default-Executor-0] [com.alipay.sofa.jraft.storage.snapshot.local.LocalSnapshotStorage] [destroySnapshot] []: Deleting snapshot sessionStore/raft/9091/default/snapshot/snapshot_4.
2023-10-13 17:20:06.574 INFO --- [JRaft-Group-Default-Executor-0] [com.alipay.sofa.jraft.storage.snapshot.local.LocalSnapshotStorage] [close] []: Renaming sessionStore/raft/9091/default/snapshot/temp to sessionStore/raft/9091/default/snapshot/snapshot_4.
2023-10-13 17:20:06.689 INFO --- [JRaft-FSMCaller-Disruptor-0] [io.seata.server.cluster.raft.snapshot.session.SessionSnapshotFile] [load] []: on snapshot load start index: 4
2023-10-13 17:20:06.694 INFO --- [JRaft-FSMCaller-Disruptor-0] [io.seata.server.cluster.raft.snapshot.session.SessionSnapshotFile] [load] []: on snapshot load end index: 4
2023-10-13 17:20:06.694 INFO --- [JRaft-FSMCaller-Disruptor-0] [io.seata.server.cluster.raft.RaftStateMachine] [onSnapshotLoad] []: groupId: default, onSnapshotLoad cost: 110 ms.
2023-10-13 17:20:06.694 INFO --- [JRaft-FSMCaller-Disruptor-0] [io.seata.server.cluster.raft.RaftStateMachine] [onConfigurationCommitted] []: groupId: default, onConfigurationCommitted: 10.58.12.165:9091,10.58.12.217:9091,10.58.16.231:9091.
2023-10-13 17:20:06.705 INFO --- [JRaft-FSMCaller-Disruptor-0] [com.alipay.sofa.jraft.storage.snapshot.SnapshotExecutorImpl] [onSnapshotLoadDone] []: Node <default/10.58.16.231:9091> onSnapshotLoadDone, last_included_index: 4
last_included_term: 4
peers: "10.58.12.165:9091"
peers: "10.58.12.217:9091"
peers: "10.58.16.231:9091"
2023-10-13 17:20:06.722 INFO --- [JRaft-Group-Default-Executor-1] [com.alipay.sofa.jraft.storage.impl.RocksDBLogStorage] [lambda$truncatePrefixInBackground$2] []: Truncated prefix logs in data path: sessionStore/raft/9091/default/log from log index 1 to 5, cost 0 ms.
3.3 faq
-
Once the
seata.raft.server-addr
is configured, cluster scaling or shrinking must be done through the server's openapi. Directly changing this configuration and restarting won't take effect. The API for this operation is/metadata/v1/changeCluster?raftClusterStr=new_cluster_list
. -
If the addresses in
server-addr:
are all on the local machine, you need to add a 1000 offset to the netty ports of different servers on the local machine. For example, ifserver.port: 7092
, the netty port will be 8092, and the raft election and communication port will be 9092. You need to add the startup parameter-Dserver.raftPort=9092
. On Linux, this can be specified usingexport JAVA_OPT="-Dserver.raftPort=9092"
.
4. Performance Test Comparison
Performance testing is divided into two scenarios. To avoid data hotspots and thread optimization, the client side initializes 3 million items and uses jdk21 virtual threads + Spring Boot3 + Seata AT for testing. Garbage collection is handled with the ZGC generational garbage collector. The testing tool used is Alibaba Cloud PTS. Server-side is uniformly configured with jdk21 (not yet adapted for virtual threads). Server configurations are as follows:
-
TC: 4c8g * 3
-
Client: 4c * 8G * 1
-
Database: Alibaba Cloud RDS 4c16g
-
64 concurrent performance test only increases the performance of the
@GlobalTransactional
annotated interface with empty submissions. -
Random 3 million data items are used for inventory deduction in a 32 concurrent scenario for 10 minutes.
4.1 1.7.1 db mode
Empty submission 64C
Random inventory deduction 32C
4.2 2.0 raft mode
Empty submission 64C
Random inventory deduction 32C
4.3 Test Result Comparison
32 concurrent random inventory deduction scenario with 3 million items
tps avg | tps max | count | rt | error | Storage Type |
---|---|---|---|---|---|
1709 (42%↑) | 2019 (21%↑) | 1228803 (42%↑) | 13.86ms (30%↓) | 0 | Raft |
1201 | 1668 | 864105 | 19.86ms | 0 | DB |
64 concurrent empty pressure on @GlobalTransactional
interface (test peak limit is 8000)
tps avg | tps max | count | rt | error | Storage Type |
---|---|---|---|---|---|
5704 (20%↑) | 8062 (30%↑) | 4101236 (20%↑) | 7.79ms (19%↓) | 0 | Raft |
4743 | 6172 | 3410240 | 9.65ms | 0 | DB |
In addition to the direct comparison of the above data, by observing the curves of the pressure test, it can be seen that under the raft mode, TPS and RT are more stable, with less jitter, and better performance and throughput.
5. Summary
In the future development of Seata, performance, entry threshold, and deployment and operation costs are directions that we need to pay attention to and continuously optimize. After the introduction of the raft mode, Seata has the following characteristics:
- In terms of storage, after the separation of storage and computation, Seata's upper limit for optimization has been raised, making it more self-controlled.
- Lower deployment costs, no need for additional registration centers, storage middleware.
- Lower entry threshold, no need to learn other knowledge such as registration centers; one can directly use Seata Raft.
In response to industry trends, some open-source projects such as ClickHouse and Kafka have started to abandon the use of ZooKeeper and instead adopt self-developed solutions, such as ClickKeeper and KRaft. These solutions ensure the storage of metadata and other information by themselves, reducing the need for third-party dependencies, thus reducing operational and learning costs. These features are mature and worth learning from.
Of course, currently, solutions based on the Raft mode may not be mature enough and may not fully meet the beautiful descriptions above. However, precisely because of such theoretical foundations, the community should strive in this direction, gradually bringing practice closer to the theoretical requirements. Here, all students interested in Seata are welcome to join the community, contributing to the development of Seata!
Seata:Bridging Data and Applications
This article mainly introduces the evolutionary journey of distributed transactions from internal development to commercialization and open source, as well as the current progress and future planning of the Seata community. Seata is an open-source distributed transaction solution designed to provide a comprehensive solution for distributed transactions under modern microservices architecture. Seata offers complete distributed transaction solutions, including AT, TCC, Saga, and XA transaction modes, supporting various programming languages and data storage schemes. Seata also provides easy-to-use APIs, extensive documentation, and examples to facilitate quick development and deployment for enterprises applying Seata. Seata's advantages lie in its high availability, high performance, and high scalability, and it does not require extra complex operations for horizontal scaling. Seata is currently used in thousands of customer business systems on Alibaba Cloud, and its reliability has been recognized and applied by major industry manufacturers. As an open-source project, the Seata community is also expanding continuously, becoming an important platform for developers to exchange, share, and learn, attracting more and more attention and support from enterprises. Today, I will primarily share about Seata on the following three topics:
- From TXC/GTS to Seata
- Latest developments in the Seata community
- Future planning for the Seata community
From TXC/GTS to Seata
The Origin of Distributed Transactions
Seata is internally codenamed TXC (taobao transaction constructor) within Alibaba, a name with a strong organizational structure flavor. TXC originated from Alibaba's Wushi (Five Color Stones) project, which in ancient mythology were the stones used by the goddess Nüwa to mend the heavens, symbolizing Alibaba's important milestone in the evolution from monolithic architecture to distributed architecture. During this project, a batch of epoch-making Internet middleware was developed, including the well-known "Big Three":
- HSF service invocation framework Solves service communication issues after the transition from monolithic applications to service-oriented architectures.
- TDDL database sharding framework Addresses storage capacity and connection count issues of databases at scale.
- MetaQ messaging framework Addresses asynchronous invocation issues. The birth of the Big Three satisfied the basic requirements of microservices-based business development, but the data consistency issues that arose after microservices were not properly addressed, lacking a unified solution. The likelihood of data consistency issues in microservices is much higher than in monolithic applications, and the increased complexity of moving from in-process calls to network calls exacerbates the production of exceptional scenarios. The increase in service hops also makes it impossible for upstream and downstream services to coordinate data rollback in the event of a business processing exception. TXC was born to address the pain points of data consistency at the application architecture layer, and the core data consistency scenarios it aimed to address included:
- Consistency across services. Coordinates rollback of upstream and downstream service nodes in the event of system exceptions such as call timeouts and business exceptions.
- Data consistency in database sharding. Ensures internal transactions during logical SQL operations on business layers are consistent across different data shards.
- Data consistency in message sending. Addresses the inconsistency between data operations and successful message sending.
To overcome the common scenarios encountered, TXC was seamlessly integrated with the Big Three. When businesses use the Big Three for development, they are completely unaware of TXC's presence in the background, do not have to consider the design of data consistency, and leave it to the framework to ensure, allowing businesses to focus more on their own development, greatly improving development efficiency.
TXC has been widely used within Alibaba Group for many years and has been baptized by the surging traffic of large-scale events like Singles' Day, significantly improving business development efficiency and ensuring data accuracy, eliminating financial and reputational issues caused by data inconsistencies. With the continuous evolution of the architecture, a standard three-node cluster can now handle peak values of nearly 100K TPS and millisecond-level transaction processing. In terms of availability and performance, it has reached a four-nines SLA guarantee, ensuring no failures throughout the year even in unattended conditions.
The Evolution of Distributed Transactions
The birth of new things is always accompanied by doubts. Is middleware capable of ensuring data consistency reliable? The initial birth of TXC was just a vague theory, lacking theoretical models and engineering practice. After we conducted MVP (Minimum Viable Product) model testing and promoted business deployment, we often encountered faults and frequently had to wake up in the middle of the night to deal with issues, wearing wristbands to sleep to cope with emergency responses. These were the most painful years I went through technically after taking over the team. Subsequently, we had extensive discussions and systematic reviews. We first needed to define the consistency problem. Were we to achieve majority consensus consistency like RAFT, solve database consistency issues like Google Spanner, or something else? Looking at the top-down layered structure from the application node, it mainly includes development frameworks, service invocation frameworks, data middleware, database drivers, and databases. We had to decide at which layer to solve the data consistency problem. We compared the consistency requirements, universality, implementation complexity, and business integration costs faced when solving data consistency issues at different levels. In the end, we weighed the pros and cons, decided to keep the implementation complexity to ourselves, and adopted the AT mode initially as a consistency component. We needed to ensure high consistency, but not be locked into specific database implementations, ensuring the generality of scenarios and the business integration costs were low enough to be easily implemented. This is also why TXC initially adopted the AT mode. A distributed transaction is not just a framework; it's a system. We defined the consistency problem in theory, abstractly conceptualized modes, roles, actions, and isolation, etc. From an engineering practice perspective, we defined the programming model, including low-intrusion annotations, simple method templates, and flexible APIs, and defined basic and enhanced transaction capabilities (e.g., how to support a large number of activities at low cost), as well as capabilities in operations, security, performance, observability, and high availability. What problems do distributed transactions solve? A classic and tangible example is the money transfer scenario. The transfer process includes subtracting balance and adding balance, how do we ensure the atomicity of the operation? Without any intervention, these two steps may encounter various problems, such as account B being canceled or service call timeouts, etc. Timeout issues have always been a difficult problem to solve in distributed applications; we cannot accurately know whether service B has executed and in what order. From a data perspective, this means the money in account B may not be successfully added. After the service-oriented transformation, each node only has partial information, while the transaction itself requires global coordination of all nodes, thus requiring a centralized role with a god's-eye view, capable of obtaining all information, which is the TC (transaction coordinator), used to globally coordinate the transaction state. The TM (Transaction Manager) is the role that drives the generation of transaction proposals. However, even gods nod off, and their judgments are not always correct, so we need an RM (resource manager) role to verify the authenticity of the transaction as a representative of the soul. This is TXC's most basic philosophical model. We have methodologically verified that its data consistency is very complete, of course, our cognition is bounded. Perhaps the future will prove we were turkey engineers, but under current circumstances, its model is already sufficient to solve most existing problems. After years of architectural evolution, from the perspective of transaction single-link latency, TXC takes an average of about 0.2 milliseconds to process at the start of the transaction and about 0.4 milliseconds for branch registration, with the entire transaction's additional latency within the millisecond range. This is also the theoretical limit value we have calculated. In terms of throughput, the TPS of a single node reaches 30,000 times/second, and the TPS of a standard cluster is close to 100,000 times/second.
Seata Open Source
Why go open source? This is a question many people have asked me. In 2017, we commercialized the GTS (Global Transaction Service) product sold on Alibaba Cloud, with both public and private cloud forms. At this time, the internal group developed smoothly, but we encountered various problems in the process of commercialization. The problems can be summed up in two main categories: First, developers are quite lacking in the theory of distributed transactions, most people do not even understand what local transactions are, let alone distributed transactions. Second, there are problems with product maturity, often encountering various strange scenario issues, leading to a sharp rise in support and delivery costs, and R&D turning into after-sales customer service. We reflected on why we encountered so many problems. The main issue here is that Alibaba Group internally has a unified language stack and unified technology stack, and our polishing of specific scenarios is very mature. Serving Alibaba, one company, and serving thousands of enterprises on the cloud is fundamentally different, which also made us realize that our product's scenario ecology was not well developed. On GitHub, more than 80% of open-source software is basic software, and basic software primarily solves the problem of scenario universality, so it cannot be locked in by a single enterprise, like Linux, which has a large number of community distributions. Therefore, in order to make our product better, we chose to open source and co-build with developers to popularize more enterprise users. Alibaba's open-source journey has gone through three main stages. The first stage is the stage where Dubbo is located, where developers contribute out of love, Dubbo has been open sourced for over 10 years, and time has fully proven that Dubbo is an excellent open-source software, and its microkernel plugin extensibility design is an important reference for me when I initially open sourced Seata. When designing software, we need to consider which is more important between extensibility and performance, whether we are doing a three-year design, a five-year design, or a ten-year design that meets business development. While solving the 0-1 service call problem, can we predict the governance problems after the 1-100 scale-up? The second stage is the closed loop of open source and commercialization, where commercialization feeds back into the open-source community, promoting the development of the open-source community. I think cloud manufacturers are more likely to do open source well for the following reasons:
- First, the cloud is a scaled economy, which must be established on a stable and mature kernel foundation, packaging its product capabilities including high availability, maintenance-free, and elasticity on top of it. An unstable kernel will inevitably lead to excessive delivery and support costs, and high penetration of the R&D team's support Q&A will prevent large-scale replication, and high penetration rates will prevent rapid evolution and iteration of products.
- Second, commercial products know business needs better. Our internal technical teams often YY requirements from a development perspective, and what they make is not used by anyone, and thus does not form a value conversion. The business requirements collected through commercialization are all real, so its open source kernel must also evolve in this direction. Failure to evolve in this direction will inevitably lead to architectural splits on both sides, increasing the team's maintenance costs.
- Finally, the closed loop of open source and commercialization can promote better development of both parties. If the open-source kernel often has various problems, would you believe that its commercial product is good enough?
The third stage is systematization and standardization. First, systematization is the basis of open-source solutions. Alibaba's open-source projects are mostly born out of internal e-commerce scenario practices. For example, Higress is used to connect Ant Group's gateways; Nacos carries services with millions of instances and tens of millions of connections; Sentinel provides degradation and throttling capabilities for high availability during major promotions; and Seata ensures transaction data consistency. This set of systematized open-source solutions is designed based on the best practices of Alibaba's e-commerce ecosystem. Second, standardization is another important feature. Taking OpenSergo as an example, it is both a standard and an implementation. In the past few years, the number of domestic open-source projects has exploded. However, the capabilities of various open-source products vary greatly, and many compatibility issues arise when integrating with each other. Therefore, open-source projects like OpenSergo can define some standardized capabilities and interfaces and provide some implementations, which will greatly help the development of the entire open-source ecosystem.
Latest Developments in the Seata Community
Introduction to the Seata Community
At present, Seata has open-sourced 4 transaction modes, including AT, TCC, Saga, and XA, and is actively exploring other viable transaction solutions. Seata has integrated with more than 10 mainstream RPC frameworks and relational databases, and has integrated or been integrated relationships with more than 20 communities. In addition, we are also exploring languages other than Java in the multi-language system, such as Golang, PHP, Python, and JS. Seata has been applied to business systems by thousands of customers. Seata applications have become more mature, with successful cooperation with the community in the financial business scenarios of CITIC Bank and Everbright Bank, and successfully adopted into core accounting systems. The landing of microservices systems in financial scenarios is very stringent, which also marks a new level of maturity for Seata's kernel.
Seata Ecosystem Expansion
Seata adopts a microkernel and plugin architecture design, exposing rich extension points in APIs, registry configuration centers, storage modes, lock control, SQL parsers, load balancing, transport, protocol encoding and decoding, observability, and more. This allows businesses to easily perform flexible extensions and select technical components.
Seata Application Cases
Case 1: China Aviation Information's Air Travel Project The China Aviation Information Air Travel project introduced Seata in the 0.2 version to solve the data consistency problem of ticket and coupon business, greatly improving development efficiency, reducing asset losses caused by data inconsistency, and enhancing user interaction experience. Case 2: Didi Chuxing's Two-Wheeler Business Unit Didi Chuxing's Two-Wheeler Business Unit introduced Seata in version 0.6.1, solving the data consistency problem of business processes such as blue bicycles, electric vehicles, and assets, optimizing the user experience, and reducing asset loss. Case 3: Meituan's Infrastructure Meituan's infrastructure team developed the internal distributed transaction solution Swan based on the open-source Seata project, which is used to solve distributed transaction problems within Meituan's various businesses. Case 4: Hema Town Hema Town uses Seata to control the flower-stealing process in game interactions, significantly shortening the development cycle from 20 days to 5 days, effectively reducing development costs.
Evolution of Seata Transaction Modes
Current Progress of Seata
- Support for Oracle and PostgreSQL multi-primary keys.
- Support for Dubbo3.
- Support for Spring Boot3.
- Support for JDK 17.
- Support for ARM64 images.
- Support for multiple registration models.
- Extended support for various SQL syntaxes.
- Support for GraalVM Native Image.
- Support for Redis lua storage mode.