Quick Start
This guide will help you quickly get started with Seata by walking through a practical microservices example. You'll learn how to integrate Seata into your distributed system and enable distributed transaction management.
Estimated Time: 15-20 minutes
Prerequisites
Before you begin, ensure you have the following installed and configured:
- Java Development Kit (JDK): Version 8 or higher
- Maven: Version 3.x or higher
- MySQL: Version 5.7 or higher with InnoDB engine
- Git: For cloning the example repository
Scenario Overview
We'll use a typical e-commerce scenario: user purchasing commodities. This business logic involves three independent microservices:
- Account Service: Manages user account balances and debits money during purchases
- Order Service: Creates and manages purchase orders
- Stock Service: Tracks and deducts product inventory
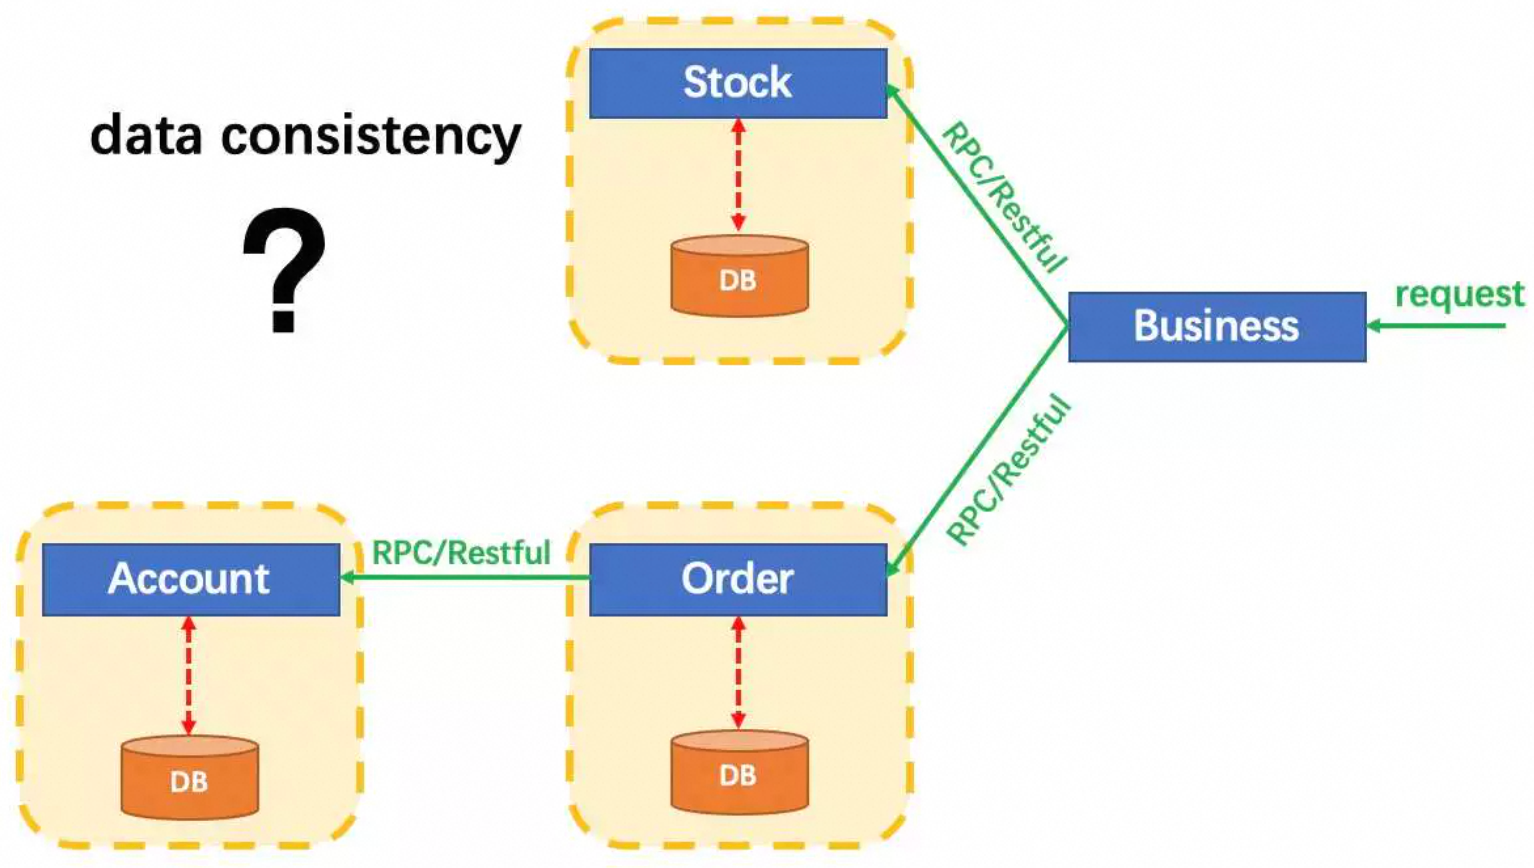
The Distributed Transaction Challenge
In a microservices architecture, each service has its own database. When a user makes a purchase:
- The Stock Service deducts inventory
- The Order Service creates an order record
- The Account Service deducts the account balance
These operations must either all succeed or all fail together. If the account deduction fails (e.g., insufficient balance), the inventory and order should be rolled back. This is the classic distributed transaction problem that Seata solves.
Architecture Diagram
Service Interfaces
StockService - Inventory Management
public interface StockService {
    /**
     * Deduct stock count for a given commodity
     * @param commodityCode The commodity identifier
     * @param count The quantity to deduct
     */
    void deduct(String commodityCode, int count);
}
OrderService - Order Management
public interface OrderService {
    /**
     * Create a new order
     * @param userId The user identifier
     * @param commodityCode The commodity identifier
     * @param orderCount The order quantity
     * @return The created order
     */
    Order create(String userId, String commodityCode, int orderCount);
}
AccountService - Account Management
public interface AccountService {
    /**
     * Debit money from user's account
     * @param userId The user identifier
     * @param money The amount to debit
     */
    void debit(String userId, int money);
}
Business Logic Implementation
Main Business Service - Orchestrates the purchase flow
public class BusinessServiceImpl implements BusinessService {

    private StockService stockService;
    private OrderService orderService;

    /**
     * Execute purchase transaction
     * This method coordinates calls to multiple microservices
     */
    public void purchase(String userId, String commodityCode, int orderCount) {
        // Step 1: Deduct inventory
        stockService.deduct(commodityCode, orderCount);

        // Step 2: Create order (which also debits account)
        orderService.create(userId, commodityCode, orderCount);
    }
}
Order Service Implementation - Creates order and debits account
public class OrderServiceImpl implements OrderService {

    private OrderDAO orderDAO;
    private AccountService accountService;

    public Order create(String userId, String commodityCode, int orderCount) {
        // Calculate order amount
        int orderMoney = calculate(commodityCode, orderCount);

        // Step 1: Debit user account
        accountService.debit(userId, orderMoney);

        // Step 2: Create order record
        Order order = new Order();
        order.userId = userId;
        order.commodityCode = commodityCode;
        order.count = orderCount;
        order.money = orderMoney;

        // Persist order to database
        return orderDAO.insert(order);
    }
}
Seata's Solution
Seata provides a simple and elegant solution to manage distributed transactions across these microservices.
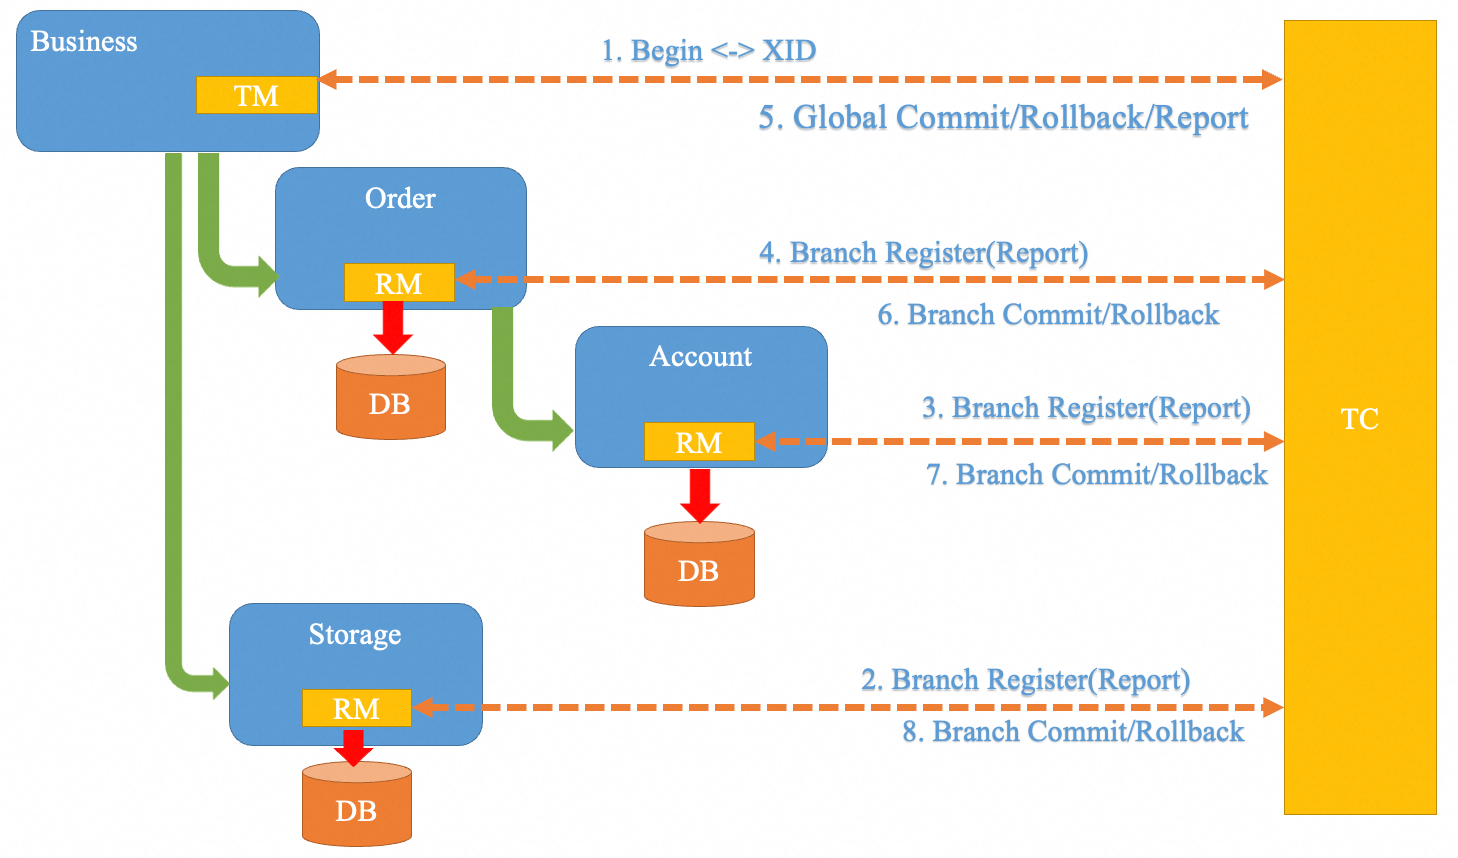
How It Works
With Seata, you only need to add a single annotation @GlobalTransactional to your business method:
@GlobalTransactional
public void purchase(String userId, String commodityCode, int orderCount) {
    // All operations within this method are now part of a global transaction
    stockService.deduct(commodityCode, orderCount);
    orderService.create(userId, commodityCode, orderCount);
    // If any operation fails, all changes will be rolled back automatically
}
That's it! Seata handles:
- Coordination: Managing the two-phase commit protocol
- Rollback: Automatically reverting all changes if any service fails
- Consistency: Ensuring data consistency across all microservices
Hands-On Example: Dubbo + Seata
Now let's set up a working example using Dubbo as the RPC framework and Seata for distributed transaction management.
Step 1: Set Up Database
Requirements:
- MySQL 5.7+ with InnoDB engine
- Create a database named
seata_example
Configuration:
For simplicity, we'll use a single database with three separate tables. In production, you would typically use separate databases for each service.
Create a database:
CREATE DATABASE IF NOT EXISTS seata_example DEFAULT CHARSET utf8mb4;
USE seata_example;
Step 2: Create UNDO_LOG Table
Seata's AT mode requires an UNDO_LOG table to store rollback information for each service.
Why is this needed? Seata uses this table to record data snapshots before and after changes, enabling automatic rollback if the transaction fails.
Execute the following SQL:
CREATE TABLE IF NOT EXISTS `undo_log`
(
    `branch_id`     BIGINT       NOT NULL COMMENT 'branch transaction id',
    `xid`           VARCHAR(128) NOT NULL COMMENT 'global transaction id',
    `context`       VARCHAR(128) NOT NULL COMMENT 'undo_log context,such as serialization',
    `rollback_info` LONGBLOB     NOT NULL COMMENT 'rollback info',
    `log_status`    INT(11)      NOT NULL COMMENT '0:normal status,1:defense status',
    `log_created`   DATETIME(6)  NOT NULL COMMENT 'create datetime',
    `log_modified`  DATETIME(6)  NOT NULL COMMENT 'modify datetime',
    UNIQUE KEY `ux_undo_log` (`xid`, `branch_id`)
) ENGINE = InnoDB
  AUTO_INCREMENT = 1
  DEFAULT CHARSET = utf8mb4
  COMMENT = 'AT transaction mode undo table';

-- Add index for performance optimization
ALTER TABLE `undo_log` ADD INDEX `ix_log_created` (`log_created`);
You can find the latest SQL scripts for different databases in the Seata GitHub repository.
Step 3: Create Business Tables
Create tables for our three services:
-- Stock Service Table
DROP TABLE IF EXISTS `stock_tbl`;
CREATE TABLE `stock_tbl` (
  `id` int(11) NOT NULL AUTO_INCREMENT,
  `commodity_code` varchar(255) DEFAULT NULL,
  `count` int(11) DEFAULT 0,
  PRIMARY KEY (`id`),
  UNIQUE KEY (`commodity_code`)
) ENGINE=InnoDB DEFAULT CHARSET=utf8;

-- Order Service Table
DROP TABLE IF EXISTS `order_tbl`;
CREATE TABLE `order_tbl` (
  `id` int(11) NOT NULL AUTO_INCREMENT,
  `user_id` varchar(255) DEFAULT NULL,
  `commodity_code` varchar(255) DEFAULT NULL,
  `count` int(11) DEFAULT 0,
  `money` int(11) DEFAULT 0,
  PRIMARY KEY (`id`)
) ENGINE=InnoDB DEFAULT CHARSET=utf8;

-- Account Service Table
DROP TABLE IF EXISTS `account_tbl`;
CREATE TABLE `account_tbl` (
  `id` int(11) NOT NULL AUTO_INCREMENT,
  `user_id` varchar(255) DEFAULT NULL,
  `money` int(11) DEFAULT 0,
  PRIMARY KEY (`id`)
) ENGINE=InnoDB DEFAULT CHARSET=utf8;
Insert test data:
-- Add a test commodity with initial stock
INSERT INTO stock_tbl (commodity_code, count) VALUES ('PRODUCT_001', 100);

-- Add a test user with initial balance
INSERT INTO account_tbl (user_id, money) VALUES ('USER_001', 1000);
Step 4: Download and Start Seata Server
Download Seata Server:
- Visit the Seata Releases page
- Download the latest version (e.g.,
seata-server-2.x.x.zip) - Extract the archive
Start the Server:
For Linux/Mac:
cd seata-server-2.x.x
sh ./bin/seata-server.sh -p 8091 -h 127.0.0.1 -m file
For Windows:
cd seata-server-2.x.x
bin\seata-server.bat -p 8091 -h 127.0.0.1 -m file
Available Options:
| Option | Description | Default |
|---|---|---|
-h, --host | The IP address exposed to registry center | 0.0.0.0 |
-p, --port | The port to listen on | 8091 |
-m, --storeMode | Transaction log store mode: file or db | file |
Verify Server Started:
You should see output like:
Server started, listen port: 8091
Step 5: Run the Example Application
Clone the Example Repository:
git clone https://github.com/apache/incubator-seata-samples.git
cd incubator-seata-samples/at-sample/springboot-dubbo-seata
Configure Database Connection:
Edit the configuration files for each service to use your database:
account-service/src/main/resources/application.propertiesorder-service/src/main/resources/application.propertiesstock-service/src/main/resources/application.properties
Update the database connection properties:
spring.datasource.url=jdbc:mysql://localhost:3306/seata_example
spring.datasource.username=your_username
spring.datasource.password=your_password
Build and Start Services:
# Build all services
mvn clean install

# Start each service in separate terminal windows:

# Terminal 1 - Account Service
cd account-service
mvn spring-boot:run

# Terminal 2 - Order Service
cd order-service
mvn spring-boot:run

# Terminal 3 - Stock Service
cd stock-service
mvn spring-boot:run

# Terminal 4 - Business Service
cd business-service
mvn spring-boot:run
Step 6: Test the Distributed Transaction
Once all services are running, you can test the distributed transaction:
Success Scenario:
curl -X POST http://localhost:8084/purchase \
  -H "Content-Type: application/json" \
  -d '{
    "userId": "USER_001",
    "commodityCode": "PRODUCT_001",
    "orderCount": 1
  }'
Expected Result:
- Order created successfully
- Stock deducted
- Account balance reduced
- Check database to verify all changes
Failure Scenario (Insufficient Balance):
Modify the account balance to be insufficient:
UPDATE account_tbl SET money = 1 WHERE user_id = 'USER_001';
Try purchasing again - the entire transaction should rollback:
curl -X POST http://localhost:8084/purchase \
  -H "Content-Type: application/json" \
  -d '{
    "userId": "USER_001",
    "commodityCode": "PRODUCT_001",
    "orderCount": 1
  }'
Expected Result:
- Transaction fails
- No order created
- Stock remains unchanged
- Account balance remains unchanged
Verification
Check the Seata logs to see the transaction coordination:
tail -f seata-server-2.x.x/logs/seata-server.log
You should see logs showing:
- Global transaction begin
- Branch transaction registration
- Two-phase commit or rollback
Next Steps
Congratulations! You've successfully set up and run a distributed transaction with Seata. Here's what you can explore next:
- Transaction Modes: Learn about different transaction modes (AT, TCC, SAGA, XA)
- Microservices Integration: Integrate Seata with various microservices frameworks
- Production Deployment: Deploy Seata Server in production environment
- Performance Optimization: Optimize Seata for high-performance scenarios
- Configuration Guide: Configure Seata for different scenarios
Troubleshooting
Services can't connect to Seata Server
- Verify Seata Server is running on port 8091
- Check firewall settings
- Ensure the host and port in service configuration match the Seata Server
Transaction not rolling back
- Verify
@GlobalTransactionalannotation is present - Check if
UNDO_LOGtable exists in all databases - Review application logs for errors
Database connection errors
- Verify database credentials in configuration files
- Ensure MySQL is running and accessible
- Check if the database and tables exist
For more troubleshooting tips, visit the FAQ section or check out our contribution guide.
RocketMQ Integration to Seata
Using RocketMQ as a participant in Seata global transaction is simple. First, make sure you have introduced seata-all or springboot-starter of Seata dependency.
Create the producer by SeataMQProducerFactory, then send messages by SeataMQProducer. Here is an example:
public class BusinessServiceImpl implements BusinessService {
    private static final String NAME_SERVER = "127.0.0.1:9876";
    private static final String PRODUCER_GROUP = "test-group";
    private static final String TOPIC = "test-topic";
    private static SeataMQProducer producer = SeataMQProducerFactory.createSingle(NAME_SERVER, PRODUCER_GROUP);

    public void purchase(String userId, String commodityCode, int orderCount) {
        producer.send(new Message(TOPIC, "testMessage".getBytes(StandardCharsets.UTF_8)));
        // do something
    }
}
The effect of this approach is that the production message acts as a participant RM in the Seata global transaction. When the 1st phase of the global transaction is completed, the MQ message will be committed or rolled back based on the transaction 2nd phase's request. The message will not be consumed until then.
If there is no xid in the current thread, the producer will degrade to a normal send instead of sending a half-message.